Some deliveries may take a little longer than usual due to regional shipping conditions.

DOWNLOAD THE APP


Customer Services
Copyright © 2025 Desertcart Holdings Limited
DOWNLOAD THE APP


✨ Elevate your ride’s glow game — because your car deserves the Gold Standard!
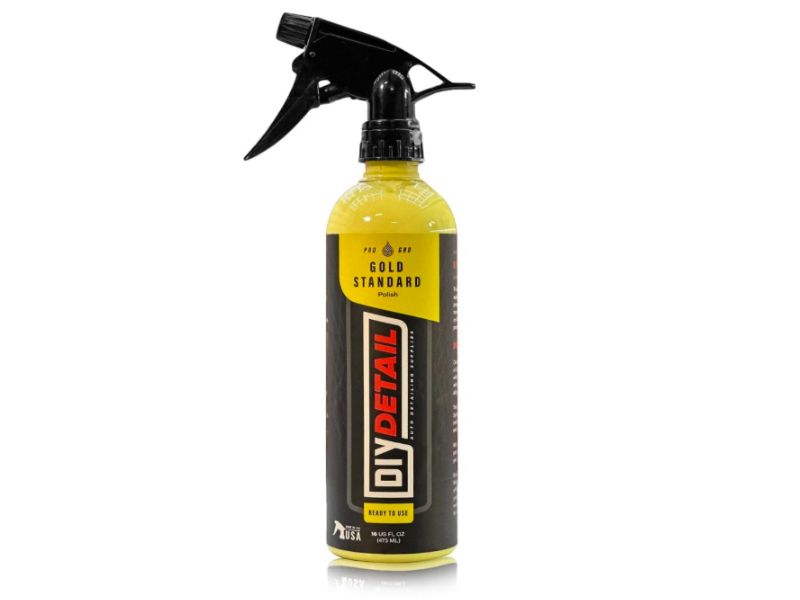
DIY Detail Gold Standard Polish Spray is a 16.6 fl oz liquid compound designed for professional-grade polishing with spray-on application. It quickly removes fine surface marks and delivers a mirror-like finish safe for all glossy and clear coat paints. The formula protects against UV damage and environmental wear, extending paint life while simplifying maintenance. Ideal for millennial car enthusiasts seeking efficient, high-impact detailing with minimal waste.


| ASIN | B0CGK66MT9 |
| Amazon Bestseller | #399,973 in Automotive ( See Top 100 in Automotive ) #813 in Automotive Grinding Polish Pastes & Liquids |
| Brand | diy detail |
| Color | yellow |
| Customer Reviews | 4.5 4.5 out of 5 stars (120) |
| Date First Available | September 13, 2024 |
| Item Dimensions L x W x H | 10 x 6 x 6 cm |
| Item Weight | 544 g |
| Item model number | DIYGSP016 |
| Manufacturer | ディーアイワイ ディテール(DIY Detail) |
| Model | Gold Standard Polish |
| Product Dimensions | 10 x 6 x 6 cm; 544 g |
M**.
In Amerika wird der DIY Gold Standard gefeiert. In den Lehrvideos wird der Lack mit 180er Waffel-Pads für 20 Sekunden poliert und die restliche noch klebrige Politur dann mit viel Aufwand und zwei Poliertüchern aufwändig abgewischt. Ich bin nur gut informierter Laie, aber das halte ich für Quatsch. Ich wollte nur Glanz. Darum habe ich mit einer 125er Excenter und einem weichen Finishing Pad (kein Waffel) für 5-Minuten etwa 30% meiner Haube im mehrfachen Kreuzgang poliert. Die gelbe Politur habe ich dabei ausgefahren bis sie weiß ausgesehen hat. Die Ergebnisse sind wirklich sehr gut und die Paste auf dem Lack ließ sich ganz leicht mit nur einem Tuch abwischen. Das "Ansaugrohr" für den Spritzmechanismus ist absichtlich zu lang, damit es seitlich auf dem Boden aufliegt und man den Behälter "leersaugen" kann. Das macht das Aufschrauben der Spritze fummelig. Ich habe 5-Minuten und mehr als 30x die Spritze betätigt, bis sie endlich angesaugt und ich den Sprühstrahl richtig eingestellt hatte. Die Empfehlung von DIY ist 1x die Politur auf das rotierende Pad zu spritzen. Damit ist das Pad zu 40% benetzt. Ich wollte aber nicht zu 60% mit dem Pad, sondern zu 80% mit der Politur polieren, darum habe ich 2x gespritzt. Die Politur ist deutlich flüssiger als andere Polierpasten. Ruck zuck fällt was von dem Zeug beim Benetzen auf den Boden. Beim Polieren spritzt die Politur aber nicht. Das Cutten mit einem Cuttingpad habe ich noch nicht gecheckt. 4x Sterne nur wegen dem erstmalig schlechten Ansaugen.
T**Y
Does what it says. Would definitely recommend 👍
A**E
UPDATE: 5 Stars . I asked DIY Detail about my bottle issues... The long feed tube, or straw, is designed to curl in the bottom to extract all the material when the bottle is low on polish. The nozzle needs opened only very slightly and the trigger needs to be pulled “like you are angry with it”! Those two thing gave me a much better spray pattern. 😊 . ORIGINAL REVIEW: 4 Stars . I was doing a full polish of my 2025 Toyota Camry in advance of a ceramic coating. I liked the idea of a spray polish that doesn't require taping off of black trim, no dust, and can be used with various pads to achieve the cut needed. I ordered the DIY Detail Gold Standard Polish. . The bottle comes with a cap for security and a separate sprayer. Screwing on the spray head, the feed tube seems way too long and needed to be bent over at the bottom of the bottle to get the sprayer to go on. It looks like it's a couple inches too long! . Once everything was assembled, I adjusted the spray nozzle and squirted polish onto my spinning Chemical Guys Hex Logic Green pad, per the instructions. It came out in a very messy and unexpected pattern. Adjusting the nozzle didn't help. I expected an even spray pattern that would mist the pad all over. All I could get was something like 3 streams, and spattering, with one stream aiming well to the side of the others. The nozzle also dripped at the end of the spraying. Looking at the pad, I had a thin spiral just around the center. I know one jet had missed the pad completely because of its aim. I was very disappointed in that part of the product. I had to try and spread the product around the pad on the paint itself but it was very clear that most of the polish remained in the middle of the pad, not around the perimeter. 1 Star lost! :-( . As far as the polish goes, I was very impressed with the working time. It remains liquid for a very long time and you can keep working it for several minutes. I never actually got to a point where it was too dry. I did the windows on one side, cleaned the pad, then polished the other side's windows and forgot to buff off the original windows' polish. It must have been 15 mins. The polish was still workable and buffed off as if I'd done it immediately! Buffing off needed two microfiber towels. I found the first wipes left a hazy film and contaminated the first towel so that it never fully cleaned the paint of polish residue. The second clean towel did the job. When the fist towel got too 'filmy', I used the second towel as the first and introduced a new towel for the final wipe. . The results were great. I had some light towel marring and light finger scratches, and a few deeper dealer-installed scratches (!). The light stuff disappeared and the deeper scratches were nicely rounded off to become almost invisible unless the light hit them just right. It was easy to apply a second polish with the same unsprayed pad if a mark was still visible after buffing. I applied one spray per panel to the pad after the initial two sprays to prime the pad, cleaning the pad every couple panels. . After polishing the whole car, the polish level was only just under the top of the label around the bottle. You don't need much on the pad at all to get the results you desire. Compared with compound and the usual 3, 4 or 5 dime-sized drops, you use very little of this DIY Detail polish, making it very economical for the price. IF you can spray it efficiently! . CONCLUSION: . I wish the bottle and sprayer was of better quality and performance to match that of the polish itself. . The polish is VERY user-friendly. It remains workable for ages, requires very little product, can be applied to trim without leaving any residue, wipes off fairly easily, and, combined with the right aggression of pad, does the paint correction job really well. You can even use two cut levels of pad without wiping off the polish, which is a great time-saver. I didn't try that though. . DIY Detail Gold Standard polish is now a staple in my detailing tray. I have no problem recommending this polish to care for your vehicle's paint.
A**R
So I am an amateur and so watched the video and thought it would work better. Also it does not spray as well as the video.
L**E
Reçu tel que vue et livraison rapide. Pas encore essayé
Trustpilot
2 weeks ago
1 month ago