Desert Online General Trading LLC
Dubai, United Arab Emirates
Desert Online General Trading LLC
Dubai, United Arab Emirates

🚀 Double your Pi 5 speed with dual NVMe SSD power!
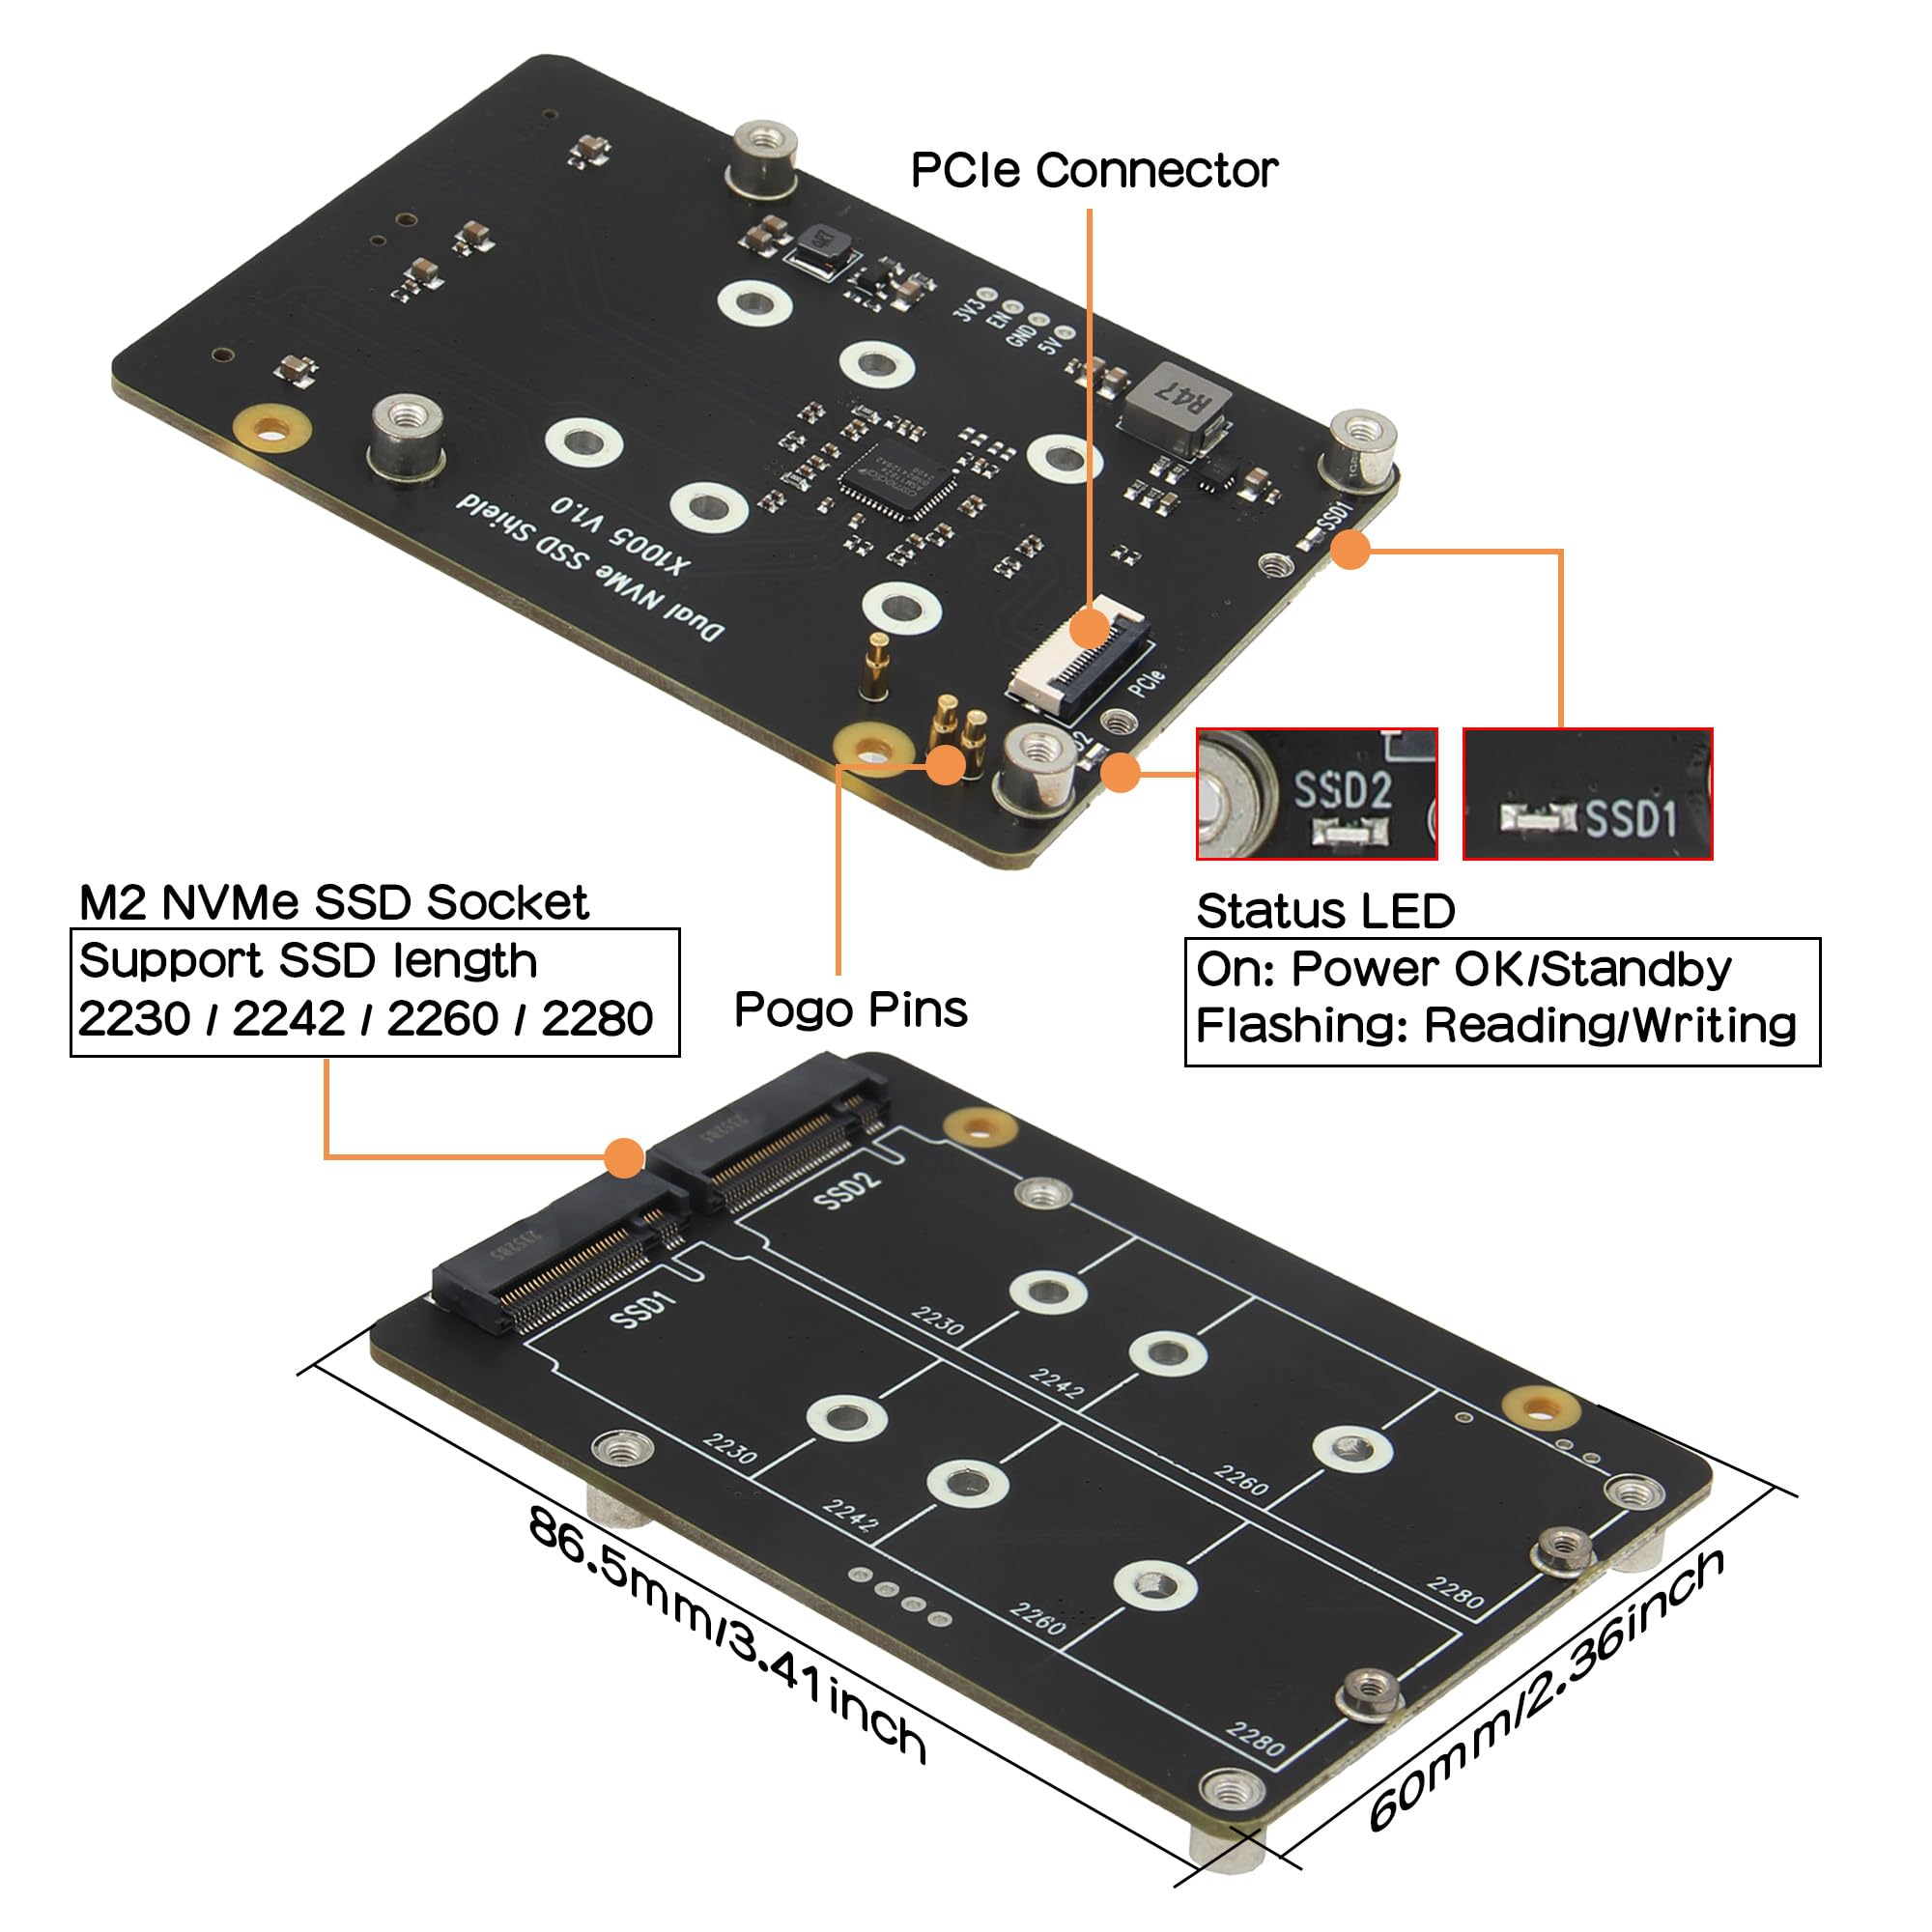
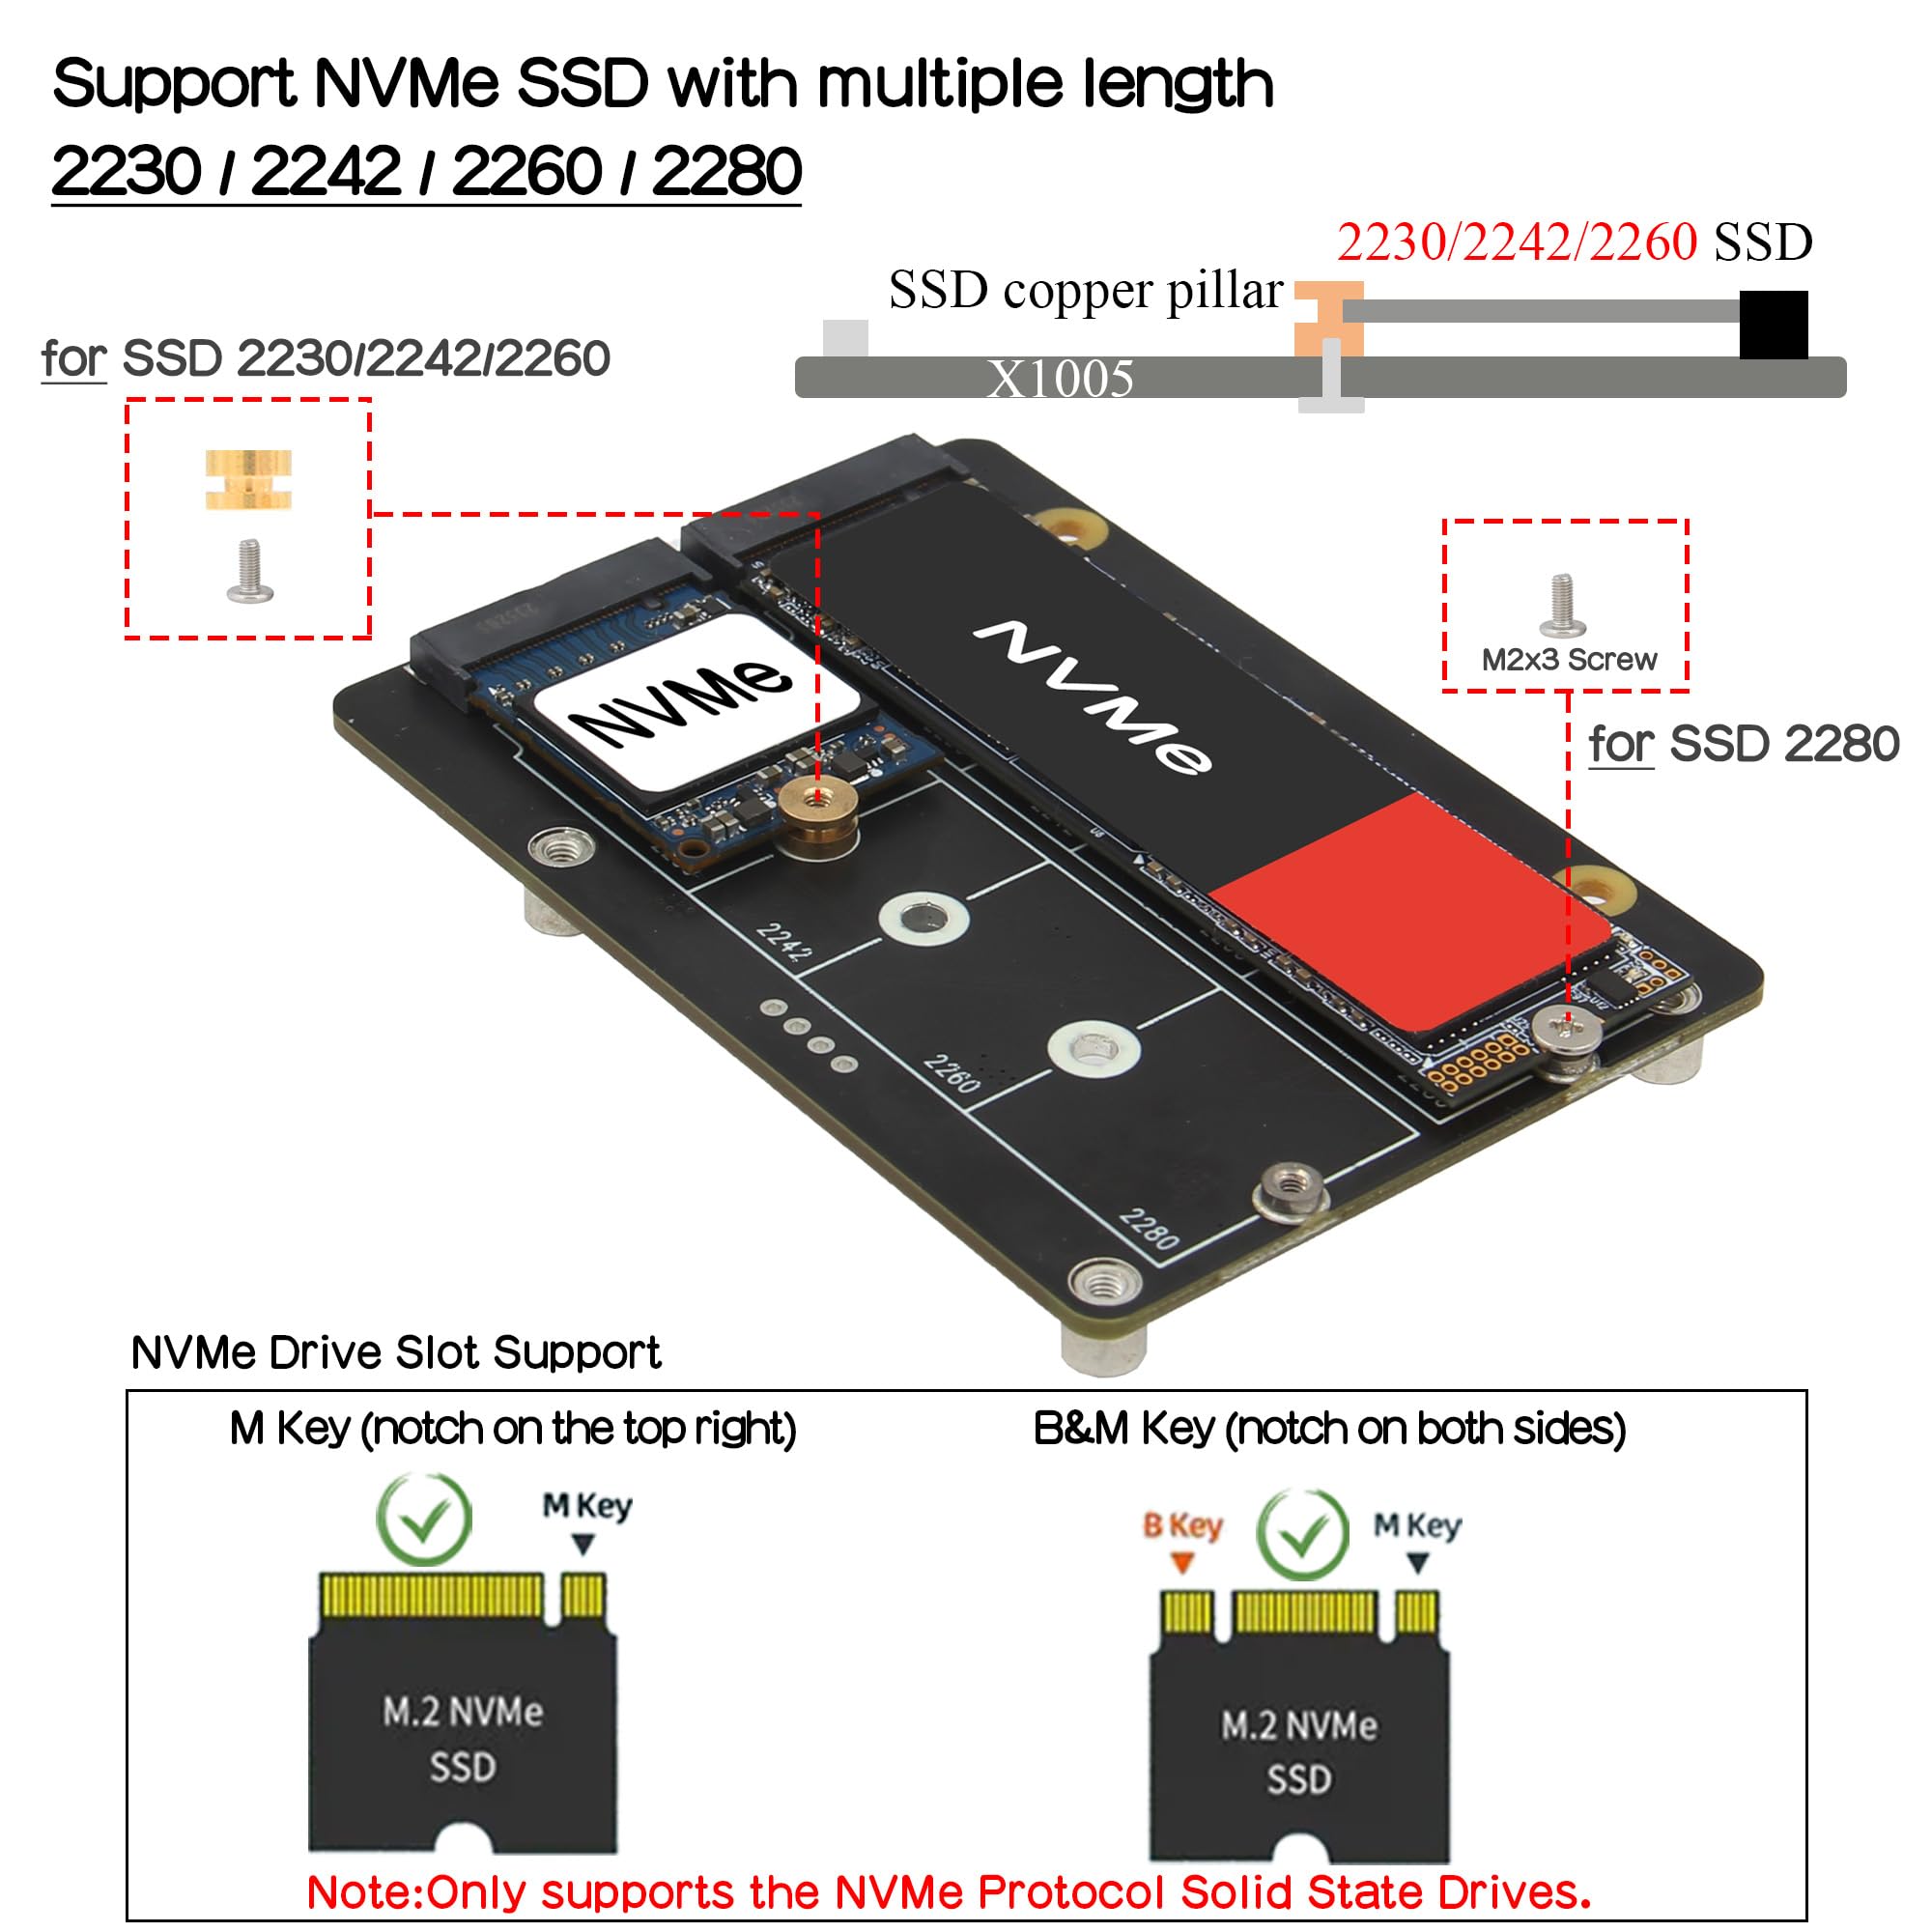
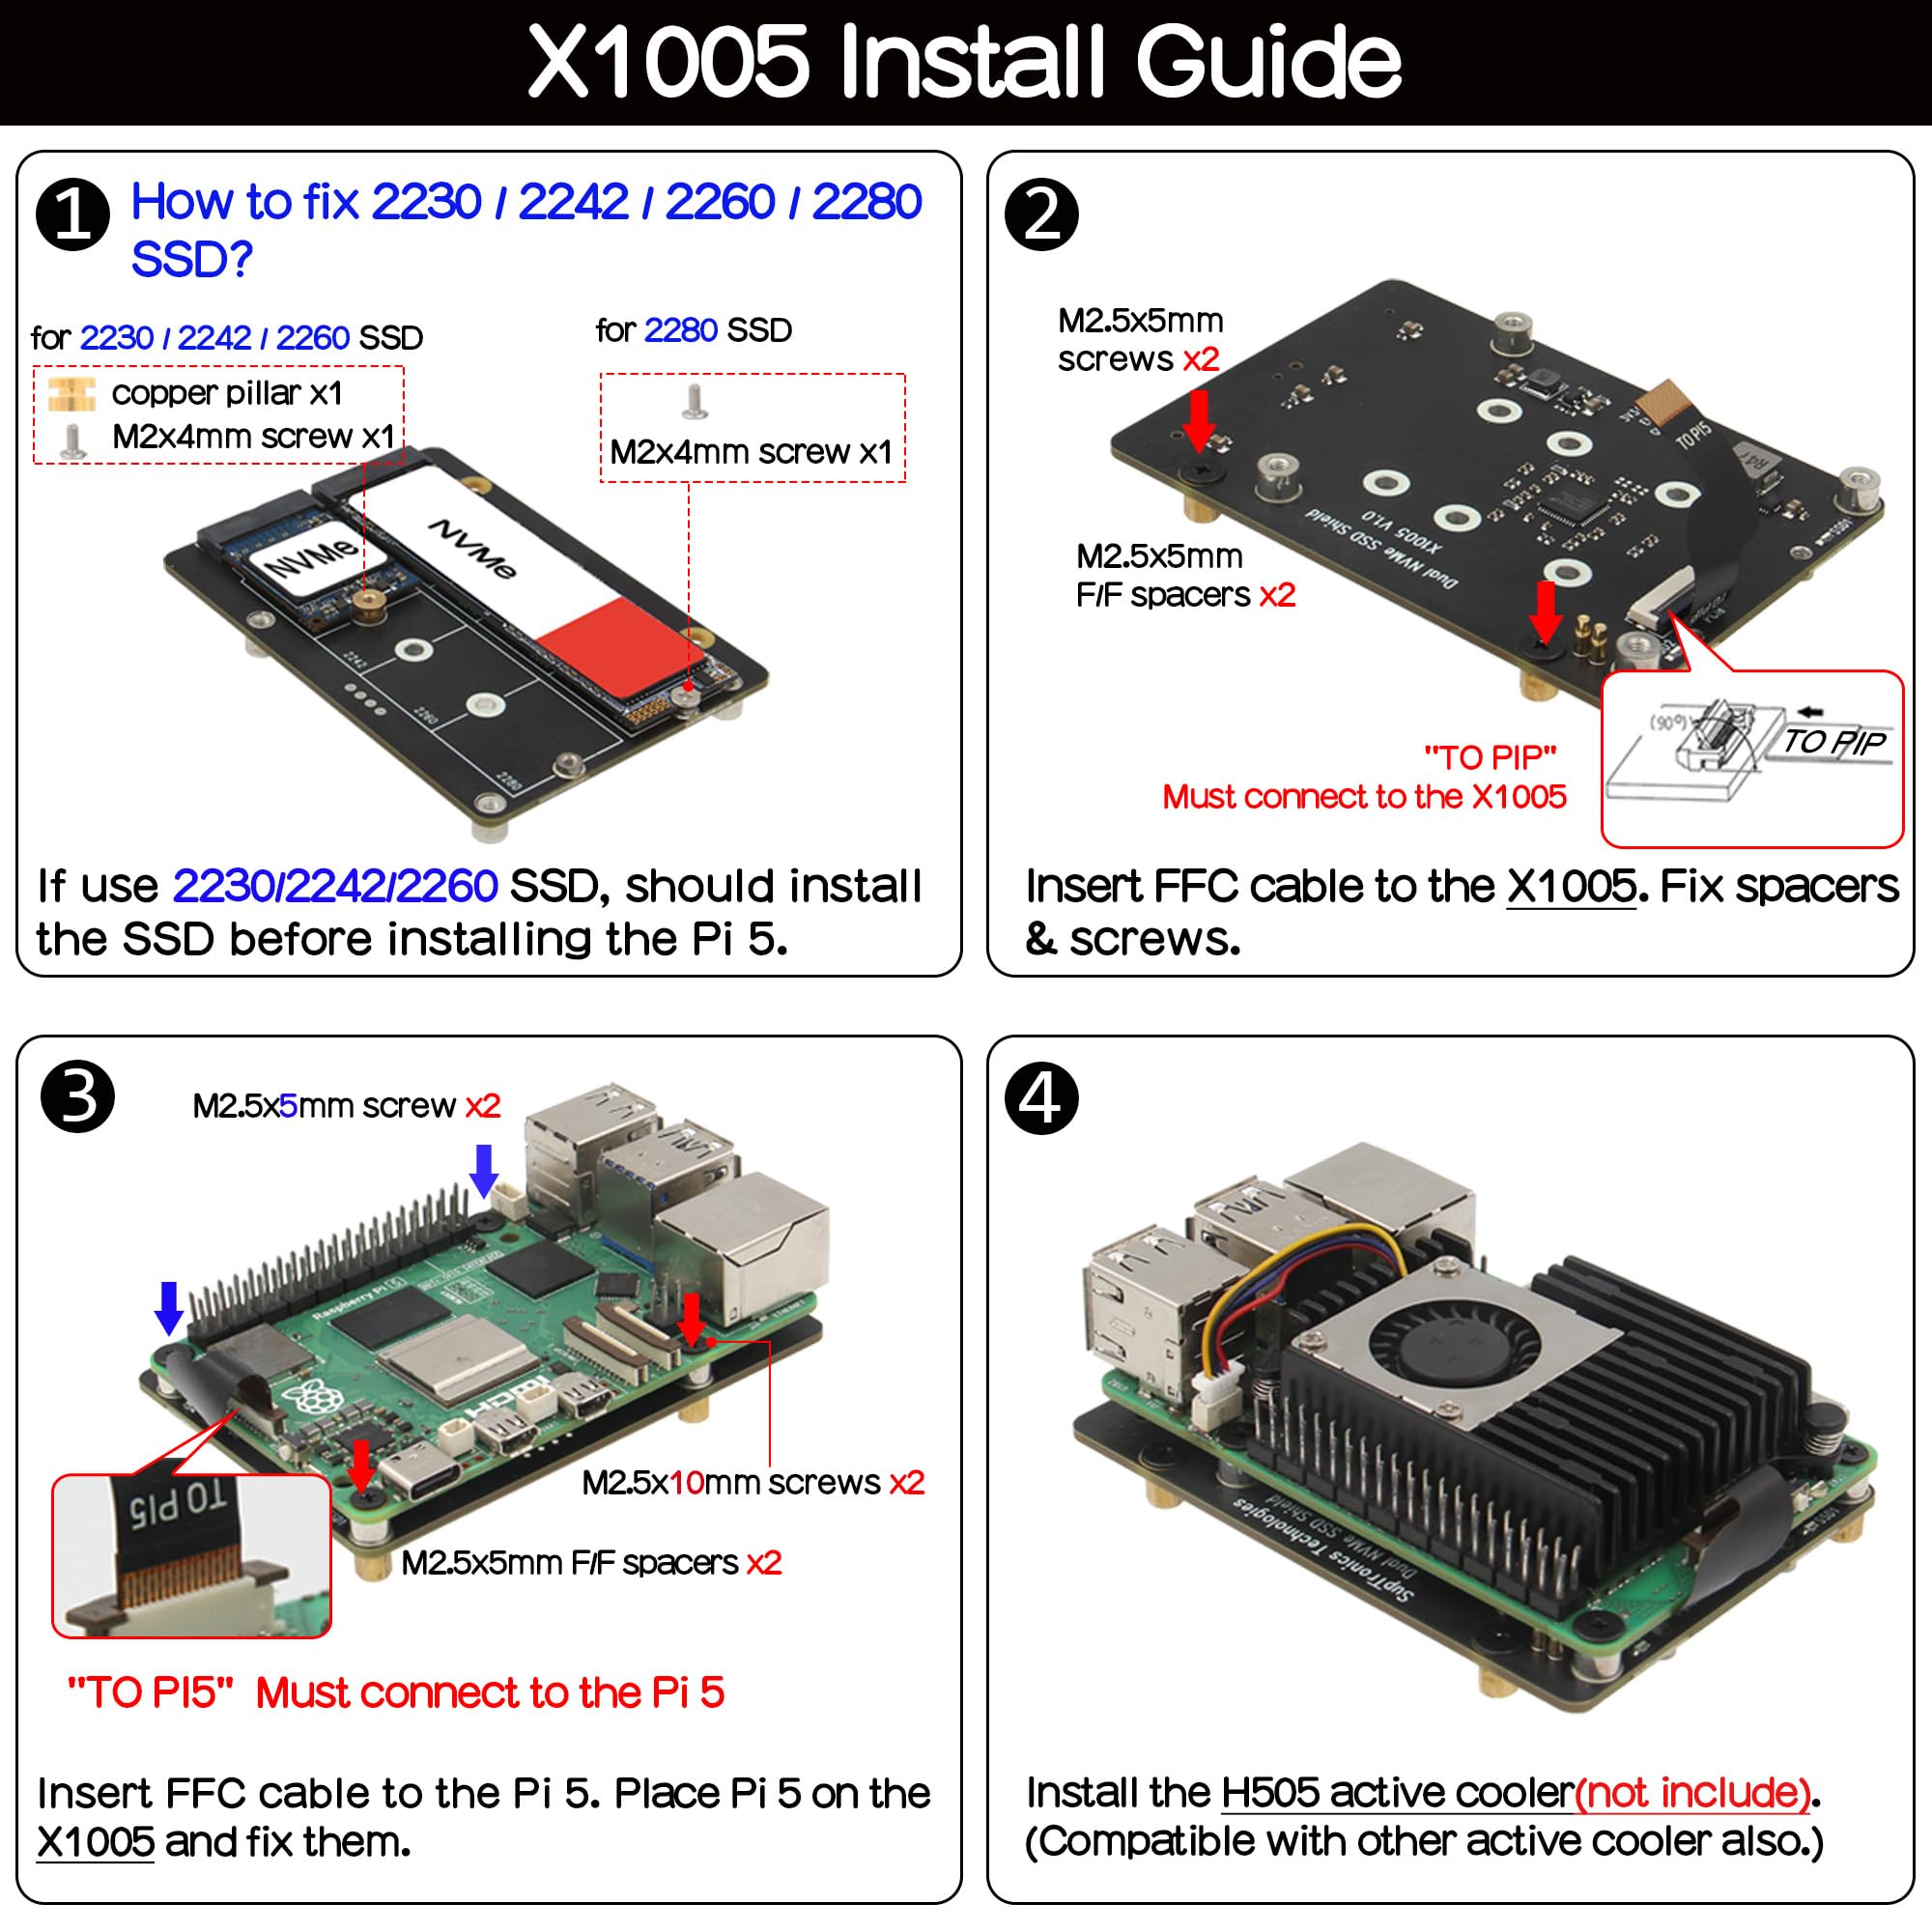
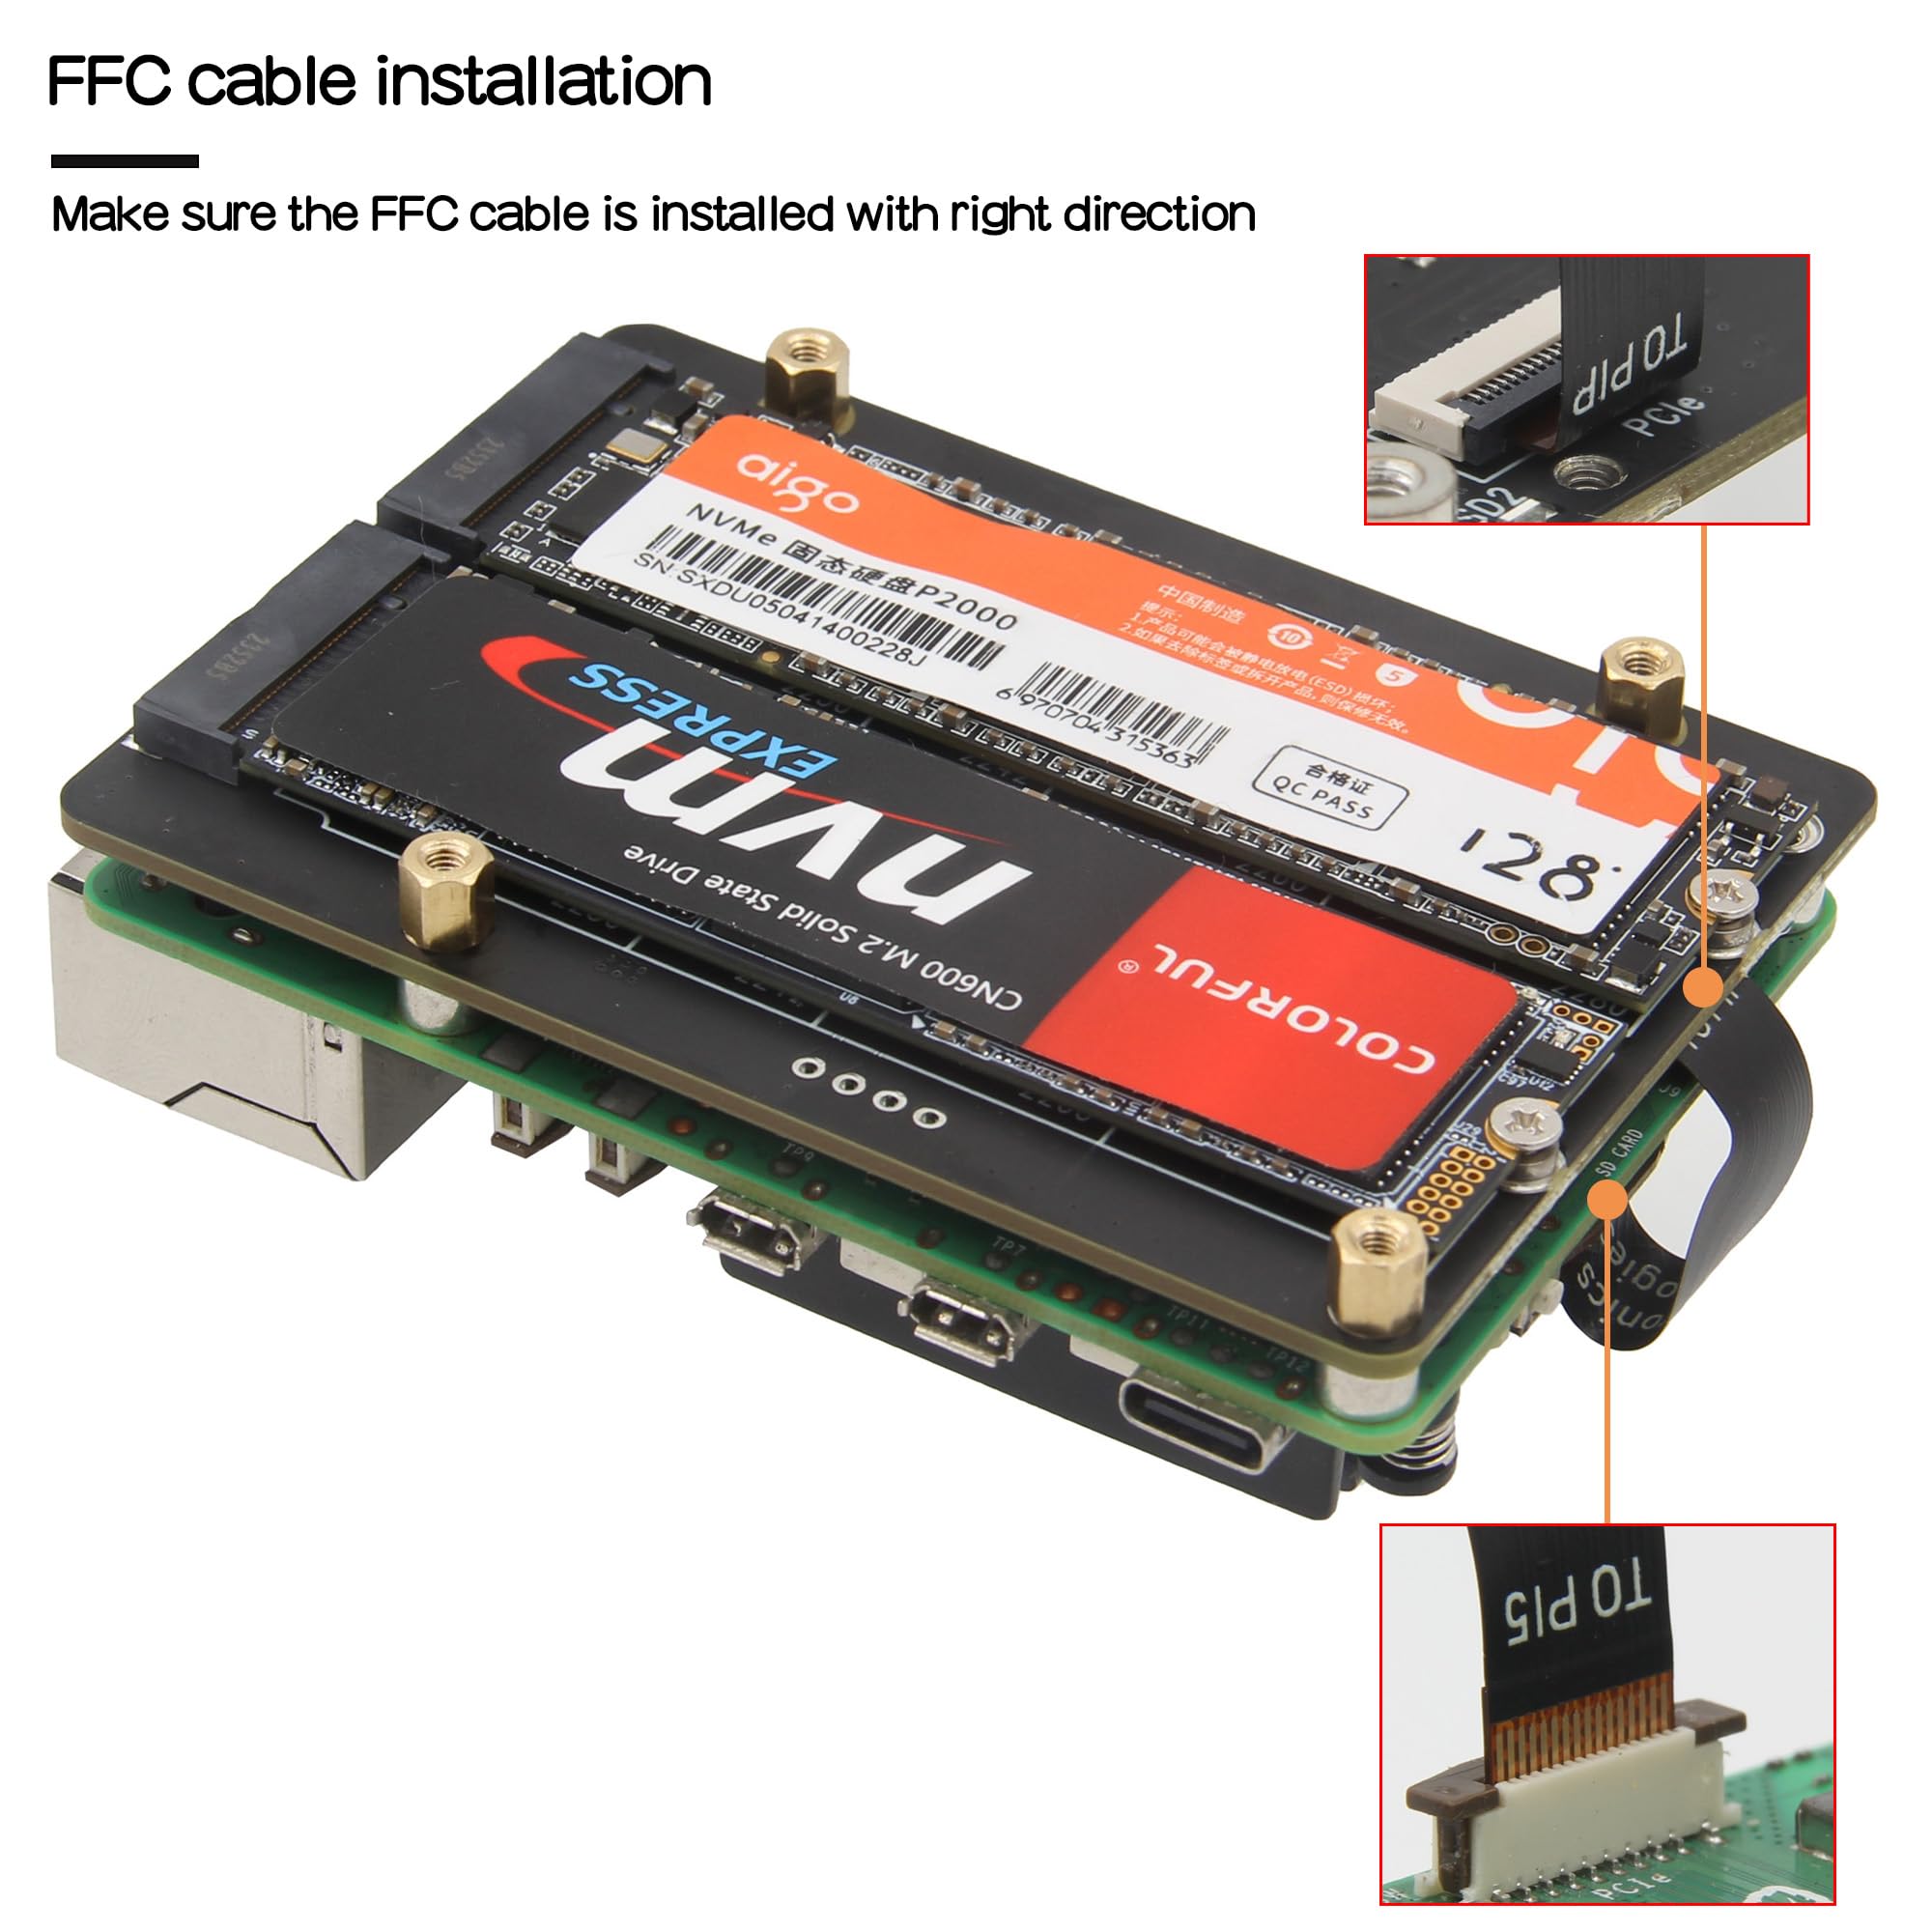
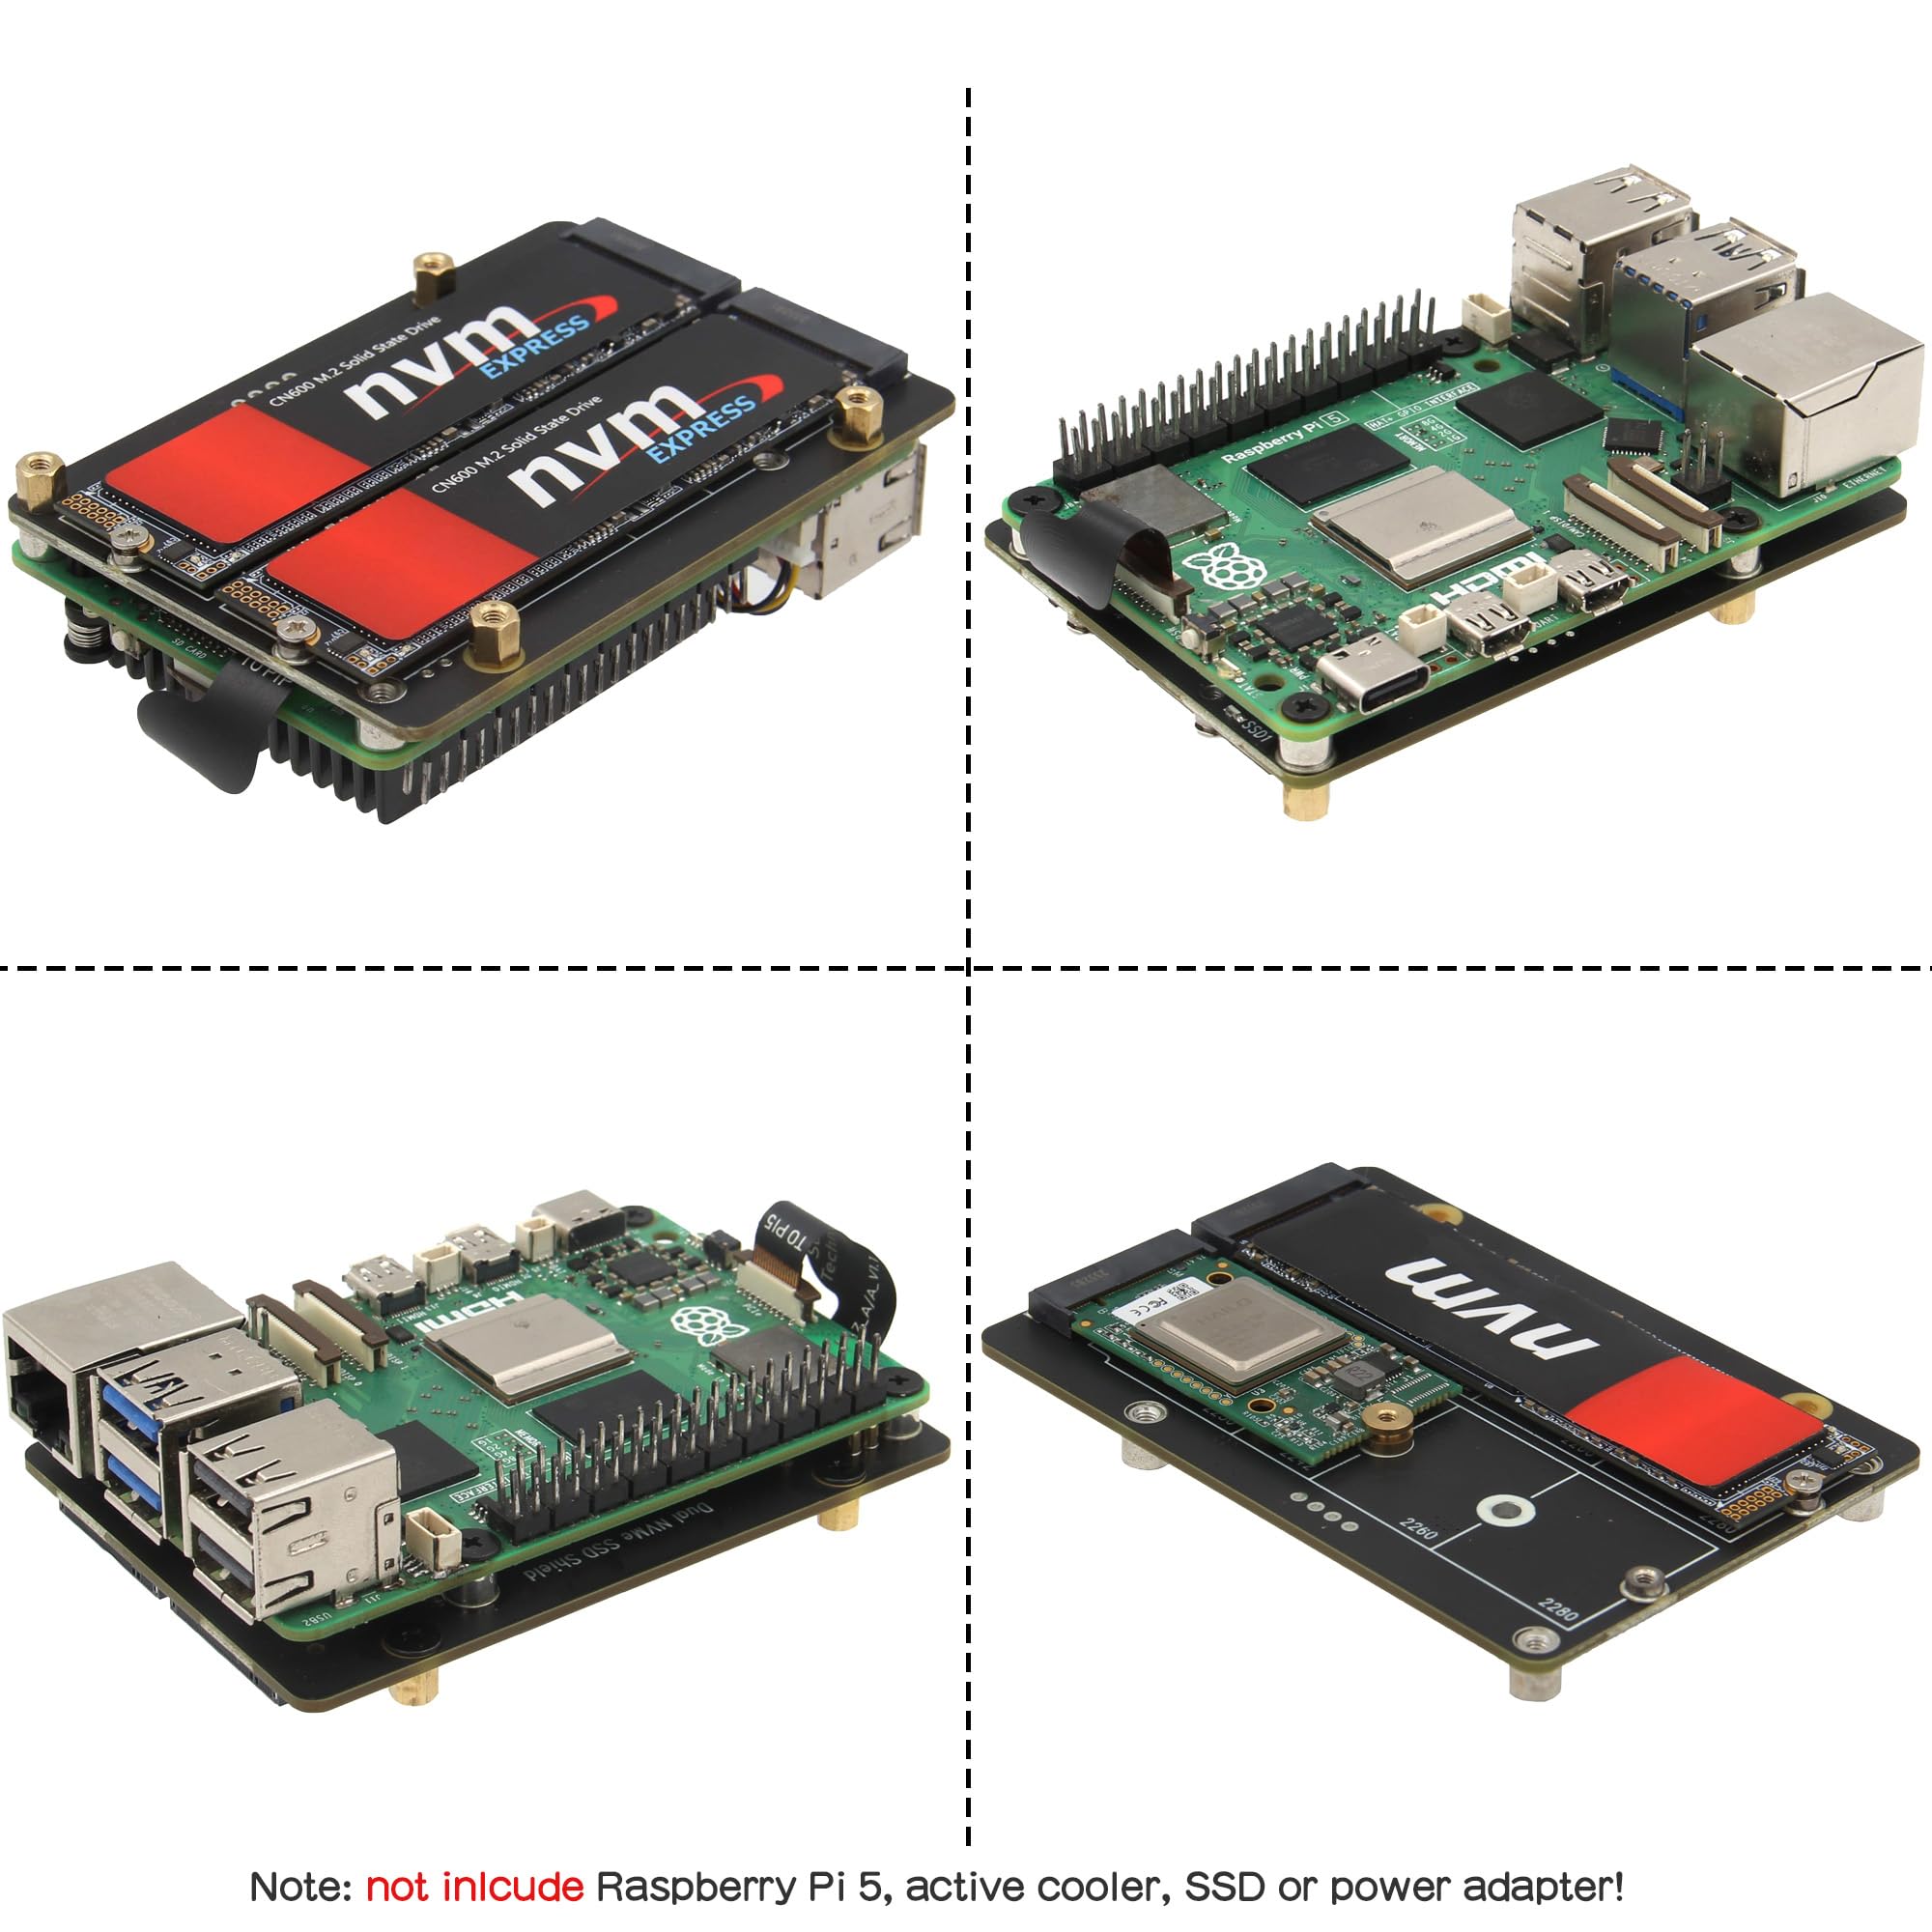
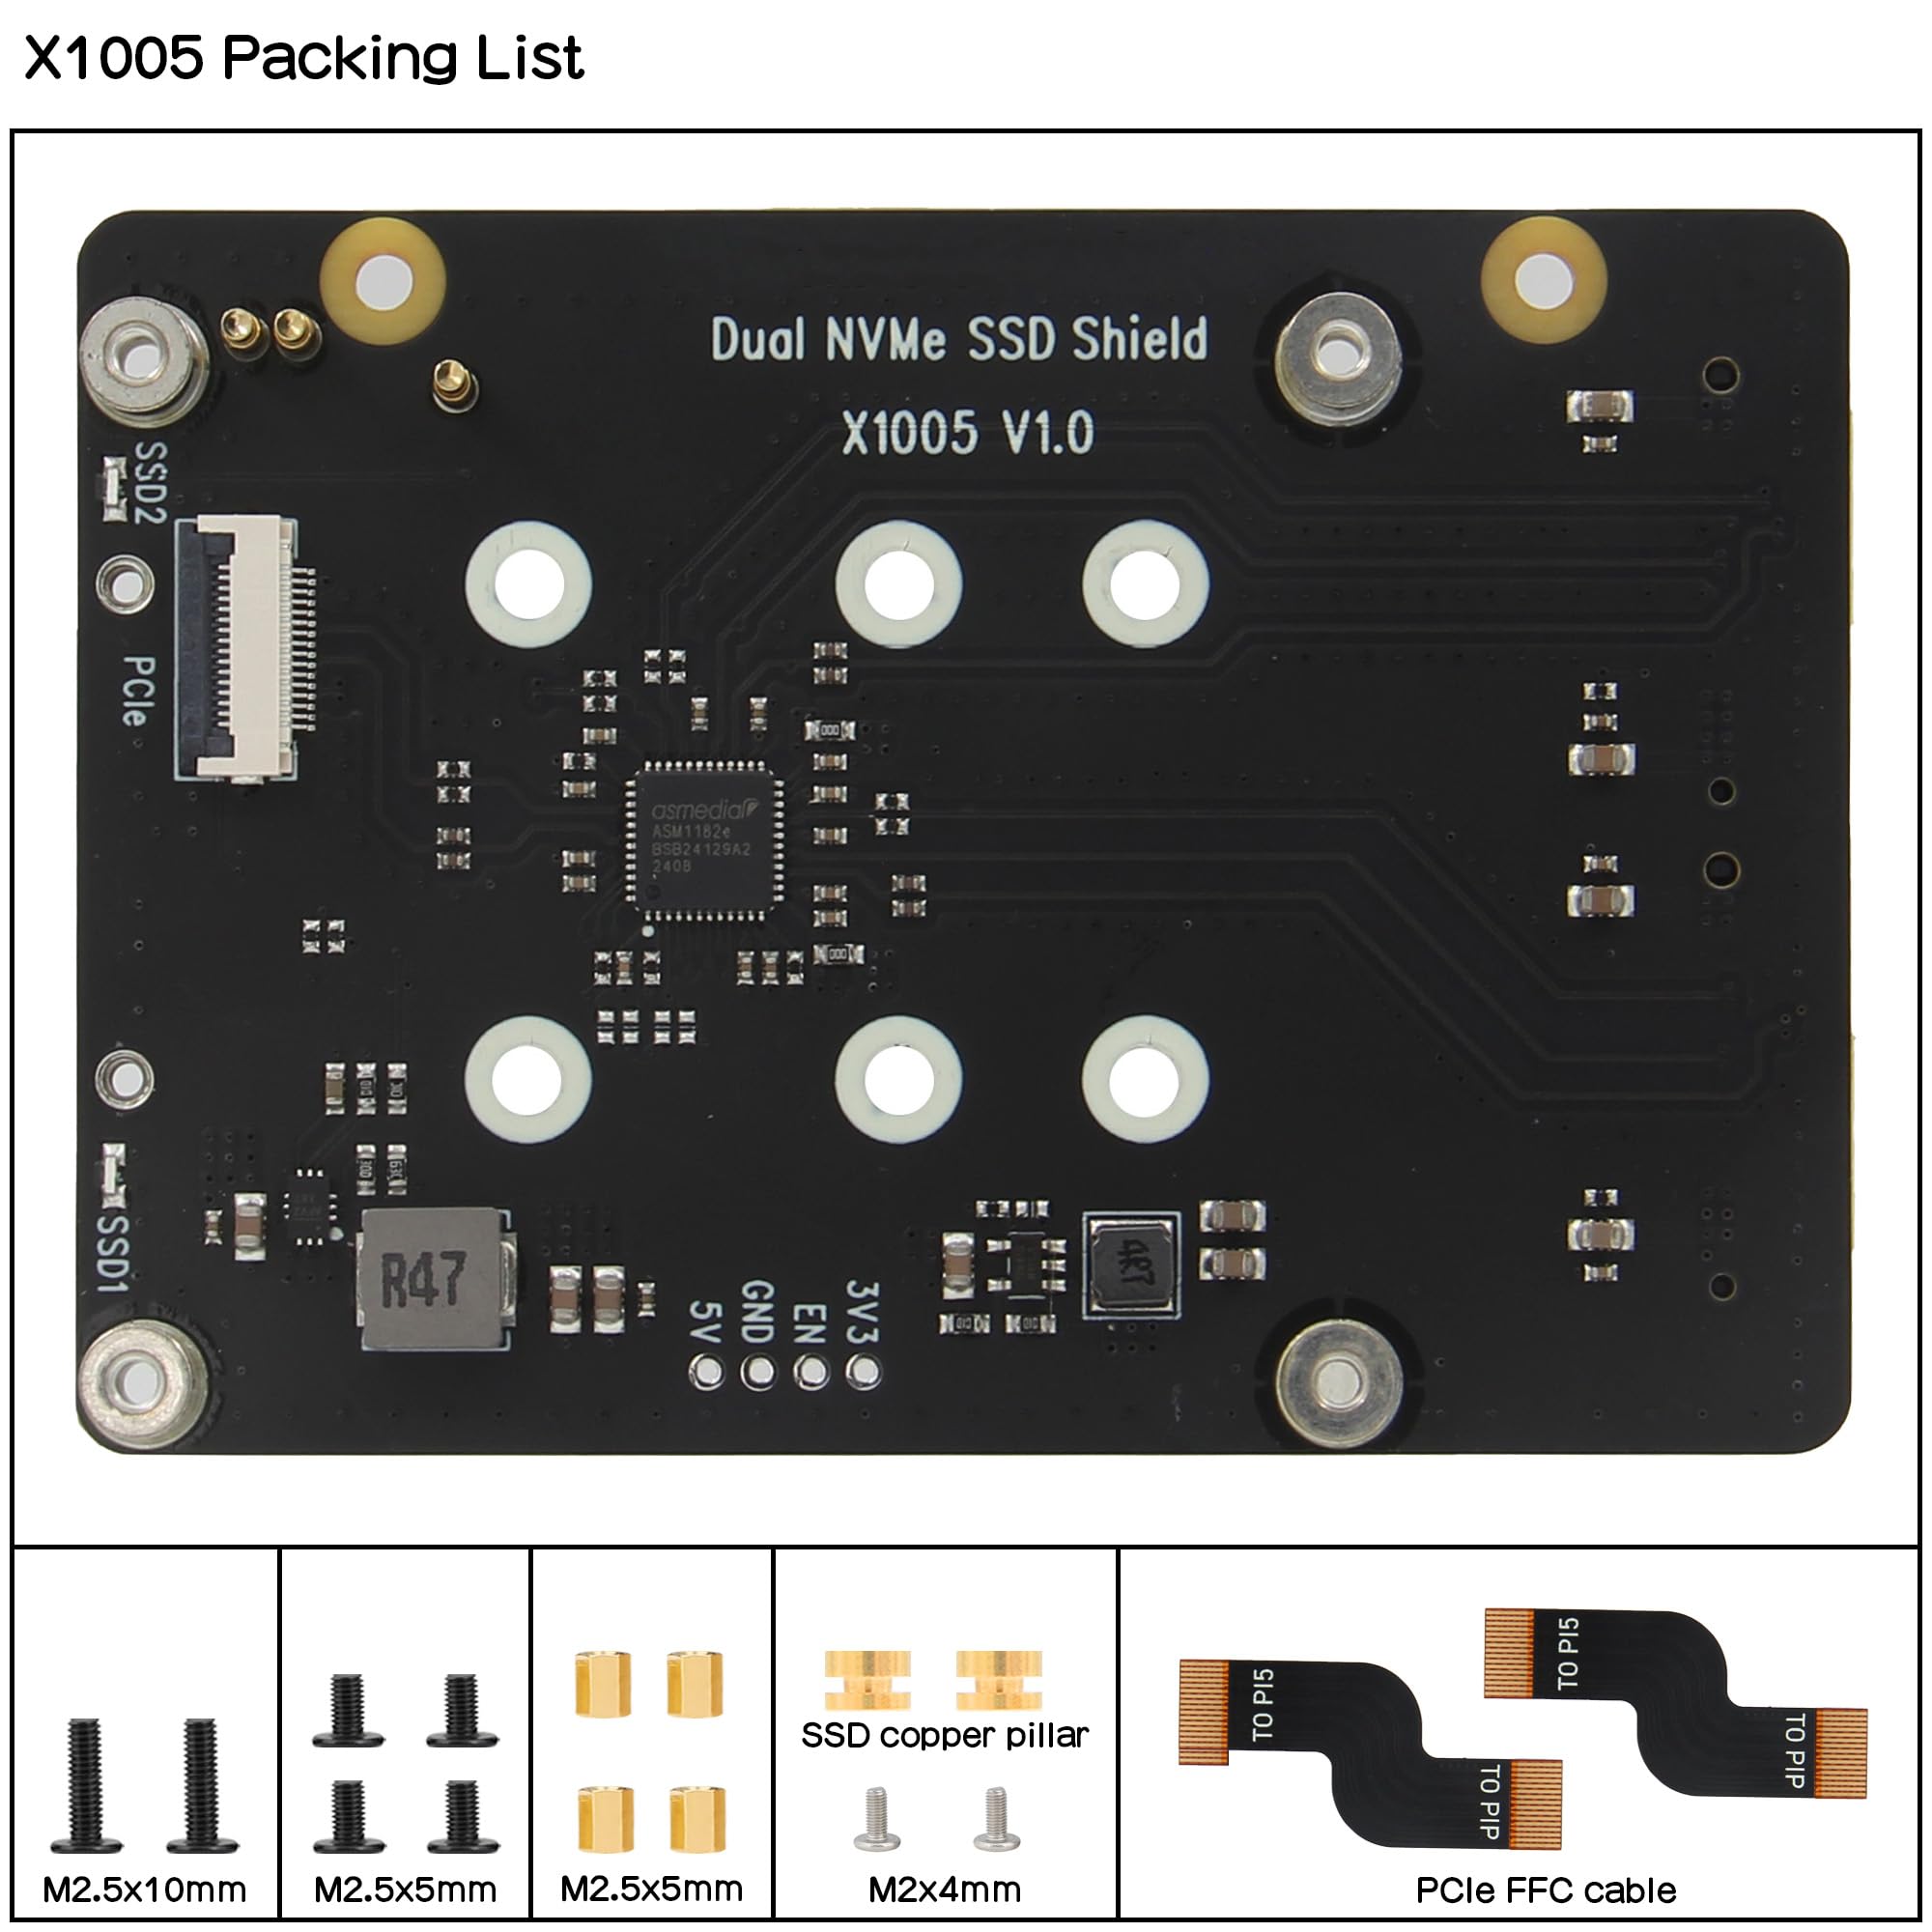
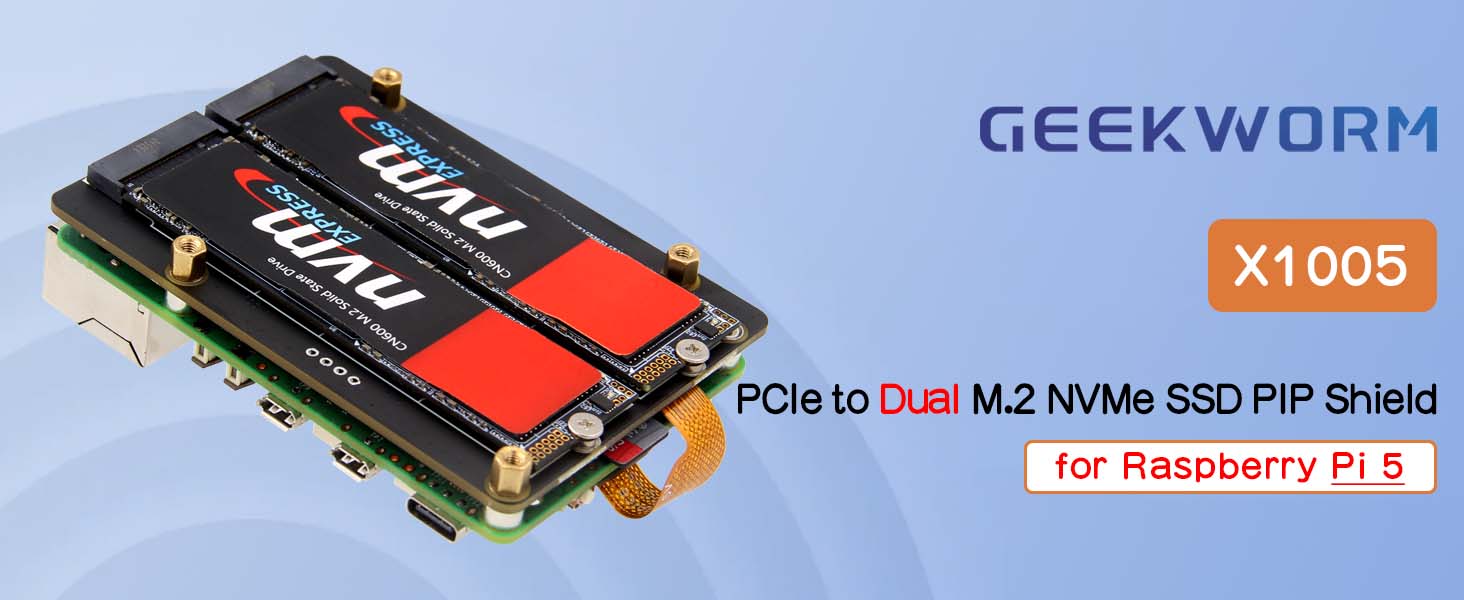
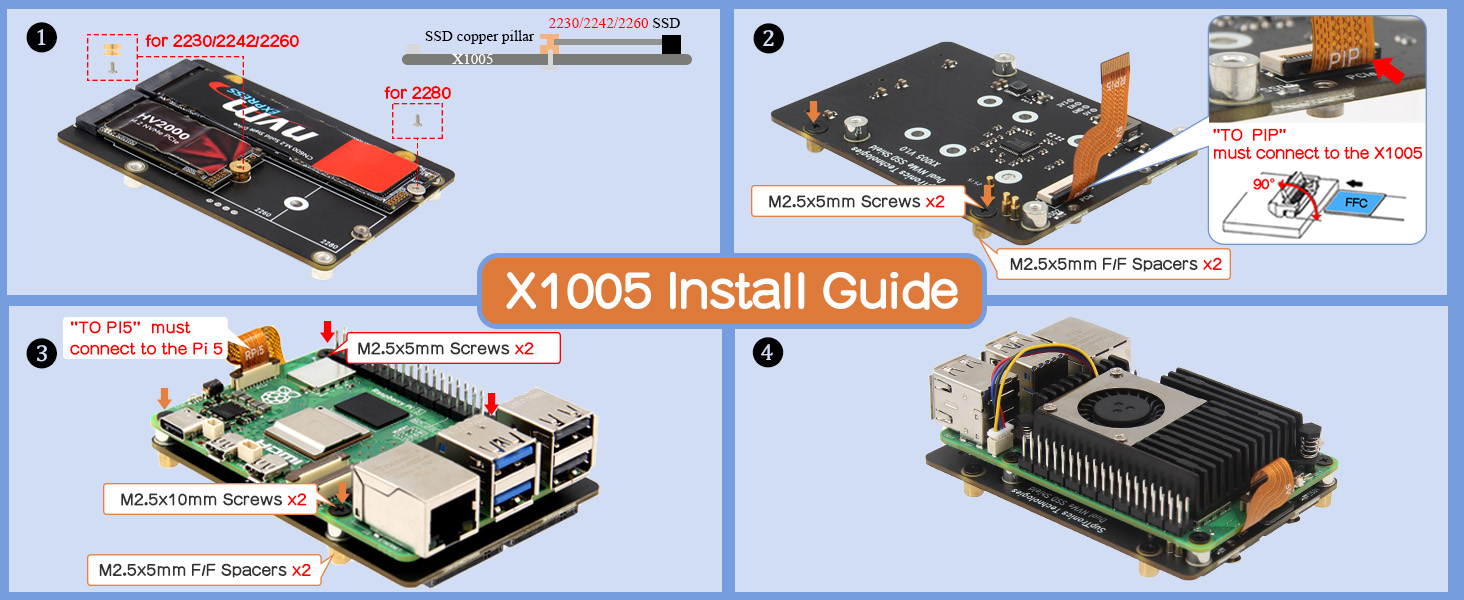
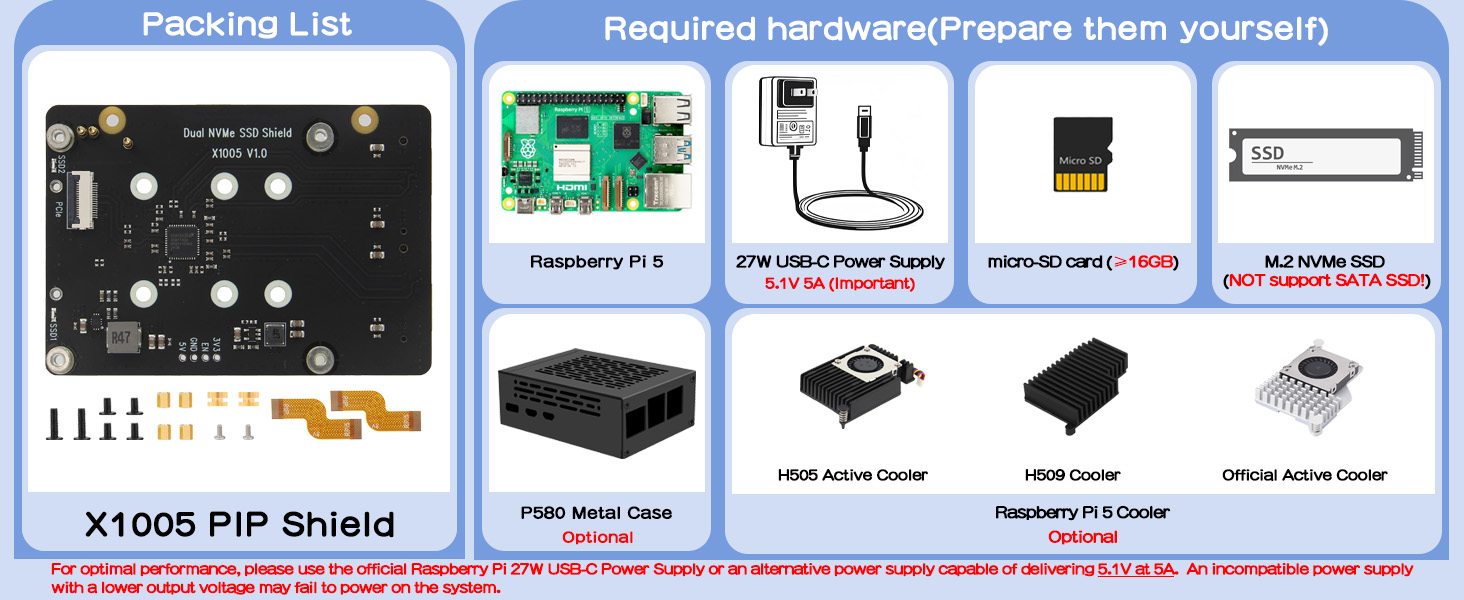
The Geekworm X1005 is a PCIe peripheral board designed exclusively for Raspberry Pi 5 models, enabling dual M.2 NVMe SSD installation (2230 to 2280 sizes). It supports NVMe boot with updated EEPROM versions, offers stable power delivery via GPIO, and is compatible with AI acceleration modules, making it a must-have for professionals seeking ultra-fast, expandable storage and AI-ready performance on their Pi 5.
| Brand | Geekworm |
| Series | X1005 |
| Item model number | X1005 |
| Operating System | Linux |
| Item Weight | 1.23 ounces |
| Package Dimensions | 4.49 x 3.31 x 1.3 inches |
| Color | black |
| Manufacturer | Geekworm |
| ASIN | B0D95KRJNC |
| Date First Available | July 10, 2024 |
T**R
Works great with my little server.
This worked flawlessly with my Raspberry Pi 5 and 2x 2TB Toshiba m.2 SSDs. Speeds aren't incredible. I think it is running at PCIe gen 2 speeds. The form factor is great though. You can still install a regular hat, or put it in a little case which Geekbench also sells. I'm using it as an Immich server, and I'm very happy with the performance.
M**H
No instructions and missing essential parts
If you’re new to raspberry pi then this isn’t the product for you. The directions make absolutely no sense. They are on a tiny paper with pictures that show you where the various pieces could go not not how it should look after. The pins mostly connect which powers the device. But I learned that from hours of google instead of the manufacturer. The additional pieces necessary to fit it together properly are not included in the included parts packed. Why would you make directions visually showing passes in the directions that aren’t in the box!? It’s like they packaged it up and grabbed whatever was laying around to throw in the box. I would love to review the device itself however it still won’t work. And the plugs to hold the cards in place are soldered in the very last spot which is great if you have the largest size card it accepts but if it’s smaller in any capacity start looking around now for something to hold the card in place. If you’ve been tinkering with Pi for a while this whole rant probably sounds very noob/novice and you’re right bc that’s what I am at this. However the purpose of RPi is for ppl to learn by doing. But if you’re new like me, this product assumes way more than we know for it to be user friendly and teachable. I’m returning it and think it’s best I limit myself to Geekworm cases or the like. If you still want to buy one, figure out how to connect the board to the pi 5 before adding the card bc you can’t reach those mount points once the card is installed. And let’s not even begin to get started on how the additional two mounting points get attached. There’s not enough parts to do it anyway and even if there were it’s either not covered at ask in the directions or it is but the parts to do it aren’t there. Neither of which matter bc there’s no image of the finished product to see what those should look like
A**N
Easy to configure
Operating with my RPI5 perfectly
D**J
Works great right out of the box
Got this for my RPi5 (of course) so that I could put in an NVME SSD and the Hailo AI card. I put in a 1 TB Western Digital Blue card, and it worked fine. I just did an SD Copy from the Raspberry Pi Accessories menu, if I remember right. Then pulled out the SD card, rebooted, and bam, faster Pi. Now I am just tweaking 3d print file to make it fit.Advice - for $14 the metal P580 case would have saved several 3d prints that didn't fit!
M**H
Could not get the system to boot properly.
I could not get mine to work reliably. Using a Samsung 256gig NVME SSD that works great with the X1002 (I have four of the X1002 with the same Samsung SSD) would not reliably boot on this X1005. If it did boot, the OS would crash within 5 to 10 seconds upon getting the desktop. It would not stay up long enough to check the system log so all I could do was to reseat the ribbon cable, but that did not help. I was using the official Raspberry Pi5 power supply with only a Logitech Unifying Receiver (for mouse and keyboard) plugged into one of the USB 2.0 ports. I really needed this to work before purchasing a 2 TB drive.
R**E
Works exactly as advertised
Worked first try. PiOS boots virtually the second the monitor turns on.
Trustpilot
1 month ago
1 month ago
1 day ago
2 weeks ago