
DOWNLOAD THE APP


Customer Services
Copyright © 2025 Desertcart Holdings Limited
DOWNLOAD THE APP
🚪 Transform your entryway with color that lasts and dries fast!
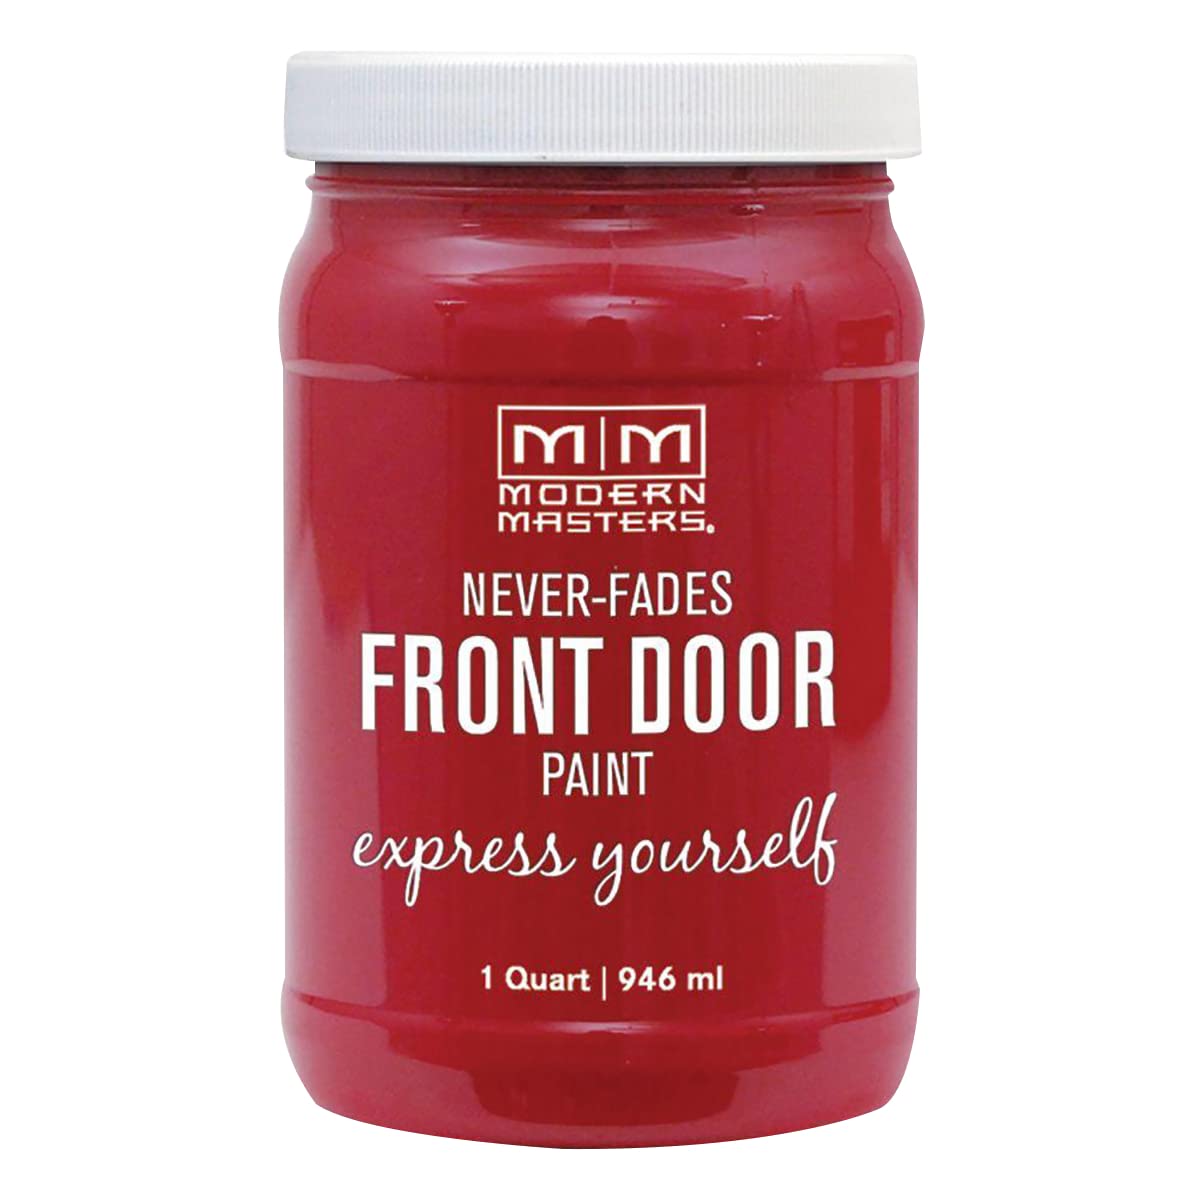
Modern Masters 1 qt Ambitious Front Door Paint is a water-based, fade-resistant exterior enamel designed for metal and wood surfaces. It dries to the touch in just 1 hour, covers up to 100 sq. ft., and delivers a smooth satin finish that withstands harsh weather while maintaining vibrant color for years.


| Brand | Modern Masters |
| Color | Red |
| Finish Type | Satin |
| Item Volume | 1 Quarts |
| Size | 32 Fl Oz (Pack of 1) |
| Special Feature | Fade Resistant, UV Resistant |
V**I
The BEST paint EVER for doors!!
I LOVE this paint. Whenever you paint a door you either have to leave the door open for several days so it cures or you end up with the fresh paint sticking to the door frame & it peels & just looks awful. I thought it was super expensive when I 1st bought it BUT the guy said he would refund it even after I used it if I didn't like it. So I bought it. That was 7 years ago. BUT the door looks amazing AND hasn't faded in the 7 years since I painted it. When I wanted to touch it up (It has a few cracks in the caulking & a few dings & scraps from me banging into it with ladders, etc..) I found out that the paint shop closed during the plague. I freaked out... Amazon to the rescue! They had it & I ordered another jar of it This stuff is amazing. The 1st time I did it everyone said Prepping was the most important part so I washed the door, let it dry over night & used exterior caulk on the details the weekend before. The day before I primed the door & let it dry. I started early in the day. I painted the door & was able to put on 3 (count 'em THREE) coats & have them dry before nightfall!! So to repair my dings, I am gonna wash, prime & paint it in the next couple of weeks. Wonderful colors too! And who wouldn't want a door painted with a paint called "Happy"?!?
D**N
Great Quality, drys fast.
My first time using Modern Masters, a great quality paint I love the color, it drys fast. I used 3 coats and have 3/4 left in the container.
R**Y
Front Door Beauty
We have a pair of front doors that had been exposed to the elements for over 30 years. The doors are solid wood with oak veneer and solid oak molding. Each door is 3’x 8’ and weighs about 225 pounds. The exterior veneer started separating from the core in several spots. The inside of the doors are custom painted to match the interior of our home, and they are in excellent condition. We considered replacing the doors but the cost was prohibitive, and we could never match the custom paint job on the inside. So we decided to paint the exterior of the doors. Due to the complexity of the project, we decided to remove the doors from their hinges, move them into my shop, and remove as much of the veneer as possible, while preserving the interior finish. Some of the veneer came off with a simple putty knife. We had to moisten the remaining veneer with a damp towel for a couple of hours and then steam it with a hot iron so we could remove it with the putty knife. Approximately 90% of the veneer was removed, and that which remained was sanded down to blend smoothly with the rest of the door. Good preparation is the key to a successful paint job, so we began sanding with 80 grit sandpaper, then moved to 120 grit, 180 grit, and finished with a fine 220 grit. We used a power sander with a vacuum hose connected to a shop vac and wore face protection during the process. All of the solid oak molding was hand sanded with the same grits of sandpaper, and every attempt was made to preserve the detail in the molding. The colors of front door paint offered by Modern Masters are beautiful and stunning. After great deliberation, we decided on “Sophisticated,” the middle of the three red-tone paints offered. We wanted our front doors to define our home, to give our home some personality, and bring it to life. “Sophisticated” was the perfect answer. Some may not care for red front doors, and that’s fine. The important thing is that we know this special color hit a home run for us, and we could not be happier. It is important to remember that the light and shade your front doors receive throughout the day will change the way your paint looks. The shade will darken the appearance of the paint and direct sunlight will make it look its brightest. Since our doors receive both, we see different tones throughout the day. It is almost like our doors are alive expressing different moods as the day progresses. The attached photographs show how the appearance of our paint changes in different lighting. Before painting, we removed all dust and particles from the wood surface and taped the doors to protect the good inside finish. Also, we removed the solid brass hardware from the doors, stripped its old lacquer finish, and refinished it before replacing it on the newly painted doors. We had some water damage to the bottom of the doors and used Bondo to repair them before painting. We also applied new weather stripping to the bottoms of the doors. We followed Modern Masters instructions for painting. Due to the veneer removal, there were areas on the doors which were much lighter than the molding. To ensure the different shades would not spoil our paint job, we applied three coats of Bulls Eye 1-2-3 Gray Primer by Zinsser. And this was followed by four coats of Modern Masters “Sophisticated.” We brush-painted the molding and used a four-inch foam roller on the flat surfaces of the doors. This is a semi-gloss paint, and the finished surface appears a little like a laminate which should really stand up to the elements. The doors look beautiful finished and should be good for another 30 years. We learned so much from the comments on Amazon, we decided to provide a little more detail in our review in hopes it will be helpful to those tackling a little more complex front door paint job.
M**A
I now have a "Spiritual" metal front door!
I ordered the Modern Master's Door Paint in the color Spiritual several months ago, but things came up and I was not able to get to use it until now. Today it was in the 70's so I decided it was time to paint the door and change the lock on the door. I love the color!!!! My house is red brick with beige and white trim and I was a little worried about painting the door purple, but hey, it is my house, I can paint the door any color I want, and if someone does not like it, they don't have to look! I think it came out really nice. The paint went on very nice, but after the first coat I was afraid I was going to have to do three coats, but two covered nicely. I used a foam roller and a regular paint brush. After it dried, I could not see any brush marks. On the second coat, I did get some air bubbles in the paint, but I think I was pressing to hard with the roller. So after I lighted up my touch, it cut down on the number of air bubbles. After it fully dried, the air bubbles that did remain were verily visible. I only painted one side of the door, and have a lot of paint left over. I will be saving it for touch ups, but I hope I don't need it. The new lock set I put on was a brushed nickel and it looks so good on the purple door. Some tips for everyone else. Buy the best roller and brush you can. I went with the cheap ones as I am on a very tight budget, but if you are a perfectionist, you will be much happier with the better ones. IF you found this review helpful, please click the Yes button below. Thank You! STAR RATINGS: Each product is carefully reviewed in an unbiased manner. Star ratings are earned, never given. 5 Star: I really love this product, it is an exceptional, impressive product. It is very well made (designed, formulated, composed, etc) and lives up to the product details and description. It exceeds normal consumer expectations. 4 Star: I like this product. It meets the product description, details, and normal customer expectations. It does what it is supposed to do. 3 Star: This is not a negative rating. It is a neutral rating. I could take it or leave it. It met the product description and details for the most part but isn't something I am ever likely to order again. 2 Star: I don't like this product. It has mistakes in the product details or description and does not live up to what it advertises or normal customer expectations. 1 Star: I really do not like this product. There may be something wrong in the product details or description, it does not live up to what it is advertised as. I would tell my friends, acquaintances, and strangers that they shouldn't use their hard earned money on this product. Thank you for taking the time to read my review. Please consider following me here on Amazon for other reviews. Thanks and have a blessed day.
T**H
Lovely paint. Lovely results. You can definitely do this. Here's how.
Lovely paint. Lovely results. It was easy, too. Here's how I did it in pictures. YOU can definitely do this. I hope this helps at least a few reluctant painters. A great paint job is really all about preparation, which means assembling the right tools before you start. TOOLS I USED: 1. Purdy 144080310 1-Inch Angular Trim Dale Brush, X-Large 2. Artist brush, #8 Filbert, for touch-up. Guerrilla Painter Short Handle Bristle Brush, Set of 4, Filberts 3. Shur-Line 3700C 4-Inch Foam Mini Roller with 12-Inch Handle Make sure your roller is for SMOOTH SURFACES. It will probably specify "doors and cabinets." The 4-inch size is perfect. The 6-inch size is clumsy for this job but it would work. 4. One zipper lock bag, sandwich size. Protects brushes between coats. 5. One zipper lock freezer bag, quart size. Protects roller between coats. 6. One zipper lock bag, gallon size. Protects paint tray between coats. A small trash bag will work if your tray is too large for a gallon bag. 7. Disposable plastic paint tray like FoamPRO 306 Mini Roller Paint Tray, 6" . I actually reused a plastic vegetable container that previously held a pound of mushrooms. It just needs to be a little larger than the roller. 8. Several paper towels 9. Less than one roll of painters' tape. The 1-inch size (actually 0.94") is fine for this job. Scotch ScotchBlue Painter's Tape 2090-24A, .94 in x 60 yd (24 mm x 54,8 m) - 0.94" Width x 60 yd Length - Rubber Resin - Adhesive, Residue-free - 1 Roll - Blue . A local source may be less expensive. 10. Some old plastic as a drop cloth 11. Paper for masking glass, etc. Newspaper works fine. I already had some rolled brown paper so I used it. Trimaco GP12 General Purpose Masking Paper, 12-Inch x 180-Feet, Brown 12. Keep hands neat with disposable gloves. Ammex AINPF Indigo Nitrile Glove, Medical Exam, Latex Free, Disposable, Powder Free, Large (Box of 100) 13. And of course, the paint. PHOTOS: 1. Paint comes packaged like peanut butter. Sealed well. Easy to open. 2. Door surface may be smooth or textured. This JELD-WEN "smooth" fiberglass door has just enough surface to hold paint. 3. I removed the latch and deadbolt. You could leave them installed and mask them. The glass panel is masked along with the sweep at the bottom and the latch side of the door. On the inside of the door, not shown, is masking at the top and along the hinge side. 4. To neatly mask hinges, overlap several strips of tape, a half inch or so above and below the hinge. Then use a utility knife to gently cut along the edge of the hinge. Peel off the excess. Rub the edges to be sure they adhere. 5. Before starting brush work, "marinate" your roller. Pour some paint in the quart bag. Put the roller in. Zip bag closed. Make sure the entire roller surface is wet with paint. This eliminates splotchy coverage when you first start rolling. There's not much surface area on a door to "work in" the paint to the roller, thus the "marinated" roller technique. 6. Most doors have panels or trim details. Use brush to paint the parts that are not flat. Leave the flat surfaces for the roller. 7. You don't have to paint a perfect edge. Just wipe the flat edge with a paper towel to smooth out any paint. You only need SMOOTH, not clean. 8. Paint the top of the door. Nobody will see it, but this helps keep a wood-framed door from warping. 9. Paint the hinge side the same color as the door. (The latch side is usually the same color as the inside of the door.) 10. Bag your wet brush right away. It's okay if the handle sticks out. 11. Get to work with your marinated roller. 12. Roll the top. 13. Roll the rest of the rails. 14. Roll the flat part of the panels. 15. Bag your tools while the first coat dries. This paint dries nicely--probably one hour. Then do it all one more time. Carefully remove all masking. Wash your brushes with water. Rollers are hard to clean--I usually pull them off the handle and dispose. Easy. Right? I am REALLY PLEASED WITH THIS PAINT. Otherwise I never would have written such a long and detailed review. Thanks for reading. Good luck with YOUR door.
J**A
Great paint brand
I used Modern Masters brand paints for years in my decorative painting business. But this line of front door paints was new to me, and I ordered it for a client. The color was perfect for their front door. Very good paint, and beautiful pigments!
I**D
My Door is a Ray of Pure Sunshine!
I fell in love with this paint because of the color and that is made to paint front doors. I always wanted a yellow front door. My neighbor who retired from being a professional painter for 40 years offered to paint my door for me. I gave him this paint and he told me more than once what a great paint this was and how nice it went on. He said it covered the whole door with one coat but he put two coats on anyway. He asked me where I bought the paint because now he wanted to paint his front door too. People in my neighborhood have also remarked on how nice and pretty my front door looks. I'm going to paint my back door the same color. This paint is a great choice!
J**C
Does not stick to pvc/vinyl door inset material
I do not think I have ever executed a project more meticulously..... but my results are mixed. The trouble is, who wants mixed results out of a project meant to make something spiffy? Like half the doors in the hardware store, my door has an inset that, I now know, is made out of vinyl or pvc.. This paint won't stick to those materials, but that is not indicated in the instructions. Am I just supposed to know this? As a product made for DIY, my situation should have been clearly addressed in the instructions. Here's the story: I have a steel-covered wooden door, with a semicircular window (with several panes), set in to it. This is the door that was on the house when I bought it. (Its a pretty homely door - that's why we decided to spend a day making it nice). I worked hard to verify that yes, this was a pre-primed door and thus would not need priming according to the modern masters instructions. I cleaned the door carefully. I scuff-sanded the entire surface, including the window inset. I cleaned the door again to rid it of any sanding dust. I taped the widows carefully, and trimmed the tape with a razor for a perfect edge. I applied two coats, with beautiful results. I finished at 2 PM, and reinstalled the doorknob and closed the door at 8 PM. At 10 the next morning, I started to remove the tape on the window panes, by first running a razor around the pane edges. But I did not get my razor deep enough into a corner. So, when I removed the tape, a big strip of paint came off of the vinyl or pvc inset. Perhaps I should wait a full 24 hours to remove the tape? I tried again later on with the same results. I've tried to touch it up with a tiny paintbrush, but the results are crummy because I can't paint a sharp edge freehand to save my life, and I can't use painter's tape without risking the same issue. It looks worse than before, and I wish I had just left the door as-is, saved myself money, a day, and a door that just looks awful.
Trustpilot
1 month ago
3 weeks ago