
Desert Online General Trading LLC
Dubai, United Arab Emirates
Desert Online General Trading LLC
Dubai, United Arab Emirates


🔍 See What You've Been Missing!
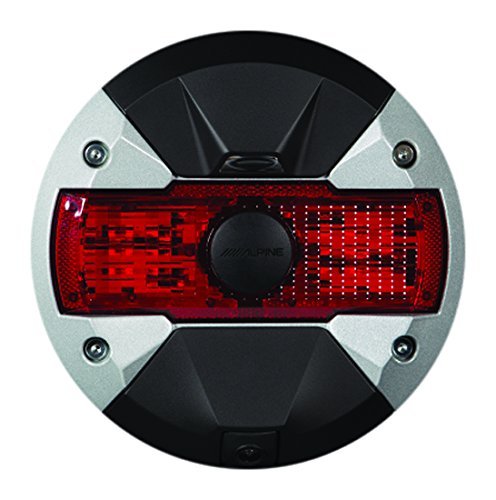
The AlpineHCE-TCAM1-WRA Spare Tire Rear View Camera & Light is designed specifically for 2007-Up Jeep Wranglers, offering seamless compatibility with factory screens and a rugged, waterproof design. With built-in brake and reverse lights, this camera enhances visibility while ensuring easy installation and secure mounting.


| Connector Type Used on Cable | RCA |
| Display Technology | LED |
| Screen Size | 7 Inches |
| Compatible Devices | Monitor |
| Installation Method | Surface Mount |
| Item Dimensions L x W x H | 7.25"L x 7.25"W x 2.25"H |
G**T
Excellent Product But Challenging to Install and Requires Dealer Involvement to Complete
I installed this in my 2017 Jeep Wrangler Unlimited Rubicon, which came with the 430N radio made by Alpine. The first thing to know is that this requires an adapter for the current Wrangler Radio, which can be found here: https://www.amazon.com/Alpine-Electronics-ALP-HRN-CAMCH-HCE-TCAM1-WRA-2007-2017/dp/B06XYSMB7N/ref=sr_1_2?ie=UTF8&qid=1512501180&sr=8-2&keywords=alpine+jeep+wrangler+backupThis is a challenging product to install, and requires that you have the following in addition to the camera and the adapter: (1) some plastic "trim removal" tools (available at your local auto parts supplier, like these: https://www.amazon.com/Motivx-Tools-11pc-Trim-Removal/dp/B01FPPOQ6I/ref=sr_1_1_sspa?ie=UTF8&qid=1512501249&sr=8-1-spons&keywords=trim+removal+tool&psc=1); (2) some in-line wiring connectors like these: https://www.amazon.com/gp/product/B01ALAE89M/ref=ox_sc_act_title_1?smid=A3HMB6GLG0WJ17&psc=1); (3) a package of "zip" ties like these: https://www.amazon.com/TR-Industrial-TR88302-Multi-Purpose-Cable/dp/B01018DC96/ref=sr_1_4?s=hi&ie=UTF8&qid=1512501411&sr=1-4&keywords=zip+ties+black); (4) 7mm, 10mm and 19mm sockets and a wrench; and (5) a Torx head set for removing the passenger side cargo anchors from the cargo area.It took me about 2.5 hours to do the install, and I consider myself pretty handy with cars and wiring, so allocate time to doing this right. It requires removing the interior plastic trim on the passenger inside of the Jeep, from the back corner all the way to the passenger footwell. This was difficult, and requires patience to remove the trim pieces without cracking or breaking any of the parts. This is where a good set of trim removal tools comes in handy, and you will want to use the nylon versions so you don't scratch up the pain on your Jeep. It also requires removing the center of the dash, which is one piece with the driver's side. I had no idea how to do this, but fortunately there are some great videos on YouTube (this one is great: https://www.youtube.com/watch?v=VtzrNJVTPl4). The dash must be removed to get access to the back of the Alpine radio so that you can plug in the adapter. Once the adapter wire is run to the passenger footwell, you must connect a wire that goes all the way to the rear camera to two wires that are in the wiring harness in the footwell. Alpine does not give you any connectors to do this - this is where the in-line wiring connectors come in handy, and allow you to connect the camera to the existing wiring WITHOUT cutting the existing wiring harness. There is also a connection to "ground" that requires you to strip the wire and wrap it underneath a 10mm bolt in the passenger footwell (I used a "crimp" wire ring connector for the ground). Once connected, it's a matter of wrapping the connections a few times with electrical tape to keep them out of harm's way, and then using numerous zip ties to strap the new wire to the existing wiring harness all the way to the back door of the Jeep, and then routing it into the rear camera on the spare tire. There is some extra wire, which I zip-tied into a bundle and stashed inside the back door. Alpine supplies several mounts in different lengths depending upon the wheels you have. For the factory wheels, you use the "short" mount.Once the install is complete, and all the trim is put back on (again, be patient and careful), the unit's "third brake light" will function, as will the backup light that lights up the rear area viewed by the camera, but the camera will not function - this requires taking your Jeep to the local dealer, who must "flash" the radio to enable the backup camera, which is disabled from the factory on a Wrangler since there is no factory backup camera available. This is easy and takes less than an hour, but it can only be done at the dealer. Once the dealer's work is complete, you have a terrific backup camera with its own backup light and brake light functions.A couple of hints: since the camera has it's own "third brake light" included, you can remove the factory brake light that sits above the spare while you have the spare off for an even better rear view out your back window. Also, you really need two people to install the spare - once you have the camera mount installed, you cannot just throw the spare up onto the lug nuts and hope for the best. You have to carefully put it in place so as not to break the camera mount, which slides through the center hole of your spare tire's wheel and is steel but not strong enough to hold the spare tire by itself.Overall, this is a great product and I am very glad to have it since the rear view from a Wrangler isn't very good, but be prepared for quite a bit of disassembly of your Jeep to get access to the radio and the wiring harness. While not terribly difficult, it does require the right tools and some patience.
J**T
Defective product
This is the second camera unit I bought from this person and both units were defective. Each unit was installed by Cartunes and the first unit had missing pieces and wire was cut. The second unit camera didn’t work. I’ve had the hard time trying to get a refund of my money. Do not buy this product or from this seller. Alpine is discontinuing this product.
R**R
Nice product, easy install
Easy installation, high quality product. I saw some people that were having issues with the camera going in and out. I had the same issue. The product actually has a 3 year warranty, which I thought was great! All I had to do was send the camera unit in for them to inspect. They determined it was water intrusion into the camera unit and sent me a complete kit free of charge. Turns out it was actually a failed wiring harness, but a new one was included in the kit. Highly recommended and Alpine was very easy to deal with. I have this unit paired with X409-WRA-JK and could not be more satisfied with the products. The installation of the camera took about 2 hours in my driveway with no special tools needed.
T**B
Great addition to the new 2017 Jeep JKU
Great addition to the new 2017 Jeep JKU. I chose this option over some of the others because I really liked having the additional brake light, as well as the backup light. The backup light makes a huge difference with visibility at night time and is as bright as a flashlight. It doesn't have the green/yellow/red lines other car cameras have, but neither do my mirrors...The installation was pretty straight forward, but I would add that you need the camera harness adapter Alpine Electronics ALP-HRN-CAMCH Camera Input Harness for the HCE-TCAM1-WRA, Rear View Camera System & 2007-2017 Jeep Wrangler Factory Display if you wish to use with the stock touch screen stereo. I have the non-nav stereo 430 and it works fine.You do have to splice into your wiring harness, so if you were looking for a plug-and-play option, this isn't it, and it probably doesn't exist.As far as the installation details, I wasn't able to fish the cable through the fabric sleeve running from the back gate to the body (marked optional in the installation instructions). There just wasn't enough room. I used three-way crimp connectors to tap into the wiring harness similar to these Ancor 210510 Marine Grade Electrical Nylon Insulated Double Crimp Funnel Entry 3-Way Connector (16 to 14-Gauge, 25-Pack), except the cable is more 20-22 gauge.Also, do a trial setup of the camera on the spare before you tape the rubber grommet and strap everything down, so you get the correct amount of cable slack. I had to undo a little bit of work when my estimate of slack came up about 1 inch short.If you use the camera input harness, you may need a small RCA patch cable to extend the length (male to female or with a coupler), depending on where you ground the cable. I used a wire ring terminal to attach the ground to the last bolt behind the passenger kick panel, and the camera input harness cable came up too short based on how I wanted to run the cable.Dealer reprogrammed the radio for about $80 while I waited.
R**R
Yeah, it's Expensive! But it Works & Looks Great! Love it!
Great Product & Features! It's expensive, but it works & looks great! I installed it myself, no rush, pretty easy to install if you have the correct tools. When it comes to taking the top left side of your dashboard apart to gain access to the Audio/Video deck, it's just 4 screws. Then 4 more screws holding the deck in-place. Just Google or You-tube for any "See How" videos. I also bought the Interface that goes with this Rear Camera unit that adds the Active motion Guidelines that move with the steering wheel. Also a Nice feature! This project put a dent in my wallet & consumed about 7 hours of my time to install, but I'm quite pleased with the results!
Trustpilot
1 month ago
1 day ago