
Desert Online General Trading LLC
Dubai, United Arab Emirates
Desert Online General Trading LLC
Dubai, United Arab Emirates


🎉 Unleash Your Creativity with Every Click!
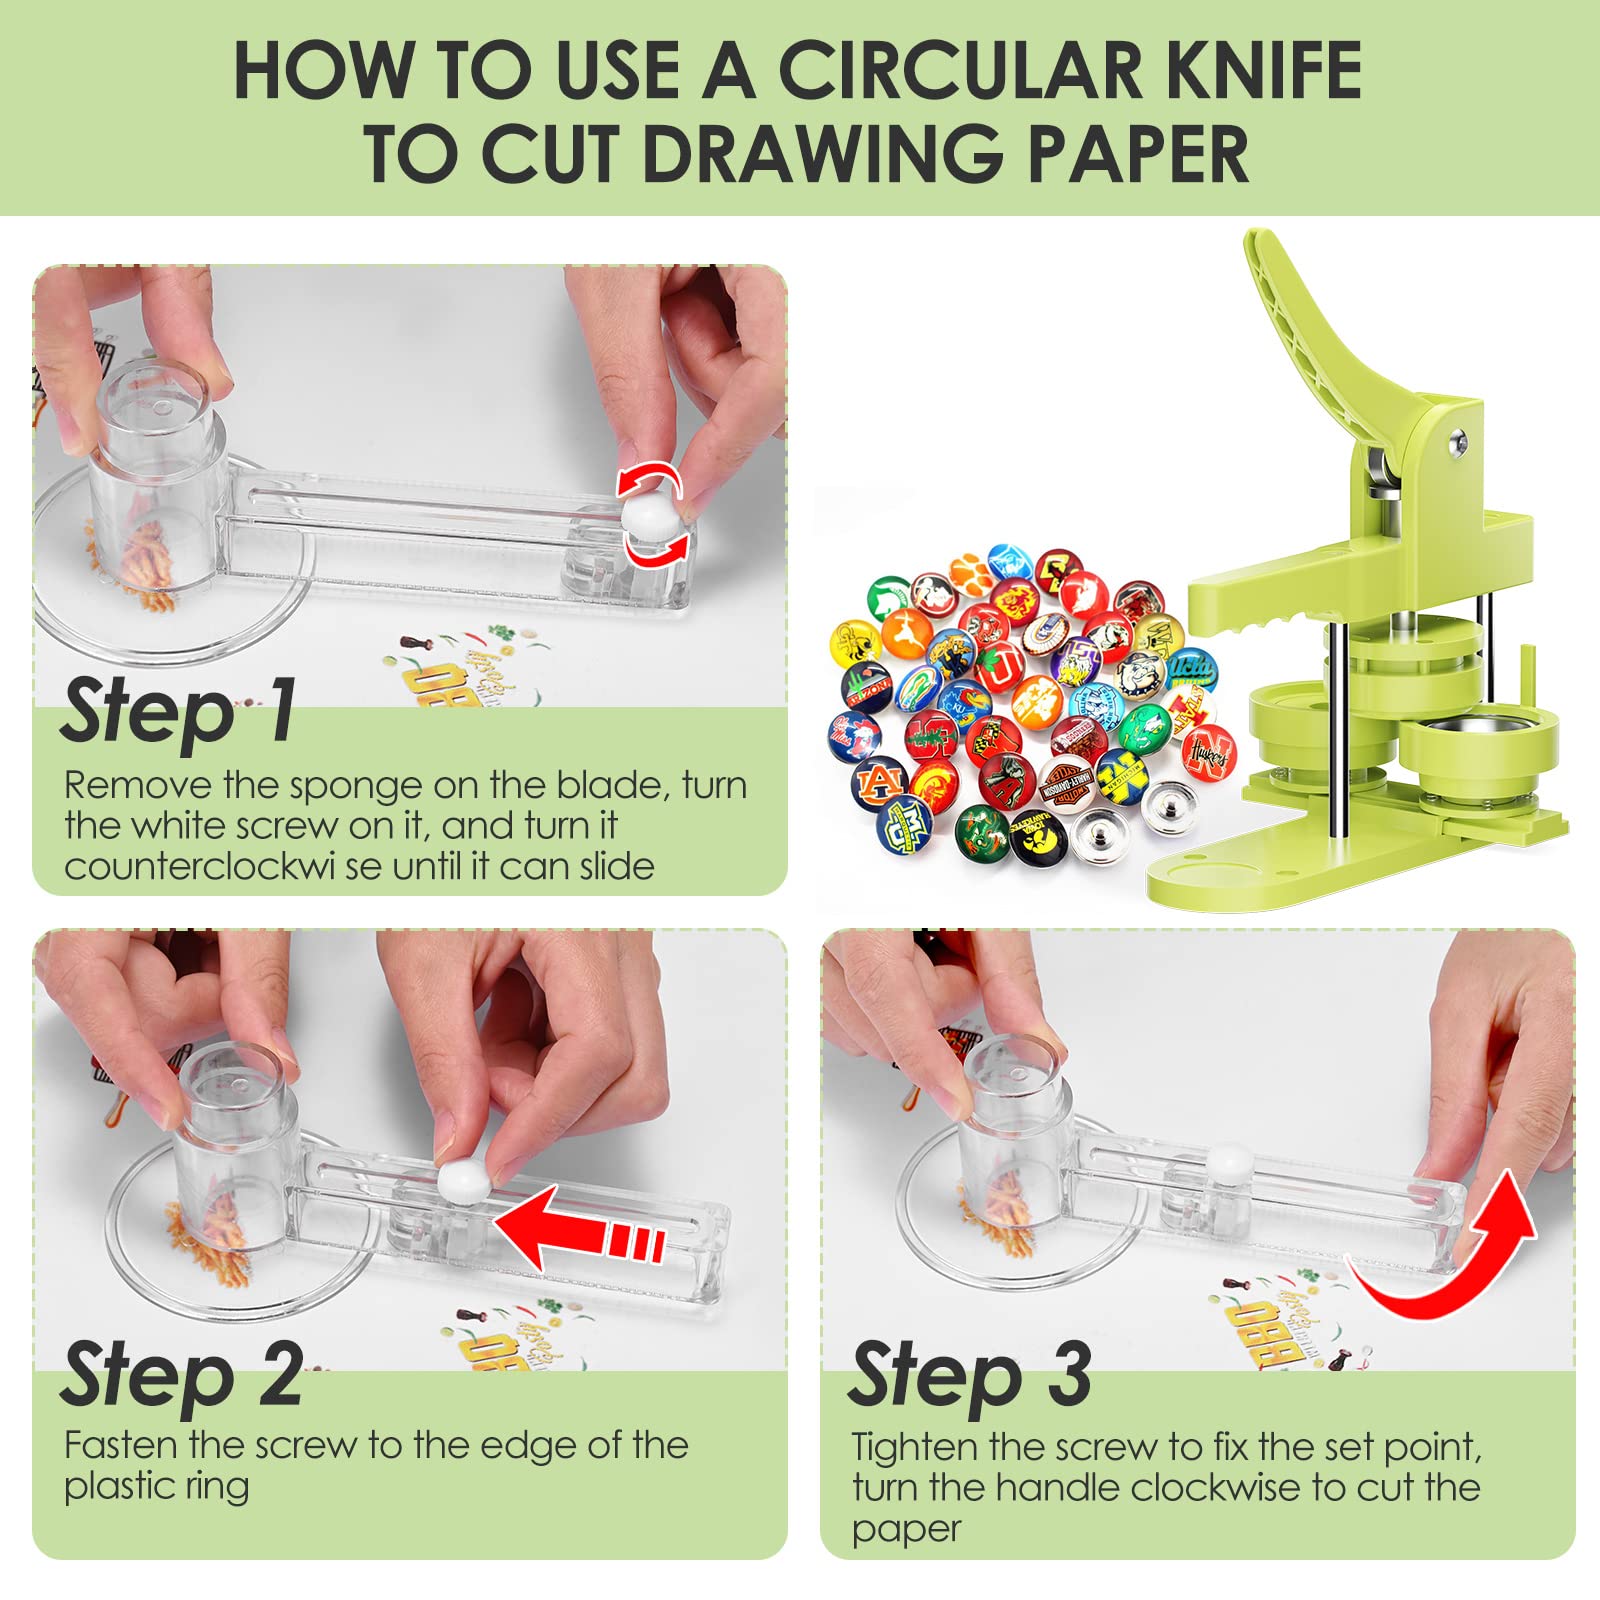
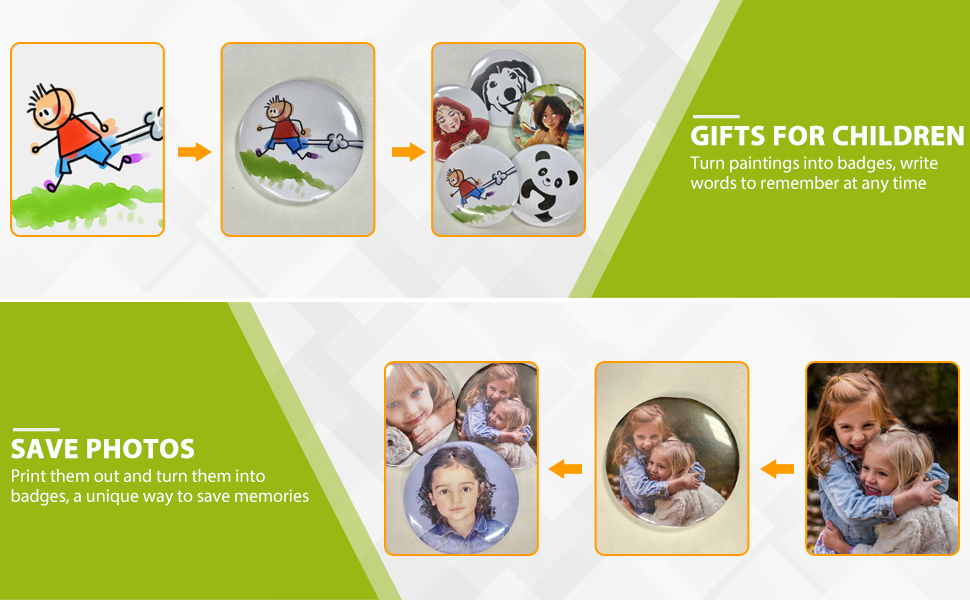
The Button Maker Machine offers a comprehensive solution for crafting personalized pinback buttons in three versatile sizes. With 400 button-making supplies included, this user-friendly device allows you to create custom badges quickly and efficiently, making it perfect for events, promotions, and creative projects.


P**P
Works wonderfully and is very easy to use!
We make buttons for charities and this machine is so easy to use and very sturdy. I'd recommend it for lots of button making. We've already made more than 100 with zero issues.
J**H
Works Great!- Piece broke, company set replacement right away.
Fun button maker! Has options to make different sizes. Sadly, a piece broke. Reached out to company about replacement. They responded quickly and sent out a replacement button maker. Fantastic customer service. You can not go wrong by ordering this machine. Order it. You will be very happy.
B**Q
QR code doesn't work
I'm trying to access via the QR code and I get that the page is no longer in service. How about an old fashioned web address?
V**L
Easy Machine To Use
The machine was easy to figure out after watching a couple of little demo videos. The printed directions weren't much help but the videos made all the difference.I printed my art on regular 81/2 x 11 paper, used the circled cutters, prepared my stack o'art, and got my materials ready.The biggest challenge for me was to line up the front with the back pin so it came out level and centered towards the top of the button. I was able to figure it out in two buttons.Firsts I paid attention to how I placed my artwork for the front - straight up with the center at 12 o'clock. Then the back piece (metal) I placed the pin mechanism twisted slightly to the left about 20 degrees - almost 10 and 2 clock positions. I marked a dot on the edge of the press with a sharpie so I could quickly line it up the next time. It was consistent from button to button. Pay attention to the smaller button backs that they are right side up for pinning after they're assembled. The pin mechanism is more centered so I had to look at the back of each one before I placed it in the press.I cranked out 50 buttons in a very short time. Two sizes. Easy Peasy.
B**T
Completely useless garbage
The product does not function. You cannot make buttons with it. This is a complete rip off. You could just save time and burn your money instead. Hugely regret wasting money in this pile of trash.
K**.
Big hit!
We used this as a craft for our VBS! We let them decorate their circles however they wanted & guided them thru the machine steps. Some needed help pushing the lever all the way down, but so did I at the end of the night! All ages loved doing it. The younger ones were really impressed with themselves too! It was great!This is a nifty machine... especially since I can change out the molds & do multiple sizes. We already have ideas for our next church project forming! ☺️
T**E
Not as durable as it should be, can be clumsy
If all the parts of this thing held up, it actually works quite well. The directions are a terrible read, but I did find a video that was super helpful, so just find your self one of those vids. It's a bit of a pain switching between the button sizes, but once you get working like a factory, it's pretty easy to swap them out. It's confusing as hell which sizes require the extra little paper ring in the second cup when pressing on the backs. So, don't lose those because you need them apparently. The biggest ring is hard plastic, which at leasts feels like it will last.One thing to note, when making can openers with the largest button mold, REMOVE the plastic ring to seal the opener all the way! Once you do that, it works like a charm.Also, when you put the presser part into the handle on the top, and then try to slide in the bottom parts of the mold on the track, keep in mind you have to lift up the presser part to allow the bottom press to slide through. It's a tight squeeze, but a little jiggle on the top an bottom parts will allow the bottom slide to push under the top punch. Then, they give you these little pins to help you align up the top and bottoms when you push it left and right. They work to a degree, but in my use, it's better to just eye up the top and bottom parts to make sure they are properly aligned before you press the handle. That works just as well. If you depend solely on the machine to do the aligment, you get broken parts, as seen in the picture I attached.In the first step of the press, the little tabs sticking up prevent the top from coming all the way down. This is supposed to be the way it works, and the directions tell you that several times, which is all good and fine. Except that the directions, the troubleshooting, and many reviews say that this things requires a lot of force or the buttons done come out correctly. In my experience, you actually don't need much force at all. The tops and bottoms just need to line up and you use a reasonable amount of force. I used too much trying to avoid ruining buttons, and eventually the excesive pressure making the first part of the buttons caused those buttons to break off the mold. Now, if I want to use that mold, I have to put something between the top and bottom plate to act as a substitute for the little tabs, I've been using the allen wrench key, just sticking it between the two plates to prevent it from going all the way down, but obviously this sucks. Those little parts should never have broken off, but less pressure would have prevented this problem.The other issue with it not aligning perfectly by relying on the metal pins or the machine itself, and not your own eyes, is that one misaligment and some pressure caused the outer edge of one of my molds to break away, as seen in the fourth picture here. It still makes buttons, but the seal of the plastic will always bulge out a little where that mold is chipped, so the buttons don't look "finished" or profesh anymore.Also, note that with the openers and the pin fasteners, you put the image in the left cup, 1st stage off alignment, position it at like 2'oclock and the back in the second stage directly at 12 o'clock and the two will line up perfectly. They tell you 15% in the directions under the FAQ or troubleshooting section for both of these tips, which is annoying it's not the first thing they tell you,but hey, maybe I skimmed over that part the first time.Okay, almost done. They give you the plastic circles to cover the graphics, which work perfectly. But they also give you a ton of actual paper circles. I suppose this is for kids to color on and then make pins out of, which is cool or whatever, but if your want to make actual pins to promote your business like I did, then you need to print something out. Well, you can't rpint on the little pieces of paper, and you can't find any template or paper online that will help you with this. The directions say something about downloading a template, but there is none that they ever email you once you register. Also, trying to find one online is basically trial and error. So, to get the right size, I just adjust my image in Word and print out a test file, print it out and make a button to see if it lines up nicely with the bleed on the edges and none of the image gets folded under the edges. Once I've found the right dimensions, I copy and paste that image in Word and then just cut them all out. You can find some punches here on amazon that work well actually.If you use the punches, the actual paper that punches out will be smaller than the plastic. That actually works just fine when you make the button, but you have to line up the punched die cut circle in the center of the plastic disc before you lay it in the bottom part of the first step of the mold. Static cling can thrown off your alignent when you're putting it in there, so you may have to try a few times, but again, you'll get the hang of it once you enter full on factory mode.They do give you these little plastic cutter thingamajigs to cut circles, but they're really a joke. They suck. if you just cut out your image slightly smaller that the plastic disc it's going under, it's close enough. it doesn't have to be a perfect cirle because they edges are going to get tucked up behind the button, so you'll never see the actual cut edges, so you can be a little sloppy and no one will ever know. The die cut punches I bought work well for the small and medium bottuns, so 1 1/4 " and 1 1/2". I bought a 1 3/4 " for the largest button, but it's not big enough, so those I just cut out with scissors.Best advice...dont' press too hard! Especially on the first stage. If a button doesn't come out, then make another one. The thing is not as durable as it appears to be and will break, and trust me, I'm not a big guy. Don't lose those little paper rings that look like garbage but you actually need. But not for the bottle openers, and not when you use plastic instead of metal backs, which DO NOT come with this, but you can buy them in bulk and they work just as well. All in all, when everything works and you're in the groove, these turn out really nice looking buttons that you wouldn't know weren't made at a factory. Line them up correctly with that 15% offset so the pinback lines up, and they are a really nice little give away. Hopefully I can get replacement parts but as of now, I cannot find a way to see if this is covered under warranty or I can but just the parts that have broken. Again, they're not true metal, just very hard platic, and they will snap.
A**R
button good maker
I bought them to print tiny designs in my boutique business. I recommend them to those who want to buy a nice product for small businesses.
K**N
Easy to use - and great customer service!
I received this button maker 2 days ago and have already made over 100 buttons. It works great and is so easy to use. I had an issue with one of the parts and had to email the company- they responded very quickly and helped me out right away. Highly recommend!
R**Y
Muy practico
Fácil de utilizar! Muy buen producto.Vino completo con todo lo que describen
M**C
Fácil de usar, muy práctica
El instructivo no es muy claro, pero el uso de la máquina es muy intuitivo. Los botones quedan muy bien hechos con poco esfuerzo. Ideal para motivar a mis alumnos.
R**E
Amazing, easy, and fun. Great value.
I bought this to make holiday pins for my coworkers. Just set it up and start! Super simple. Loads of supplies included. Makes 3 sizes. Really happy I chose this item.
C**S
Conforme con la compra, excelente material.
Me gustó mucho es exactamente como lo describen y las piezas son fáciles de intercambiar, y de buen material. Mi inconformidad es que no me llegó el libro pero todo lo demás estoy conforme.
Trustpilot
2 months ago
2 months ago