Desert Online General Trading LLC
Dubai, United Arab Emirates
Desert Online General Trading LLC
Dubai, United Arab Emirates


✨ Stick, Style, Shine! ✨
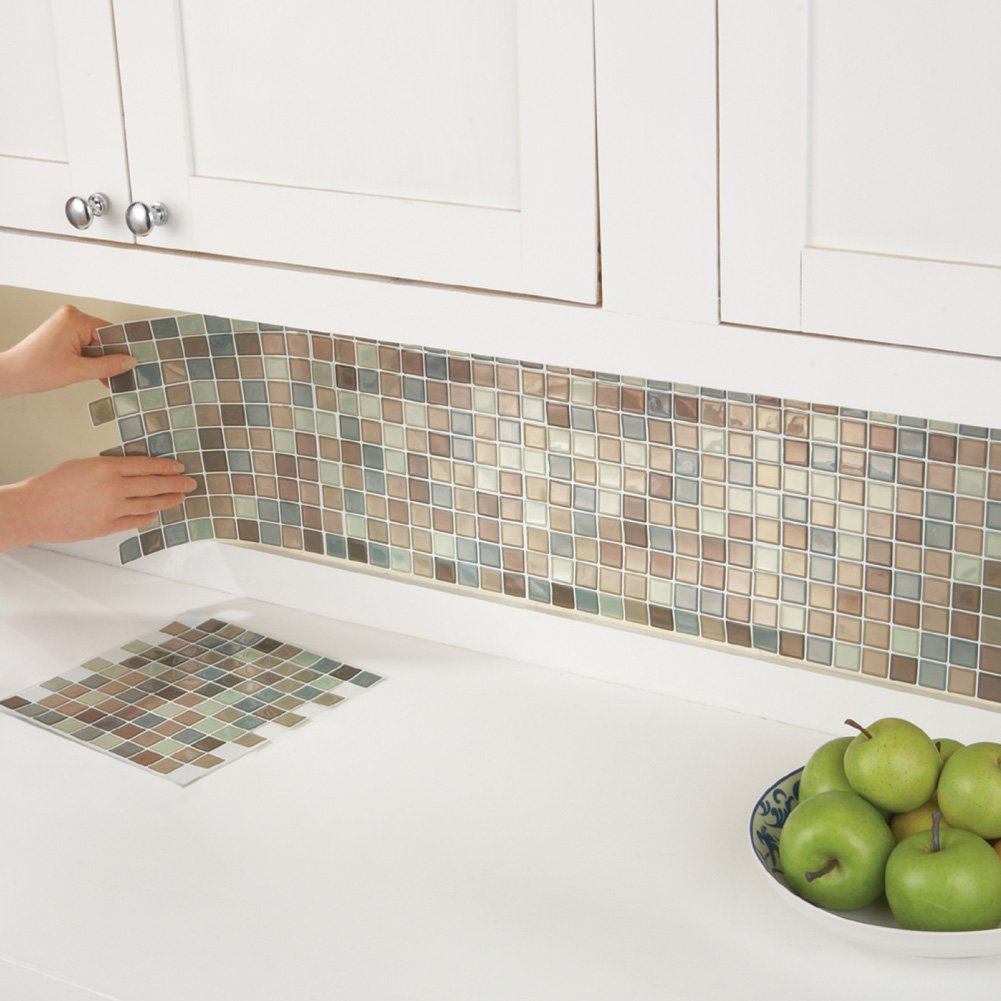
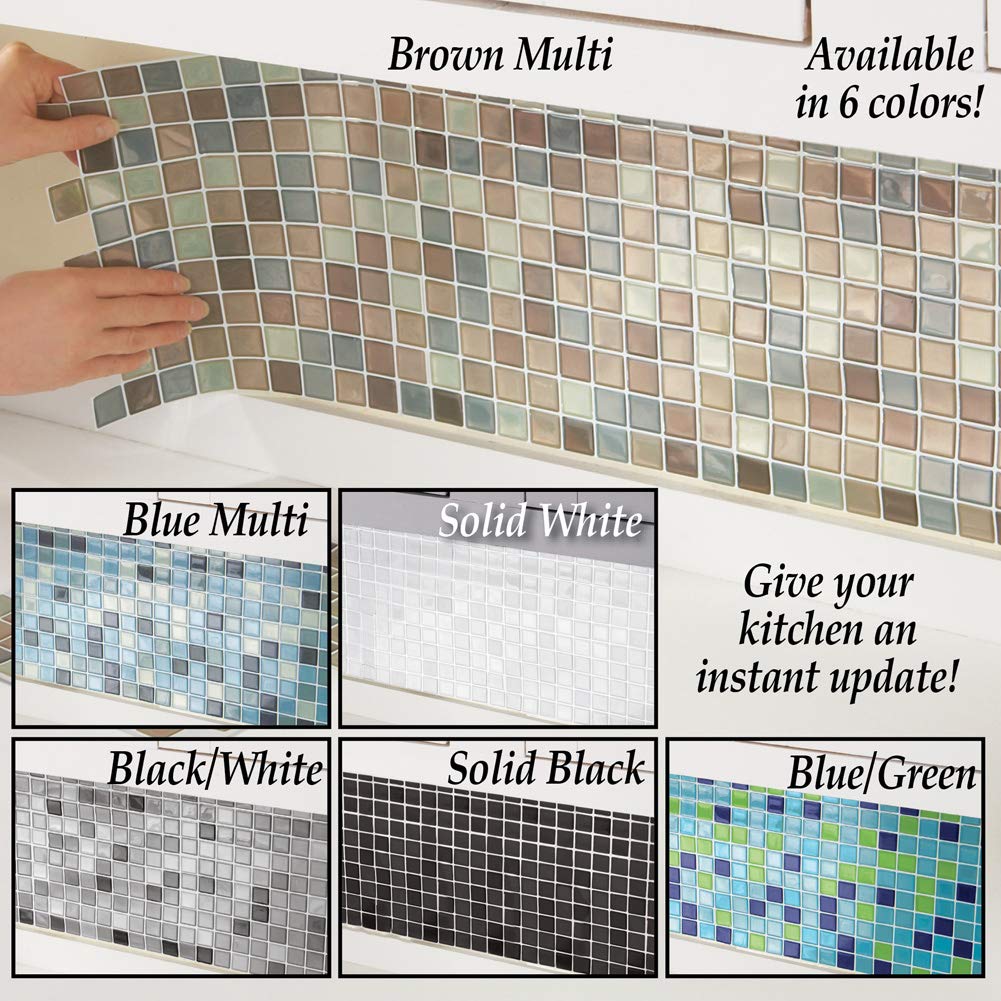
The Collections Etc Multi-Colored Adhesive Mosaic Backsplash Tiles are a set of six 10-inch square tiles designed for easy peel-and-stick installation. Made from durable epoxy, these tiles are perfect for adding a stylish touch to your kitchen or bathroom while being easy to clean and customizable to fit any space.


| Brand | Collections Etc |
| Material | epoxy |
| Size | Medium |
| Color | Brown |
| Style | mosaic-style |
| Installation Type | Peel and Stick |
| Product Dimensions | 10"L x 10"W |
| Pattern | Solid |
| Item Weight | 1.44 ounces |
| Shape | Square |
| Edge Style | Square Edge |
| Unit Count | 4.16666666666667 Sq Ft |
| Manufacturer | Collections Etc |
| Part Number | TLA0108V |
| Item model number | TLA0108V |
| Is Discontinued By Manufacturer | No |
| Item Package Quantity | 1 |
| Batteries Included? | No |
| Batteries Required? | No |
W**.
Beautiful and well worth it!
This was such an easy product to use, we loved that it was just peel and stick. I ordered 2 packages, total of 12 sheets and it was the perfect amount to cover a side wall in our small kitchen. We chose the multi-brown tiles and it was beautiful, it wasn't just shades of brown but with subtle grey and blues mixed in. I did mess up 1 sheet in the beginning but it is a very quick learning curve for this product. Once I got my planning and technique down, it took less than 2 hours to put up and do the finishing details. Some awkward sections I just cut individual tiles out and stuck them on, it blended in very well and I am confident any "repairs" if needed, would be just as simple. I used a simple paper cutter to score the tiles and made the clean cuts with a scissor when needed. The tiles were pretty sturdy and certainly way better than the horrible textured 70's wall paper our home had. I highly recommended trying this stuff out for an upgraded look that won't cost an arm and a leg. It was only about $30 to cover our side wall. We're looking forward to getting more to cover the rest of the kitchen area. I would mention that this shouldn't go behind the stove/oven since it states it is not designed for high heat areas but for the rest of the kitchen area this makes for a perfect upgrade.
R**A
Easy, quick, and inexpensive!
Overall I’m happy with the product. It looks fantastic and was easy to install. I haven’t cooked on the stove yet so I’m still worried about how the heat will affect it. I liked how I could trim it with scissors. I didn’t like that the white faux grout is SO thin and tears very easily.. I didn’t think it was THAT sticky. Sticky enough (hopefully) but may need spray adhesive if it starts falling off. I found that I could reposition pieces the following days. The heat from cooking has not damaged it, I’ve used the oven to bake and broil. I’ve boiled things on the stovetop as well. What an inexpensive and easy way to add a backsplash to your kitchen!By the way I used 6 packs for approximately 14.5 feet of counter space and had JUST enough. Though I found myself stealing a few squares from behind the stove. It took me a total of about 6 hrs to install. Day 1 (3hrs) was painstaking. Day 2 (with previous experience) was a breeze!
E**N
A quick and inexpensive makeover
I placed the tiles on the counter side of my kitchen, it was extremely easy to install and looks fantastic, however about 5 days later some areas started to peel off, I was able to reapply putting pressure, but kept doing it, so I used regular Elmer’s glue to make them stay put, it worked and they have been in place for about a month now, for the price, this are very acceptable, I think that they may last for a couple of years.
F**D
Big miracle on a small budget.
I've shopped Collections, Etc. For years but was hesitant to try their peel and stick wall tiles. But since I retired, my budget did not include a major upgrade to my kitchen. The manufacturer does not recommend using on textured walls. Well, I have to tell you I faced two challenges. I have very textured walls and my kitchen backsplash had a combination of bear textured and painted wall paper. After viewing some videos I decided it would be worth trying. Thank you Collections (and Amazon) for miracle results for about $68.00. My measurements were spot on. I purchased 4 packs of brown-multi, 6 tiles per pack. The colors are exactly what I expected, they are not chocolate, but softer, and the gray is closer to a blue/gray. Shiny, not quite iridescent, looks more like polished stone. Used a good pair of scissors and got better lines than using an x-acto knife. Also, I used an old credit card as instructed to press them in place taking extra care to press in on the grout lines because of the textured wall. Surprise! They don't mention that once you finish smoothing them in place you peel off the thin clear plastic sheet that protects them while pressing. You must remove this film after placing each one. I hung a flashlight while making sure I kept interlocking the tiles in straight line. When I reached the corners I wasn't sure what to do because the wallpaper was placed across it so I took care to cut in with the razor knife and they fit perfectly.I went ahead and put them behind the stovetop, this was bare wall. I had to press some of the squares for a few nights, but they are holding and I've decided to try a strip of peel and stick caulk for a finished look just below the cabinets and I believe this will also help keep them secure. Absolutely thrilled with the results considering I had rough walls and chunks of wallpaper missing. Achieved in a matter of a few hours over two evenings. 'Before' pics will show the nasty wallpaper and bare walls. I'm not ashamed of my kitchen now. Yes, I placed them gently as I put them on, it's advisable to fold the backing half way, this helps in positioning. Don't rush, line up the grout lines and you'll love them, too.
L**B
Great Idea ~Product fail!
Def looks nice but after a week the adhesive ends started popping up. I ignored the warning on the one star reviews and of course now I am stuck with two packs. The good news is it is easy to remove without damaging my wall. I do not recommend this product unless you are using a separate type of adhesive to make sure it stays put. Great idea but product fail.
C**T
Adhesion is not great!
They look good and were fairly easy to install but after a few days they are all lifting all over the place. I'm having to go back in and try to apply additional adhesive under the edges so I don't have to take them all down and waste my time and money.
S**M
Beautiful!
What I learned using this product:- Don’t accidentally stick it where you don’t want it to go, because it is a bear to get off. That was my fault and not the product though. On the plus side, it will stay put.- Make sure you dust/clean off anything you plan to stick this to, before you start. I’m pretty sure this is in the instructions, however I didn’t realize that a small lip would overlap the tile on my project and I didn’t dust/clean the small edge at the top that I folded it on to. I quickly realized my mistake and fixed it for the remaining tiles.- This is a quick, easy and inexpensive product that allows you to add a finishing touch to bathroom and kitchen projects.
Trustpilot
2 weeks ago
3 weeks ago