
Desert Online General Trading LLC
Warehouse # 7, 4th Street, Umm Ramool, Dubai, 30183, Dubai
Desert Online General Trading LLC
Warehouse # 7, 4th Street, Umm Ramool, Dubai, 30183, Dubai

💧 Elevate your hydration game with effortless purity and style!
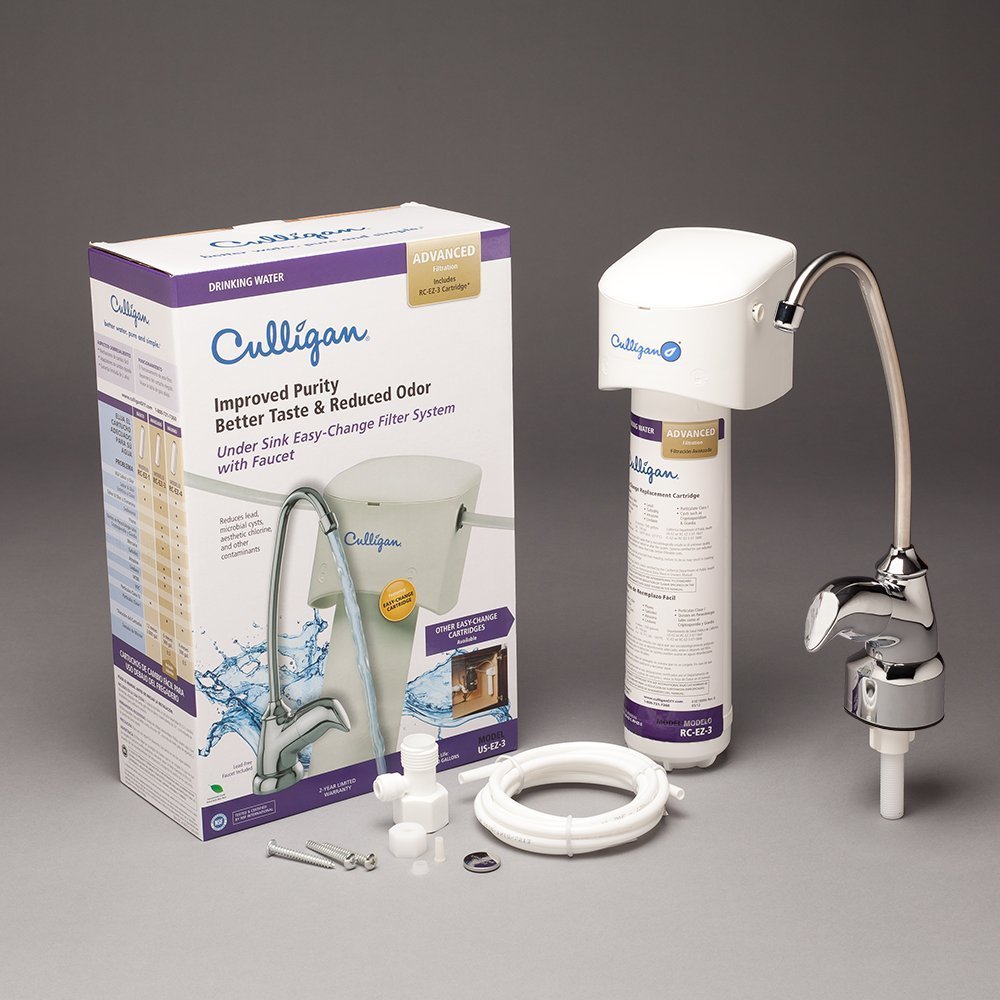
The Culligan US 3 EZ-Change Under-Sink Water Filtration System delivers up to 500 gallons of clean, great-tasting water with a tool-free cartridge replacement. Certified to reduce chlorine, lead, cysts, and other contaminants, it features a dedicated chrome faucet and a smart LED filter life indicator for seamless maintenance and premium kitchen aesthetics.


| Manufacturer | Culligan |
| Part number | 01019053 |
| Item Weight | 1.15 Kilograms |
| Product Dimensions | 20.32 x 15.24 x 30.48 cm; 1.15 kg |
| Item model number | US-EZ-3 |
| Size | 500 Gallon |
| Color | Chrome |
| Style | Advanced EZ 3 |
| Material | Plastic |
| Power source type | Battery Powered |
| Installation Method | Under Sink |
| Item Package Quantity | 1 |
| Number Of Pieces | 1 |
| Flow Rate | 0.5 Gallons Per Minute |
| Plug Profile | Plate Mount |
| Special Features | Chlorine Reduction, NSF certified |
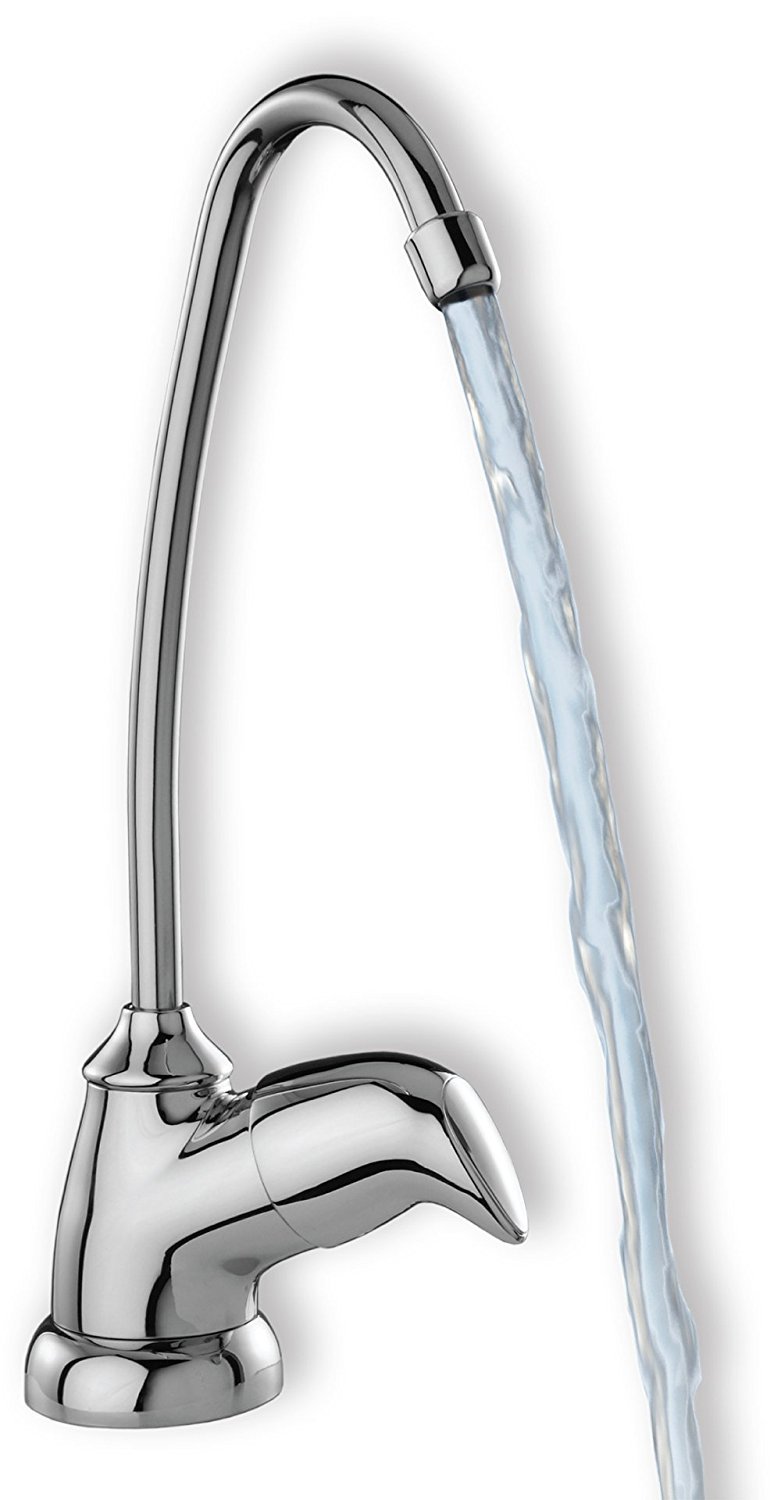
| Included components | head assembly, RC-EZ-3 filter cartridge, lead-free faucet, 1/4" thick clear tubing, mounting hardware, cartridge change reminder sticker, faucet battery |
| Batteries Included? | No |
| Batteries Required? | No |
H**N
Cheap and best.
Cheap and best water filter for dubai water purification. I got it fixed by a plumber
C**E
So convenient and it really is easy!
This is the fourth time I've bought this filter for different taps in different houses. I love it. It's a relatively easy set up and the ez filter works better than a Brita and so much cheaper and more convenient in the long run. No need to get frustrated when someone doesn't remember to refill a pitcher.If you live in Canada the included connector for the water line likely won't work. Save frustration and order the correct connector at the same time. Search Amazon for B07JVM7WLS - for us with the 3/8 braided lines it worked - this one is a 3/8 x 3/8 x 1/4 connector. This was $20.I wish I could put one in at my work as well! Highly recommend!
K**R
Excellent water filter
Easy to install, high quality water filter. It delivers water that, taste wise, is similar to distilled water.
B**N
Excellent filter for a decent price
I had one of those filters that you put on the end of your faucet for a number of years. It worked pretty well until I finally noticed that water had started leaking out from the base of the faucet neck. Apparently after all this time the back pressure caused by that filter and the weight of it levering down on the neck was causing the internal gaskets to fail. I removed the filter and the leaks stopped. But, this left me without filtered water. I wanted filtered water still but without the hassle of a pitcher in the fridge or having to replace my entire faucet due to the back pressure and levering caused by the on the neck one.Looking on Amazon I found a number of filters of varying prices and ultimately I decided to take a chance on this Culligan unit because the price was decent, the name is well known to me, and it had pretty good reviews. So far in the month or so that I've had it installed I'm quite satisfied with it. The water comes out at a very decent pressure, far better than my old on the faucet based filter.The kit comes with a plastic bracket that fits to the wall, some plastic tubing, a little adapter to put in-line with your cold water feed, some screws, the filter cartridge and the faucet.The faucet is not a super high quality item. It's mostly plastic, but it feels pretty solid for my needs. It actually comes in several pieces that you put together during the installation.I started my installation by drilling a hole in the sink. Make sure you have a sharp drill bit of the right size. The size they ask for is 5/8" which is one size larger than you'll find in most off the shelf drill bit sets. I thankfully had a 3/4" bit laying around from a different project, but my bit was fairly dull after that previous project so drilling was a bit of a challenge for me. I compared my 1/2" bits to the threaded stem on the base of the faucet and decided it just was not worth the risk of making too small a hole. The threads on the stem are all plastic and could be easily damaged by jamming the works into a hole that wasn't big enough. So do yourself a favor and get the right size drill bit before you start.After I had the hole drilled I unscrewed the wing nut from the base of the faucet and removed the metal plate. This left a plastic gasket on the base of the faucet that came off and I had to put back in place. After looking at the pictures I finally realized that the handle is supposed to go on the side of the faucet so I set the faucet in the hole and then reached under the sink to put the metal plate on and thread on the nut. Be careful not to over-tighten this as you could easily strip those plastic threads. Once it was snugly on the base felt pretty solid. I then took the neck of the faucet and attached it to the base and it looked pretty sharp, with no sign of the mangled hole I had drilled to put this in place.Next I shut off the cold water and proceeded to disconnect the feed line from the cold water connection on my faucet. I applied a little nylon plumbers tape to the connection and screwed on the plastic connector that came with the kit. A little more plumbers tape on the bottom and I reconnected the cold water feed line.After that I took the plastic bracket and using a sharpie clearly market the in and out sides so I wouldn't get confused later and hung it on the back wall with the included screws.Once all the major pieces were in place I took the plastic hose line, this is the same diameter as the kit that feeds my ice maker on my fridge, and carefully measured and cut two sections. On the base of the faucet you'll have a little plug that goes into the tube and a collar that goes over the hose. This threads onto the base of the faucet and once snugged down creates a good connection. The other end you simply wet and insert into a friction lock on the plastic bracket. The other line is even easier as it uses the same friction locks on both the hose line adapter and the plastic bracket.Finally I took out ye olde sharpie and wrote the date on the filter to remind me when I had installed it and connected it to the bracket by twisting it into place. Once it was snugly connected on went the water and after a quick check for leaks I turned on the faucet and a jet of water came streaming out. The instructions say you have to let it run for about ten minutes or so to let it flush out material from the filter. After the directed time I filled up a cup of water and tasted the sweet tasteless taste of success.The best part is that there is absolutely no impact to the water flow on my regular faucet and the new faucet provides water at pretty much full pressure. I'm sure this will go down over time but it is much better than my old filter.Looking at this solution I can see where if I ever so desired to step up to the two or three cartridge solution I could easily swap out the bracket by simply removing the plastic hoses from the friction locks. So if you are questioning whether you need the single cartridge or three cartridge solution know that you should be able to easily upgrade.
M**N
easy installation
Improved our water quality! No more lugging water from the store! Thank Goodness!
R**Y
No leaks, water tastes delicious. No floaties. Easy install.
UPDATE Sep 2019:It's been more than a year using the SAME CARTRIDGE. Our water processing plant is currently having issues with the quality of water and its coming out of the pipes very dirty. Using just the BASIC cartridge, the water comes out crystal clear, drinkable. This baby is amazing. Still no leaks whatsoever. Buying another replacement cartridge now just in case.Oh, the nut that tightens the unit to the sink broke because its plastic. Just buy a steel nut and problem solved. Should cost you like 3 dollars.-------------------------------------------------------------------------------------------ORIGINAL REVIEW:After reading the reviews on this, I was skeptical. Some people said that the filter was not of enough quality or that it would not filter the necessary impurities. I considered that we live in a metropolitan area where the city water is just about decent. So we went with the basic filter option. Also, a reverse osmosis system is very expensive and wastes a ton of water (about 3 gallons of waste per 1 gallon of drinkable water).I have to say the results are amazing, even with the Basic filter:- No solids or visible impurities in the water. This means no "floaties" or "flakes" which is the way people refer to the calcium, manganese or magnesium precipitates that can be seen in cold or room-temp water. Although these precipitates are harmless (they in fact occur naturally in other foods we eat), they taste funky and look rather discouraging to drink. This filter took out all of that.- The taste of the water is great. Even at room-temp, the water is easy to drink and delicious.- the water pressure is quite nice with the basic filter. (see pictures)As for the installation, just follow the instructions and a few Pro-tips:PRO TIP: The mark included in the white silicone tube is 5/8 inch long. When you cut the tube to your liking, go ahead and mark the other side so you'll have no trouble fitting it to the right depth.PRO TIP: If you need to drill the extra hole in your sink. It will require the 9/16 bit. I tried the 5/8 hole as mentioned in the instruction, but the white tube does not fit. Use these to drill the hole:- TEMO M35 cobalt 9 size double flute step drill 3/8" shank 1/4" to 3/4"- CRC 03400 16oz Truetap Cutting Fluid Heavy Duty- Starrett 117C Center Punch With Round Shank, 4" Length, 1/8" Tapered Point DiameterYou can check out my reviews on these 3 tools as well, for more details on how to use each for this application.PRO TIP: DO USE plumber's tape (the white one) on all male fittings. This will ensure no leakage.PRO TIP: when i first turned on the water, nothing came out. This was because the filter needed to click TWICE when tightening it in. Just make sure its nice and tight.Installation observations:- No leaks whatsoever were observed. A few people have complained about leaks, for us, this was not the case. We did use plumber's tape.- The process was very straightforward. Took us more time to clear out the area under the sink, than it took to install.- We left the filter loose (did not mount with screws) to be able to take it out and replace it easier.
Trustpilot
1 month ago
5 days ago