
DOWNLOAD THE APP


Customer Services
Copyright © 2025 Desertcart Holdings Limited
DOWNLOAD THE APP


🚗 Elevate Your Drive with Unbeatable Protection!
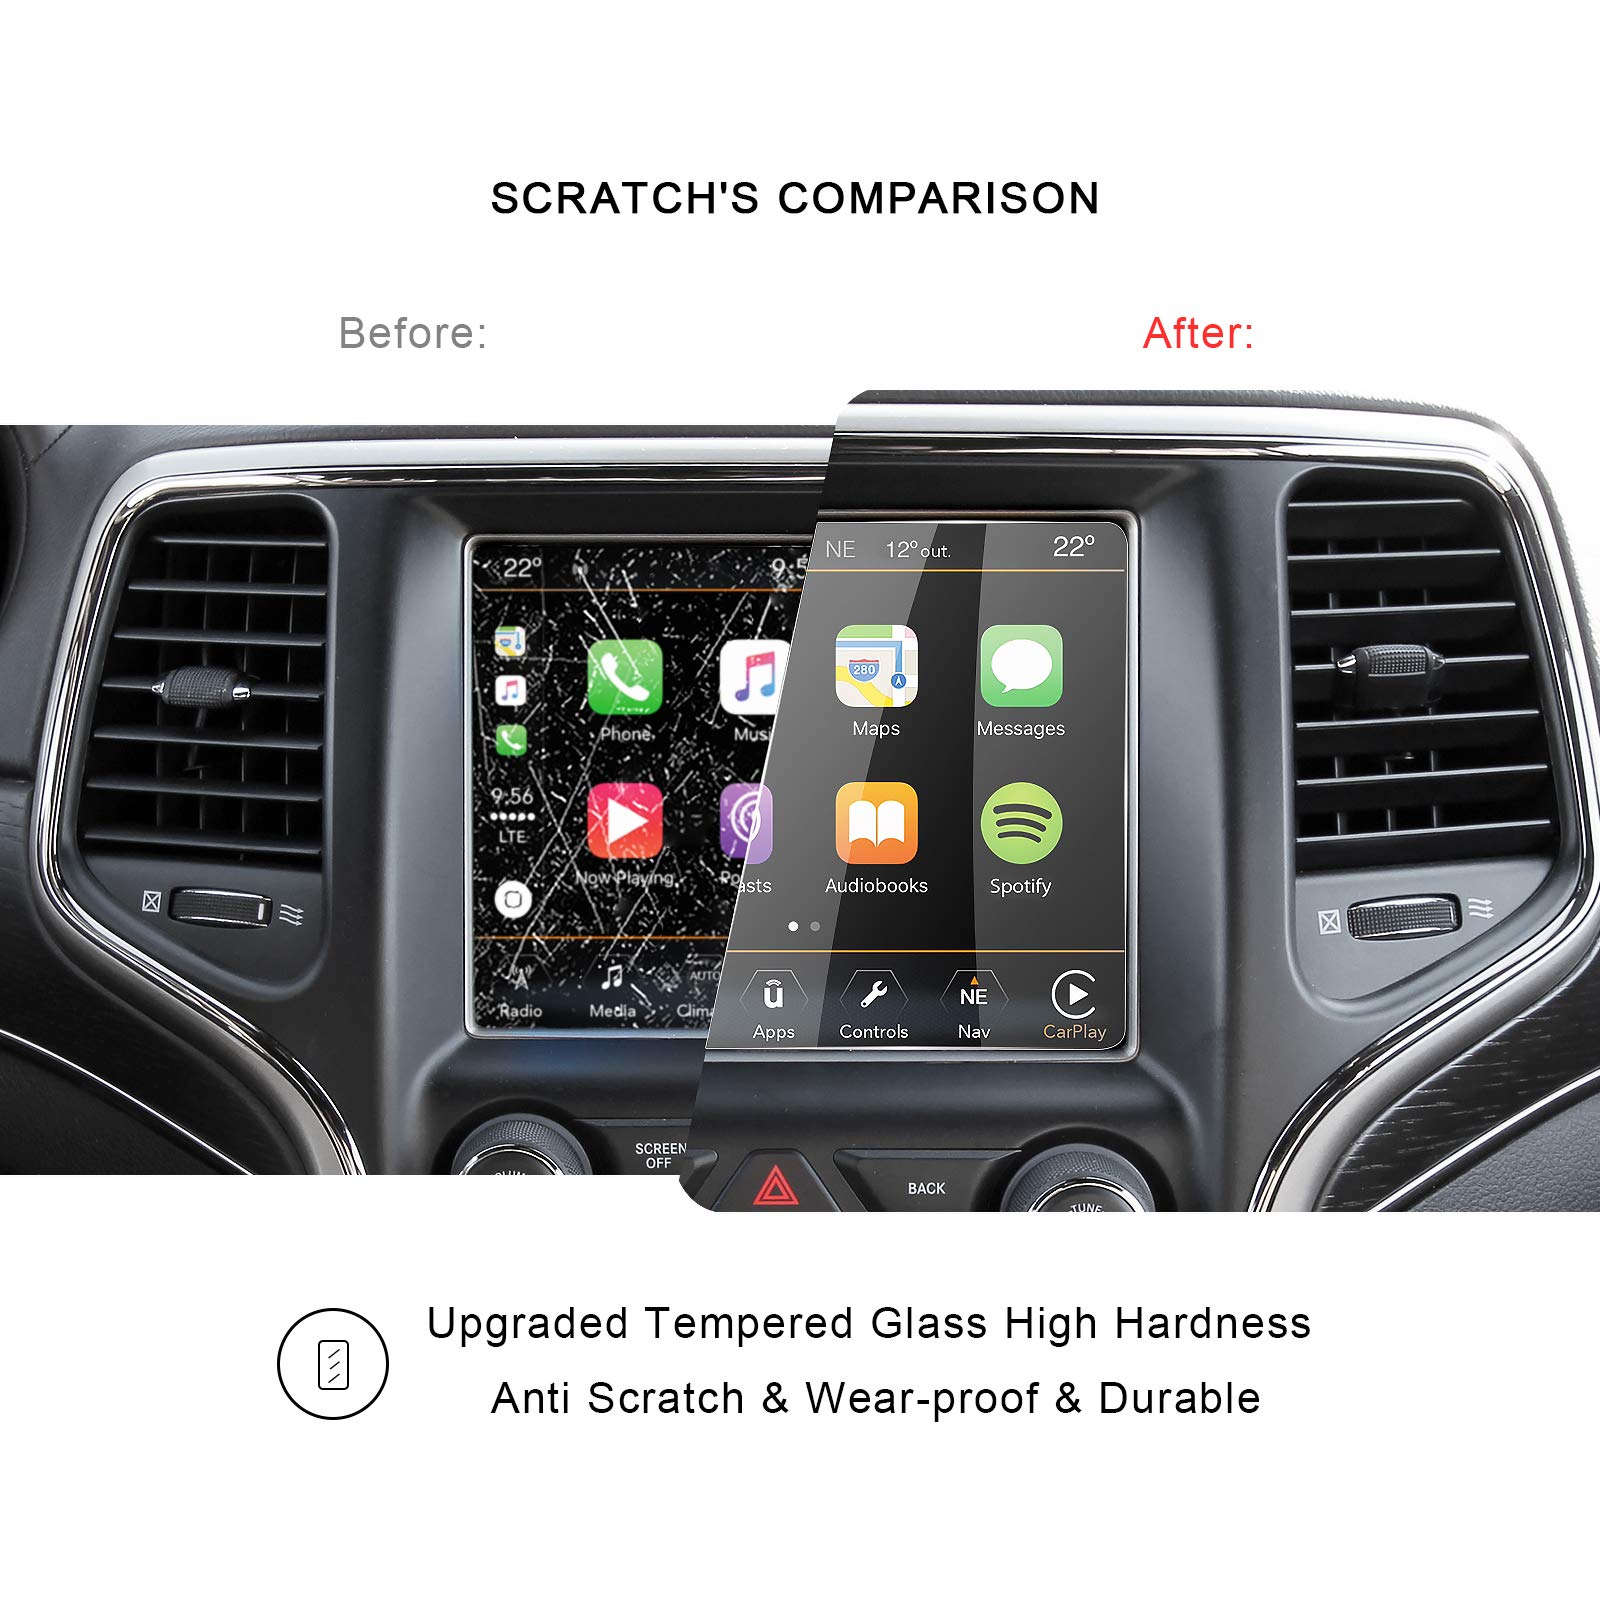
The RUIYA HD Clear Tempered Glass Screen Protector is designed specifically for the 2014-2018 Jeep Grand Cherokee Uconnect Touch Screen. With a 9H hardness rating and a thickness of just 0.25mm, it offers superior protection against scratches and smudges while maintaining the original touch sensitivity and clarity of your display. The oleophobic coating reduces fingerprints, ensuring a clean and smooth navigation experience. Easy to install with a precise laser-cut fit, this screen protector is a must-have for any Grand Cherokee owner.


| Finish Type | Matte |
| Water Resistance Level | Not Water Resistant |
| Screen Surface Description | Smooth |
| Clarity | 0.99 |
| Screen Size | 8.4 Inches |
| Compatible Phone Models | 2014-2019 Jeep Grand Cherokee Uconnect Touch Screen Car Display Navigation Screen Protector |
| Special Features | Anti Scratch |
| Compatible Devices | Navigation System |
| Item Hardness | 9H |
| Unit Count | 1.0 count |
| Number of Items | 1 |
| Item Dimensions L x W | 21.3L x 21.1W centimeters |
| Material Type | Tempered Glass |
T**O
Clear and crisp
If you're going to replace the uconnect screen you might as well pull off the entire front surface trim of the frame Don't try to Mickey mouse this screen by putting it on with the edges sticking out and think you can do it unless you want to waste money. it's very easy, all you have to do is take a little plastic knife or spatula and pry on the uconnect frame trim. There's YouTube videos on how to do this . Now since you removed the frame trim it's much easier to get the touch screen on. When you start It's best to clean it with a clean rag and make sure you roll up the windows on your vehicle so you don't get any debris or dust on the screen, you might as well wait about a minute until the dust settles down. Carefully unpeel the touch screen, align it, and slowly put it on. Try not to force it. It will naturally go on. then you can take a light cloth and dab it and push out the air bubbles but do this lightly not so hard. If you still have air bubbles that won't go away, do not worry, it will eventually clear away all the bubbles in about 3 to 4 days Just be patient. And you're good to go.
R**M
Increible
De los mejores productos que he encontrado en Amazon! la mica mas fácil de utilizar y colocar, tarda en llegar pero vale la pena esperar
L**L
Looks great and fits perfectly!
Fits my 2016 Grand Cherokee PERFECTLY. Just be patient and take your time cleaning the screen and lining up the protector. No bubbles, no cracks, looks great and works great too!
G**.
Take out the radio to install this correctly
I just installed the protector. I had the dash bezel and radio out of the truck already since I was working on other electronics. I can't speak for the touch screen function or screen appearance yet but it installed perfect and does give the screen an HD look. Looks oem.Here is how I did it:I won't get into how to remove the front bezel and radio itself on my 2016 Jeep Grand Cherokee but it's simple. No tools really required for the bezel removal but a typical interior trim plastic tool is helpful. The radio itself is only held on with 4 x 7mm screws and then you just unhook main harness and 4 or 5 other connections depending on your radio setup.1. Clean the radio screen exactly as per the instructions by placing it on a flat stable surface.2. Check and recheck there is not one piece of dust or lint on the screen. The dust stickers are super important to use as a last step.3. Place the glass protector on a mirror or super smooth surface like a granite countertop with the back side adhesive against the surface.4. Stick the suction cup in the center of the protector. This is now your holder as you remove the adhesive backing (very slowly and carefully) and also used for center positioning onto the radio screen.5. Hold center on radio from suction cup and also using a finger from your other hand on the protector edge to hold steady and as another guide. Do NOT touch the adhesive side of the screen protector once you remove the backing. Once lined up, you just let the protector "fall" into place and you will see it adhere. You will see slight bubbles but not a concern. I had one large one where the suction cup was sucked onto the protector. No worries.6. Patiently and carefully take a credit card with its even edge and push from the center outward to rid all of the air bubbles. The big one I had at suction cup spot in the center took the most effort but after 5 minutes or so I got it pushed to the edge of the protector and was eliminated.7. You can also use a hairdryer to heat up the protector as your doing this process to assist though I didn't need to use one.**Update** I installed the radio and touch function as well as screen clarity is great. No degredation.
M**N
It went on ok but had two very small pieces of debris on the bottom side of the protector
I purchased a new UAQ system for my Jeep and it arrived the same time this did so I had the opportunity to place this protector on the display before I even installed it in the Jeep. I removed the factory screen cover from the unit and held it at an angle to ensure it was clean and free of debris. I still used the provided alcohol wipe and dust stickers just to make sure it was clean. I washed my hands, checked the screen again and then pulled the backing off of the protector. Holding it by the provided suction cup and just on the very edge I lined it up and applied to the screen. It went down well and the bubbles came out easy but there were two small bubbles on the bottom that looked like something was on the screen and not allowing the protector to sit flat. I was able to remove the protector, clean the screen again and place it again to the same results. Holding the protector up to light I could barely see the debris and there was no way to remove it without making it worse. I decided to remove the protector and just install the unit without one. I did contact the company and will increase my stars if they are true to their word and send me out another one.For those that have said they were unable to remove this without breaking it. I barely have fingernails and was still able to gently pull up one side and keep even pressure on it to remove the protector without breaking it. I did this at least three times and the protector is still in one piece sitting on my counter right now.UPDATE: The company is sending me a replacement protector.UPDATE 2: I got the replacement and it went on perfectly.My suggestion is to remove the bezel, turn the vehicle on and line up the protector with the image on the screen. I did this and when the bezel is on I see no edges.
Trustpilot
3 days ago
1 day ago