We remain fully operational. Our teams are working around the clock to ensure your deliveries continue safely.

DOWNLOAD THE APP


Customer Services
Copyright © 2025 Desertcart Holdings Limited
DOWNLOAD THE APP

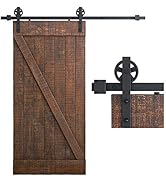
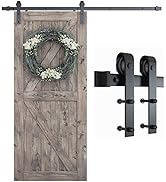
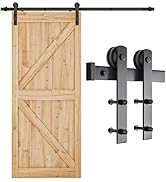
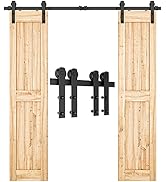
🚪 Slide into style with silent strength!
The SMARTSTANDARD 6.6 Feet Heavy Duty Sliding Barn Door Hardware Kit features a single-piece steel rail for easy leveling and smooth, quiet operation. Designed to support doors up to 220 lbs and fit 40" wide panels, it includes clear installation instructions and customer support, making it ideal for DIY enthusiasts seeking a durable, space-saving door solution with a modern aesthetic.


| ASIN | B015DFW7CU |
| Batteries Included? | No |
| Batteries Required? | No |
| Best Sellers Rank | #5,599 in Tools & Home Improvement ( See Top 100 in Tools & Home Improvement ) #7 in Sliding Door Hardware |
| Color | Black |
| Customer Reviews | 4.5 4.5 out of 5 stars (4,190) |
| Date First Available | January 12, 2015 |
| Included Components | sliding-door-hardware |
| Is Discontinued By Manufacturer | No |
| Item Package Quantity | 1 |
| Item Weight | 8.18 pounds |
| Item model number | Sliding Barn Door Hardware |
| Manufacturer | SMARTSTANDARD |
| Part Number | SDH-0066-STANDARD-BK |
| Pattern | 6.6FT Kit [Single Door] |
| Product Dimensions | 81.89 x 3.15 x 3.15 inches |
| Size | 6.6 Feet |
| Style | Modern |
J**N
Catio Door, Quality Product, Outstanding Company
The bottom line: This is an attractive, high quality barn door kit, with heavy-duty hardware, available at a very good price. It's easy to install, with excellent instructions. It works well for my sliding catio screen door. The company, SmartStandard, is exceptional and provides superior customer service. I highly recommend this product and buying from SmartStandard. The details: I purchased this barn door kit earlier this year when planning a small catio for a rescued kitten. I bought a used/returned kit to save a few dollars. The catio was planned to fit against the house on a walkway outside bedroom windows from which the cat would access the catio. I did not want a swingout door on the catio front because the catio was going to be adjacent to a patio with an above ground pool and a small rocky garden area with a small potted tree. There was limited room to pass and open a door, and I thought a sliding door would work best. Hanging a door with barn door hardware seemed like the best DIY option (for me, a 63 y/o woman). The catio is constructed with two 7' tall shelving/cabinet units that someone was discarding (which I sanded, primed/sealed & painted for exterior use), connected by a roof (made of 2x4s and corrugated metal), with a stationary screen panel "wall" and a sliding screen door on the front between the two cabinet units. I cut out windows on both sides of the cabinets, on the outer sides for windows (framed with pet proof screen and hardware cloth) and on the insides for the cat to access from the catio main interior. On the front open shelves of the cabinets, I screwed on decorative screen panels, with pet proof screen adhered to the backs of the leaf design panels (to keep insects out and little cat arms/paws in). While I believe the barn door kit is for interior use, I planned an overhanging roof eve over the catio front and sides so it would be sheltered, and I also put up some hooks to hang clear shower curtains (3) stringed on a clothes line around the catio when it rains. The catio is west facing, in the South Bay area of Los Angeles, and could get wind-driven rain. For much of year, it will get a lot of sun. (Raining now, so one of my pics includes the shower curtains.) The catio is 11' wide, 2' deep, 7' tall, with a 7' open space between the cabinets that stand on each side. I used a 7' long 1x6 board between the two cabinets, as a header board on which to mount the barn door rail. While the kit includes heavy duty long screws and anchors for mounting the rail, I bought some nuts and bolts (5/16-18 x 3"), because I was not mounting the rail into a wall but only on to the header board. I was also planning a lightweight screen door. I decided to make the stationary screen panel wall and the sliding screen door both 4' wide, so there would be a foot overlap in the center, for added security. While I was originally going to mount the stationary screen panel wall flush with the header board, I decided to secure the front frame of the screen wall, and a strip of wood vertically on the right (for the door to overlap when closed), to the front of the header board, under the door rail, to narrow the gap between the door and the stationary screen wall the door would slide over. The stationary screen wall and the screen door have screen and hardware cloth stapled on and sandwiched between 3/4" thick wood, making them 1.5" thick around their frames. I also made my own door glides for a secure fit, so I would not have to worry about the cat trying to squeeze out the sides of the door. Since I was working on this primarily by myself, everything took a lot longer than I anticipated. (I had a vision, a general plan in my head, working out the details as I went along, and initially thought it would take a few weeks to a month. It took 4 months after starting the work to completion.) When I finally got to the point of building the door, a few months after purchasing the barn door kit, I found the kit (which I had bought used/returned) was missing the two anti-jump "rubber ends" that attach to the top of the door and prevent it from lifting off the rail. Upon discovering the kit was missing the two small parts, I contacted SmartStandard to see if they could send the missing parts. If not, I was prepared to buy some but thought I'd ask first. I emailed the company at the contact email I found on Amazon. I received a professional, friendly, and gracious response within a day, offering an extremely generous resolution. It was more than I would have asked or expected, and I tried (unsuccessfully) to decline; because the parts were not available to send separately, SmartStandard sent a full replacement kit. The replacement kit arrived within a few days. I can't remember a time in my life when I have received such professional, kind and courteous responses to my customer service inquiries. Each time SmartStandard responded to my emails, including a couple after my initial inquiry about the small missing parts, it was with kindness, professionalism and enthusiasm for my project. The barn door hardware was easy to install. It works perfectly for my catio door, and it looks great. SmartStandard has been absolutely lovely to work with. I will definitely look to SmartStandard's products for other DIY home projects. I recommend this kit and SmartStandard products without reservation.
A**G
Smooth and whisper quiet
This barn door style hardware set is a dream come true. The size was perfect for the door that I made, and it’s incredibly sturdy and durable. The placement of the bolts didn’t match up with the stud pattern on my wall, so I had to put up a support board behind the rail like what is shown in the listing, but that was no problem. The wheels glide along the rail smoothly and quietly which is very satisfying, and it requires almost no effort to move the door back-and-forth along the rail. I figured it would make some noise like the pocket doors in bathrooms or perhaps even a closet door, but it’s whisper quiet. The instructions were simple and straightforward and did not require any specialty tools to install.. Fantastic quality for the price and it works incredibly well. If you’re having any doubts about which one to get, I would recommend this one.
K**Y
Excellent kit, highly recommend
Excellent hardware kit! It is quality, especially for the price. The instructions are clear, though I'd recommend going up a half inch above what it says, so to be completely confident the door won't drag. Smart Standard is also very responsive and helpful with questions. All in all, excellent purchase!
J**L
Easy to assemble and comparable to more expensive kits
Was skeptical about the low price but am glad I took the plunge to save money. Easy to assemble, directions easy to understand. Door glides smoothly and makes little noise. Great quality never would know it was inexpensive.
G**N
Really good hardware set, instructions could be better
Hardware looks nice and seems solid - it’s been up 48 hours and it’s still hanging...which is a good sign. I will say that I am fairly handy and the installation was a bit more involved than I was expecting and the instructions were not great. The instructions don’t have bolt size, dimensions or even what size drill bit to use for pilot holes. Installation took me the better part of a day, so be patient. But the end product looks good and functions well. One more thing - I chose not to use the door guide that came with the hardware as I didn’t want to use a router - so I bought an adjustable guide that was amazing and easy to install. Overall, really good product and I’ll order again for my next door - just can’t give it 5 stars because a clear installation manual would have saved me a good bit of time.
K**D
Worked great, reasonable price
Worked great, easy to install, rolls smoothly and looks good. Seems plenty heavy-duty enough for the door I used.
D**.
Great quality, heavy duty barn door hardware.
Fantastic quality barn door hardware. Smooth glide easy installation.
K**A
Easy to install
Very simple to install. Make sure you follow the instructions correctly so you get the best bang for your buck. It sits very nice and opens and closes super easy with different thickness of door. It’s really good material so it looks really nice.
Y**O
El producto es lo que esperaba, llegó a tiempo y el vendedor me dio muy buena atencion
Trustpilot
2 weeks ago
2 months ago