We remain fully operational. Our teams are working around the clock to ensure your deliveries continue safely.

DOWNLOAD THE APP


Customer Services
Copyright © 2025 Desertcart Holdings Limited
DOWNLOAD THE APP


❄️ Upgrade your chill game with precision & power!
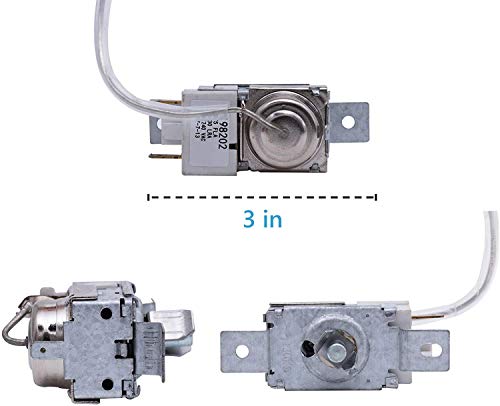
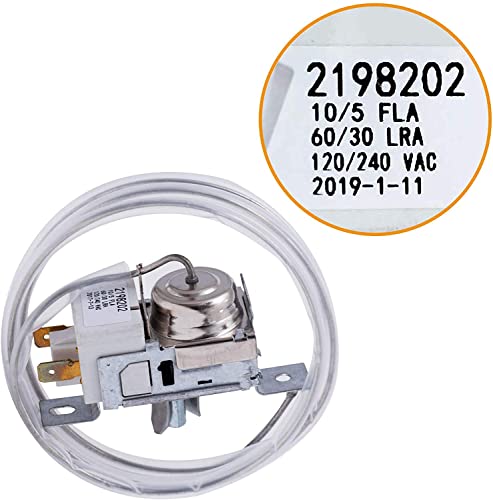
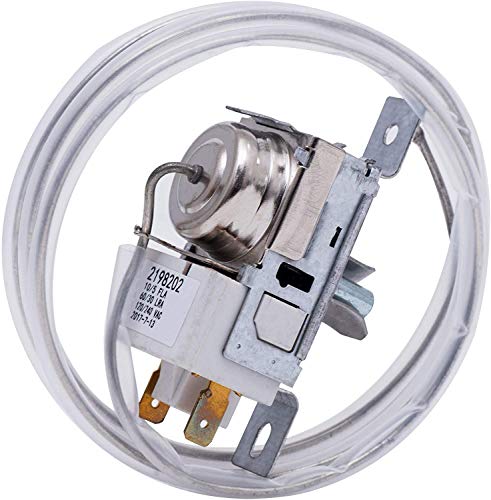
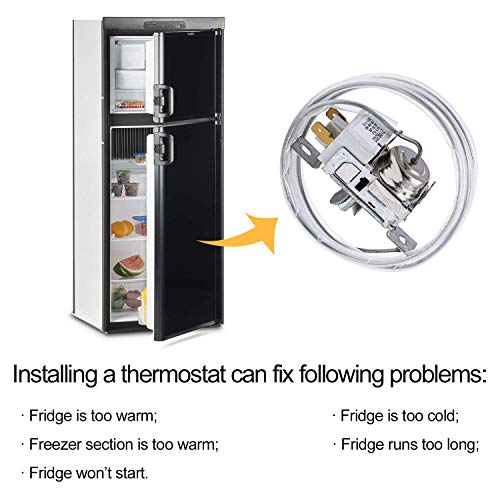
The 2198202 Refrigerator Freezer Thermostat Replacement is a high-accuracy, analog temperature controller designed for seamless compatibility with major brands like Whirlpool, Kenmore, and KitchenAid. It offers customizable temperature and delay adjustments to optimize cooling cycles, improve energy efficiency, and extend compressor life. This durable, reusable part comes with a lifetime warranty and a 100% money-back guarantee, making it the smart, cost-effective DIY fix for your fridge or freezer thermostat issues.


| ASIN | B083M8TQ7Q |
| Age Range (Description) | Adult |
| Best Sellers Rank | #229,752 in Tools & Home Improvement ( See Top 100 in Tools & Home Improvement ) #346 in Freezer Parts & Accessories |
| Brand | CIZZ |
| Color | White |
| Date First Available | February 4, 2020 |
| Display Type | Analog |
| Included Components | Refrigerator Freezer Thermostat |
| Indoor/Outdoor Usage | Indoor |
| Item Weight | 3.52 ounces |
| Item model number | 2198202 |
| Manufacturer | CIZZ |
| Model Name | 2198202 |
| Outer Material | Plastic |
| Package Dimensions | 3.62 x 3.58 x 1.54 inches |
| Power Source | Battery Powered |
| Product Care Instructions | Wipe Clean |
| Reusability | Reusable |
| Special Feature | High Accuracy |
| Specification Met | CE |
| UPC | 738626631345 |
| Unit Count | 1.0 Count |
| Upper Temperature Rating | 50 Degrees Fahrenheit |
C**O
In a sea of somewhat mixed reviews - READ ME!
OK, strap in as this review is more of a step by step since documentation as a whole is poor and reviews here are really hit or miss. Keep in mind this part is pretty much universal so there are some steps required to calibrate for your use and appliance. I used this part to replace the OEM thermostat in my KitchenAide wine cooler - essentially a mini-fridge with a glass door. (As stated earlier, there are different variations of this part that will replace other OEM part numbers so do your research between WPF-10, WPF-20-, WPF-30, etc...) I diagnosed OEM part failure (compressor not starting) by jumping the compressor wire (blue in my unit) and load (black) together, bypassing the thermostat, which started the compressor. After the process below things are working well and I will update if that changes. Installation was straight forward: unplug cooler, unbolt the old part, unplug wires, and plug BLUE wire in the new unit's terminal marked C and the black in the L terminal. Leave the new part loose (unbolted) until final adjustments are completed - just make sure wires are secure. (Electrical tape helps) 1st issue I ran into was the original thermostat probe wire (capillary) was affixed to a bracket on the bottom-backside of the cooling coil in the fridge. Carefully loosened the 2 screws and unwound the probe wire and completely removed the old part. The new probe wire was just a bit shorter, so it took one less wrap around the bracket, but secured in fine after tightening the screws slightly. With the new part connected, set main temperature dial in the middle and powered on and ran for 30 mins to let cooler chill. Using an internal thermometer, I found the temp quickly dropped below freezing. Unplugged power and 1st adjustment was a full turn CLOCKWISE on the temp. range adjustment screw (on the side of the new part). Plugged back in and ran again, but still dropped below freezing. Repeated the previous adjustment and this time the temp settled at 37 F. This is great as there is plenty of room on the main dial as it is still set in the middle of the adjustment range. I next observed that the cooler held an internal/ambient temp of 37 F with no fluctuation, but to achieve this the cooling cycles were very short and often. The compressor would kick on for 1 minute and then shut off for 2 minutes before turning on again. This would surely burn out the new thermostat quickly and possible damage the compressor. This is where the 2nd adjustment screw comes into play. The delay adjustment is on the rear of the unit (opposite the main dial) and is smaller than the temp adjustment screw so use a precision philips head screwdriver. Unplugged fridge and I gave delay screw a half turn COUNTERCLOCKWISE. Plugged fridge back in and let it run through 2 cycles to reach temp and then started my timer again. This time, the compressor kicked on for 1.5 minutes and shut off for 3.5 mins. Progress, so I repeated the adjustment, but turned the screw 2 full rotations COUNTERCLOCKWISE. Next time the cooler ran for just under 2 mins and shut off for almost 10 mins. Now that we're getting closer to ideal cycle times, the final adjustments will be keep the cooler in range. 2 mins on / 10 mins off allowed a 3 F degree swing in the cooler which is good, but the range can be a little higher to increase energy efficiency. 5-7 degrees was achieved after final adjustment of 1.5 more rotations of the delay screw. This has the compressor running for about 2.5 mins and off for about 18 mins. Turning the main dial a bit colder, clockwise, temps range from 35 - 42F. After adjustments complete, bolt in the new unit to finish. Since there are many different versions/variations of this part some of them may not look the same, but they should all share the same concepts. I have attached a technical diagram for a very similar part I found online. This was a big help to me so hopefully it is equally useful to others. Give yourself a few hours to install and adjust. I worry that those who simply throw this part in without taking the time to make the proper adjustments will find themselves in the same spot in the near future after this part fails from the oversight or worse the compressor burns out. March 21, 2022 Update: Still working well, but after moving the cooler into the house after we converted our formal dining room into a den with a bar I decided to make a small adjustment - not needed, just me being compulsive. I did not post this review for any other part numbers, but if you are here reading for any of the WPF units, this review/guide does still apply, but your connections may be different and you probe/thermo wire may be a different length. July 26 2022
L**.
installs easy and works!
fixed our freezer! cheaper than buying a new freezer. easy install too
S**N
Works - be patient need to use adjustments
Similar to other reviews, you have to study and adjust. There is a temperature range screw and a duty cycle (on/off frequency) adjustment. These are Hugely Helpful! Other units I purchased would not work for my application for a beverage cooler, where the temp ranges are typically higher. My unit's compressor would just run non stop for days struggling to try to get to the lower temps that it's just not designed to do. Suggest putting the unit in the fridge with the thermistor lead just coiled in the main chamber. Run it and adjust the screw until you get fairly close to your desired range. NOTE: One issue when I did install the long probe through the tub it places the sensor on the back wall, which gets a little frosty and colder than the rest of the fridge. So, this required a little more tuning and adjustment as the fridge temp climbed back up a bit. Eventually over a couple days you will get it dialed in where you want, be patient. At least this unit has adjustment screws other than just the main knob.
A**R
Works well.
Bought this thermostat for a vintage refrigerator. Reading other reviews was very helpful, as this product comes with absolutely no instructions. Although it is advertised as a freezer thermostat, it is also advertised as universal and can be adjusted to work in a fridge. It appears that most of these thermostats have two adjustment screws somewhere on the body, one is for temperature and the other is for the delay. When I installed mine, the fridge seemed to want to settle somewhere between 28° - 32°. I took a gamble on which screw to turn first, and luckily got the temperature in a range that I could adjust with the thermostat. These old refrigerators are very touchy, and it was a long slow process of small adjustments to get it to where beer wouldn’t freeze, but the little ice box would freeze ice cubes. 😎 This thermostat would likely work right out of the box if installed in a freezer, but don’t buy it for a fridge or cooler unless you are willing to take the time to get it adjusted correctly.
J**A
Works well
Had old fridge in the garage that was getting too cold. Hubby put this on and it works great
J**M
cool
so far so good, installed it this morning, seems fine, time will tell
R**C
Poor Substitute for OEM
My 20-year-old Frigidaire upright freezer's thermostat failed but I could not find an OEM substitute as it is very old. I found this as a "Universal" thermostat with rather surprisingly good reviews. I was willing to give this a try thinking I may be able to make it work for my old freezer. Right off the start, this one does not have a turn-off switch like my original but the lowest setting appears to turn off at a rather higher temperature within the freezer. The problem with this device was it is very inconsistent with the control of temperature and it did not maintain the freezer temperature even at the same setting over nearly 3 days. The swing of the temperature was nearly +-8*F which is bad for keeping food from spoiling. Finally, I decided to return and thanks to Amazon Prime I was able to get full refund for this defective thermostat that did not work for my freezer
T**1
War hält was die verspricht. Funktioniert auf Anhieb. Es mich nur etwas irritiert, kleinste Stufe Kühlt bis -20⁰ etwa wobei ich mir nicht sicher bin ob es auch stimmt. Hatte leider kein 2tes Thermometer zur Hand in zu überprüfen. Also schauen wir was die Zeit bringt und wie es arbeitet. Empfehlen von mir für einen Eisschrank , keinen Kühlschrank, dafür hab ich es nicht in Verwendung.
T**U
Tutto perfetto
M**R
Introduction Maintaining the perfect temperature in your refrigerator or freezer is crucial for food preservation. Enter the Universal WPF-20 Refrigerator Thermostat Freezer Refrigeration Temperature Controller. This versatile device promises to replace faulty thermostats in a variety of refrigeration units, ensuring optimal temperature control. Here’s a comprehensive review of its performance, installation, and overall value. Unboxing and Installation The Universal WPF-20 arrives well-packaged, with all necessary components included: the thermostat unit, wiring, mounting hardware, and a detailed instruction manual. The unit itself is compact and sturdy, with a clear temperature dial and robust wiring connections. Installation is straightforward, even for those with minimal technical expertise. The instruction manual provides step-by-step guidance, making it easy to follow along. Most users should be able to complete the installation within 30 minutes, requiring only basic tools. The thermostat is designed to be universally compatible with most refrigerators and freezers, making it an excellent replacement option. Performance and Temperature Control Once installed, the WPF-20 excels in maintaining consistent temperatures. The adjustable dial allows for precise temperature settings, ranging from deep-freeze to moderate refrigeration levels. This versatility makes it suitable for a wide range of uses, from household refrigerators to commercial freezers. During testing, the WPF-20 demonstrated reliable performance, maintaining steady temperatures even under varying load conditions. Whether the refrigerator was full or nearly empty, the thermostat adjusted accordingly to keep the internal temperature within the desired range. Build Quality and Durability The WPF-20 boasts a solid build quality, with durable materials that can withstand the rigors of daily use. The thermostat is designed to resist moisture and condensation, crucial features for any refrigeration component. Over several weeks of continuous operation, the unit showed no signs of wear or malfunction, indicating long-term reliability. Cost Efficiency and Value Priced competitively, the Universal WPF-20 offers excellent value for money. It’s a cost-effective solution for repairing or upgrading your refrigeration system without the need for a complete replacement. The energy-efficient design helps reduce overall power consumption, contributing to lower utility bills over time. Environmental Impact In addition to its cost savings, the WPF-20 is environmentally friendly. By enabling more efficient temperature control, it reduces the energy consumption of your refrigeration unit, helping to lower your carbon footprint. Customer Support and Warranty The manufacturer provides robust customer support, with knowledgeable representatives available to assist with installation and troubleshooting. The WPF-20 also comes with a comprehensive warranty, ensuring peace of mind for buyers. Conclusion The Universal WPF-20 Refrigerator Thermostat Freezer Refrigeration Temperature Controller is an outstanding choice for anyone needing a reliable, efficient, and affordable temperature control solution. Its easy installation, precise temperature management, and durable build make it a standout product in its category. Whether for home or commercial use, the WPF-20 delivers exceptional performance and value, solidifying its place as a top contender in the refrigeration accessory market.
M**N
الترموستات عمل بالشكل المطلوب والحمد لله
R**Y
J'ai besoin de coupe les terminaux un petit peut (les connections pour mon frigo sont plus petit), mais après je le monte sans problèmes. Le fil pour le sonde est un peu trop longue (ne coupez pas!) mais c'est pas grave. Dans cet modèle, il y que trois connexions, il terminal terre (dessous) et deux pour faire un interrupteur (en haut; courant secteur donc n'oubliez pas de débrancher). Un réparation de dix minutes. C'est un choix simple. Moins que quinze euros pour un thermostat de remplacement, ou plus que deux cent euros pour un nouveau frigo? Il est en place maintenant pour quelques mois, aucun problème. Le plateau haut de mon petit frigo reste bien autour de 1.5C.
Trustpilot
1 month ago
3 days ago