
DOWNLOAD THE APP


Customer Services
Copyright © 2025 Desertcart Holdings Limited
DOWNLOAD THE APP

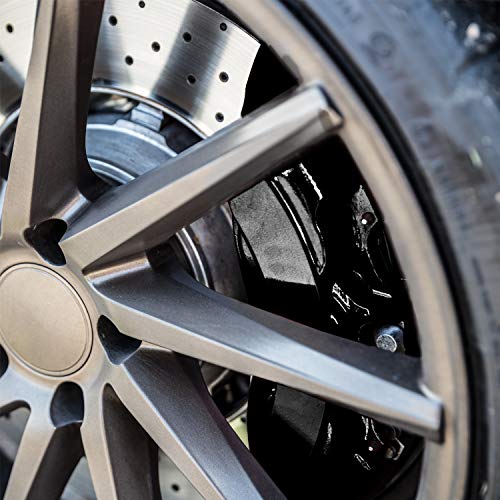


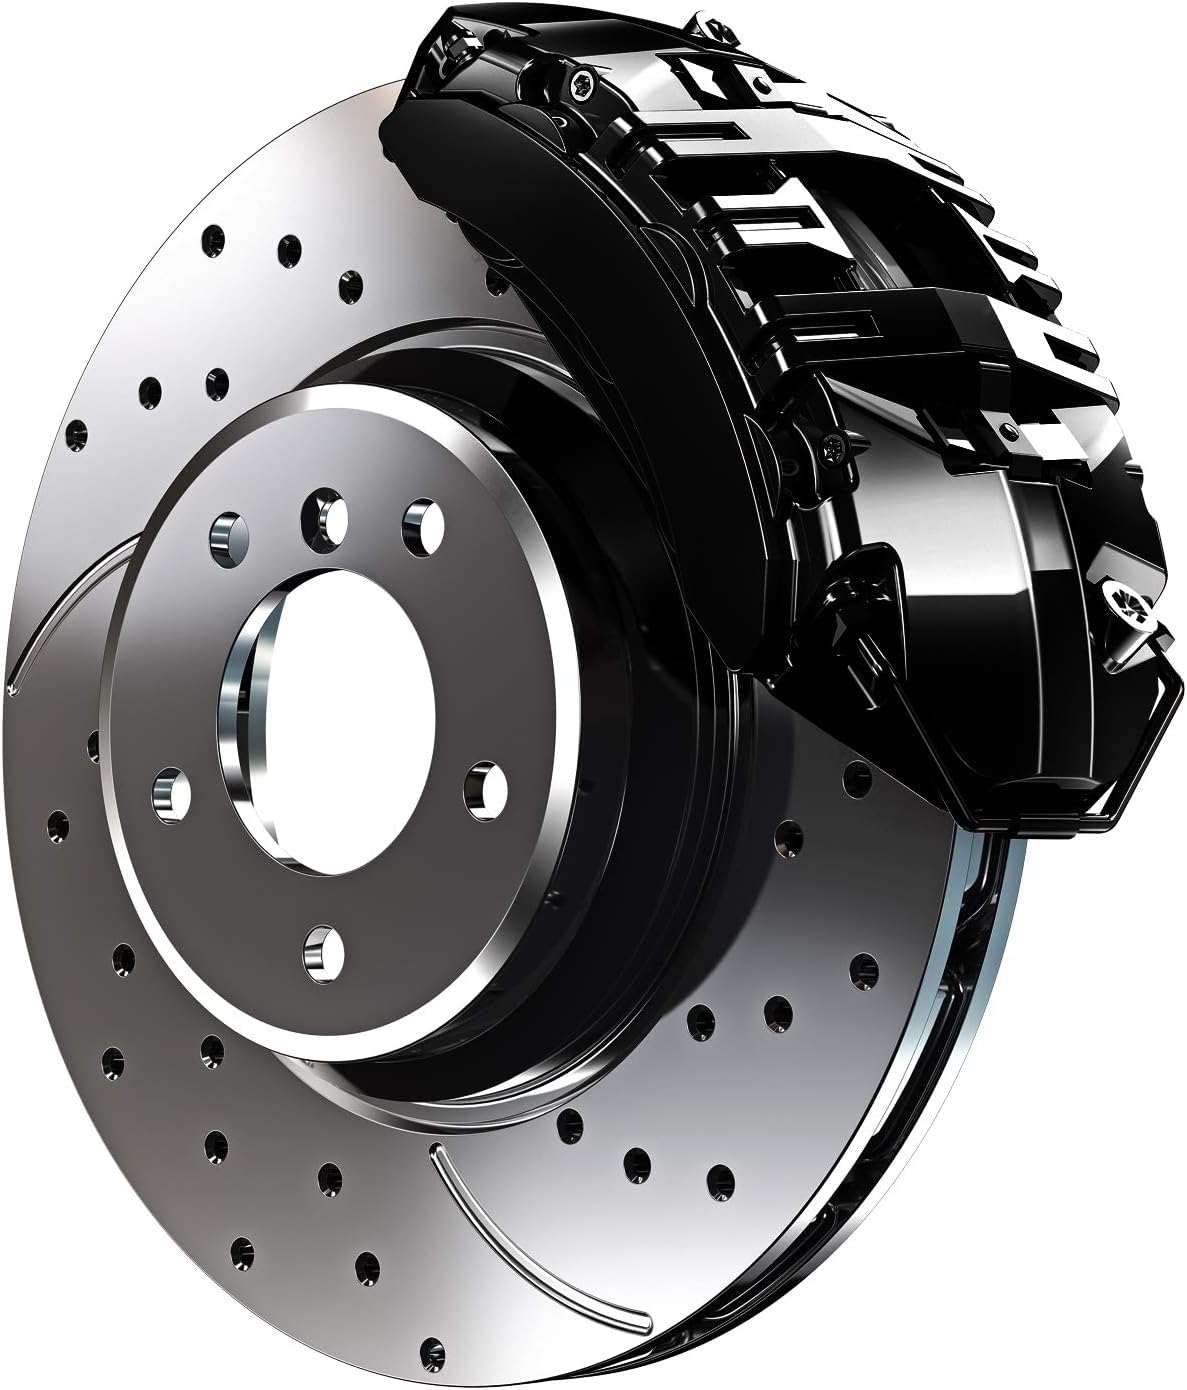


🔥 Elevate your ride’s style and toughness with G2’s heatproof caliper paint!
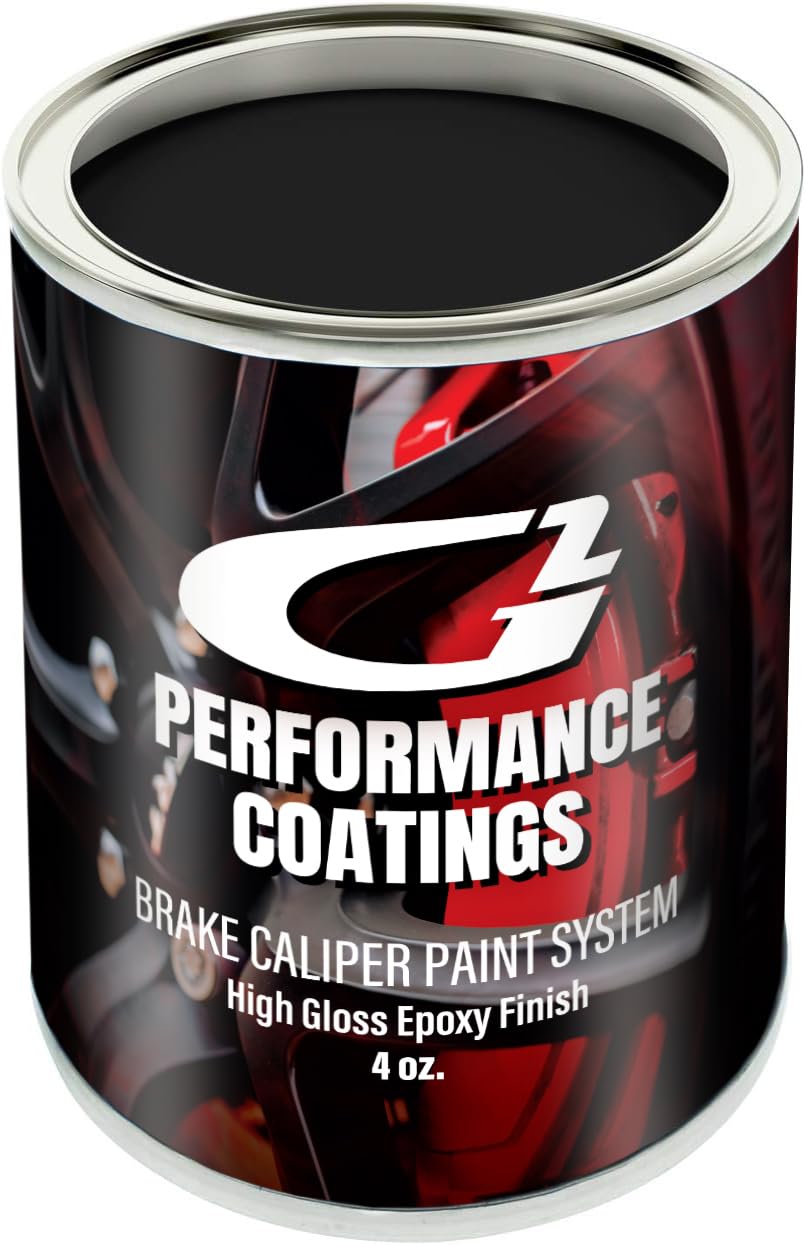
The G2 High Temperature Brake Caliper Paint Kit offers a professional-grade epoxy system that resists heat up to 980°F and protects against chemical and physical wear. Featuring a high-gloss finish that dries hard without flaking or fading, it comes in 12 vibrant colors and includes all necessary application tools. Made in the USA, this kit ensures durable, stylish brake calipers that stand out and last.


| ASIN | B000G2AOU8 |
| Age Range Description | Adult |
| Best Sellers Rank | #7,260 in Automotive ( See Top 100 in Automotive ) #1 in Automotive High Temperature Paint |
| Brand | G2 |
| Brand Name | G2 |
| Color | Black |
| Color Code | #000000 |
| Container Type | Can |
| Coverage | Heat and wear resistance |
| Customer Reviews | 4.4 out of 5 stars 5,484 Reviews |
| Finish Type | High-Gloss |
| Full Cure Time | 6 Hours |
| Included Components | Caliper Paint Kit |
| Indoor Outdoor Usage | Outdoor |
| Is Waterproof | True |
| Item Form | Liquid |
| Item Type Name | Brake Caliper Paint Kit |
| Item Volume | 4 Fluid Ounces |
| Manufacturer | G2 USA |
| Model Name | Brake Caliper Paint Kit |
| Paint Type | Spray |
| Size | 4 Fl Oz (Pack of 1) |
| Special Feature | Heat Resistant |
| Special Features | Heat Resistant |
| Surface Recommendation | Glass,Metal |
| UPC | 196852456680 |
| Unit Count | 4.0 Fluid Ounces |
| Warranty Description | Lifetime Manufacturer |
| Water Resistance Level | Water Resistant |
A**R
Excellent product, very happy!
Product was easy to use. Pour in the reactor, mix and paint your little heart out. More than enough paint provided. I only painted what will be visible once the new calibers go on. Super simple with the new calipers off the vehicle since they are all getting replaced. I did 2 thin coats followed by a slightly thicker coat so it could settle and limit the visibility of brush strokes. Paint is thin enough once mixed it will take multiple coats. First 2 coats left some open spots since it was filling in all of the divots of the calipers. Overall it took a few hours as I figured it out. That was with multiple interuptions from the crotch goblins I created. They are very shiny and coverage is really good. I should have put a few more layers on to get a smoother surface. It absolutely took shape of the metal. Flaws in the caliper making process are visible. Them again it it will be mostly tucked away behind rims. Took about 30 minutes after the final coat to not feel tacky. Left them for the night and by the next afternoon they felt solid. As I was re assembling the calipers I knocked on against the bracket and it took the paint off. Not a huge deal as I missed some visible spots anyways. Once I finished the original 3 coats I sealed the paint and put it in the fridge. Attempts at slowing the solidifying process. Slowed it and was gunky but enough to be able to "touch up" the few spots. Don't think it will be as shiny or smooth as the original but it will be pink like the mother of spawn asked. I bought another set for my truck and will update on the ease of process with calipers mounted on the truck. As well as pics of these from on a blacked out Edge. I hope this helps anyone who is looking for a decent price for a fun accent. V/R M
K**R
Good product, prep prep prep, great finish.
Solid product. In short, 5 stars for bright color and does seem like itll hold up with proper prep, ease to use. BUT!.. if you have large calipers(Like Brembo 4 piston), a single can will not do the 3 layers id say you want to do, on the every inch front and back of caliper. Prep is big deal, get more supplies than provided is recommended(some hand wire brushes, brillo pad, rags, brake clean). Dont rush any step, it was about 63 degrees when i did mine, in shade. 15 mins wasnt enough for dry times. Go get more brushes for each coat(i got cheap ones)
R**É
Great product
Application was very easy, followed the instructions and the results were great. A little bit goes a long way. I was worried doing all four calipers on my wife's f350 there wouldn't be enough since they are large. I was dead wrong and we had plenty left over for multiple coats. Have put a lot of miles on them and they hold up and clean nicely. Would buy again
A**R
It's BLUE when dry! Not purple.
FIRSTLY - it does look purple in the can, it dries blue, I'll post after pics. This is an obvious concern, and a few reviews here made me sketchy. Wet paint and dry paint don't always look the same people, especially when it's special purpose paint with add-in activators. I used this a 2004 Mustang with Sonic Blue paint (one of the pics has part of the car in it so you can see the compare of the blues for reference). G2 will send you a color swatch free in the mail from their site btw, that's what I did. I also copied it from thier site and used Photoshop to place it on a pic of my car to give me an idea how it'd look. Got the package promptly, inspected it. It was packed like crap but unbroken. In the product box you'll find - A spray can of brake cleaner Can of paint, a little more than half full, this is so you have slush and mixing room. A glass vial of activator A paint brush. Brush itself isn't bad quality, but way to small for this use, it would take you all day! A Popsicle stick mixer, works fine. Instructions Other things you'll need and/or want - Better brushes! I got 1 inch wood chip brushes locally for $7 cents each, I got several. These worked well, but be careful as the bristles come out easily and stick to the paint. I also got some smaller detail brushes for the little spot the bigger brushes couldn't hit. Tape, I used Scotch Blue Painters tape, worked great. Gloves, masks. A can of brake cleaner, just in case. I'm sure the one they give you will be enough if all you're doing is calipers. I think I went through about 1.54 cans. I actually used some Brakleen I already had on hand. PATIENCE! Seriously, take your time on the cleaning part, it'll be worth it! Can't thing of anything else I used that was specifically caliper paint related. Here's how I did this... Read the instructions. Put the car up on stands. The paint is only good for a few hours after you mix it so you can't really do one caliper at a time. I was painting my rotors, dust shields and wheels as well on this project, so I took the calipers off the car. I did not disconnect the lines, just placed them on boxes under the wheel well. Cleaned everything on the car extremely well, steel brushing, sanding, steel wool, spraying, etc. Since the calipers were off, I didn't worry about taping anything off for that part. (I taped and placed cals under paper when spraying the shields) Read the instructions - again! Mixed the paint and activator in can using the popsicle stick. NOTES on color - IT LOOKS PURPLE IN THE CAN!!! It DOES turn blue as it dries, I'll post after pics. Paint time! I did one light coat all around. I took time, about ten minutes from start to reach the first caliper again, which is the coat time, perfect. Second coat was a little heavier, filled in gaps missed on first coat. Third coat, about the same heaviness of second, any heavier you'd have runs and dripping. Fourth, and final, coat. By this time, it was clearly blue in color. Three coats probably would have been fine. There's plenty of paint for more though, probably could've gotten a fifth still. Since I bought a ton of those 1 inch brushes, I'd used a new one for each coat. Allow to dry overnight before use. Since I still had the rest of project to do, it was actually 2 days before I put anything together again. Pay attention to your weather too. I started this in the morning, but being in San Diego, it got real hot, real fast. I did the whole project in about a week as a result of the heat and sun. I put everything back together, wiped some grease of the calipers - that was awesome, it just wiped off cleanly with a towel! I choose to add a "Mustang" decal to my calipers, this would be the time to do so if you choose (for your car of course). Remember to push your brake pedal a couple times before drive off. Enjoy! There are tons of vids available for this, I watched a few, learned a little :) Also of note, I did smell some paint burning when driving the first few days, especially when braking hard. Not sure it this was the caliper paint or the rotors, or the heat/dust shield (I used a different black caliper spray paint and high heat spray paint paint for those). I'd definitely recommend this product if you want a little extra class on your ride. It's been only a couple weeks since I applied it, but it still looks great! It's comes out a glossy medium blue. G2 also sells color coded paint too, for twice the price.
N**N
Great product. Excellent customer service
Here are a few tips to make this process easier: 1. Definitely buy quality brushes instead of using the brushes come with the kit. I bought a set of brushes from home depo only for $8. Trust me how smooth the end result depends a lot on the brushes that you are using (I'm a nail tech by the way). 2. Light colors will need extra coats of paint to get that even finish. For example white, light pink or yellow like mine took 4 coats easily. Don't overpaint the first or second coat, go light and easy when you first started. 3. Try to paint all calipers within 2 hours for the best result. The paint will get harden quickly once you open the bottle. You don't wanna leave the bottle in hot area for this reason. I had to contact them for a warranty replacement because my paint harden before I could finish my last 2 calipers. Customer service was easy and fast for me though. 4. If you can use 4 jacks to lift the car up, that will probably best. I only had 2 jacks that's why I couldn't paint 4 calipers at the same time, which was the reason why my paint harden before I could finish everything. Overall I like this method much better than spray paint because I hate spray paint preps. This method was super easy, and fast. Remove the wheels, clean the calipers (maybe some sanding), paints, and that's it.
E**K
Excellent results
What I like: + Simple to use + Large can of brake clean + Good looking end result What I don't: - Included paint brush is worthless - It is pretty expensive for paint - Foam packing peanuts Fairly simple well packed kit, paint, hardener, crappy paintbrush, decals and a lots of little messy foam peanuts. Please keep in mind that this G2 Paint Kit only only one part of the entire painting process (the other is labor). If you've ever painted anything half decent you'll know that to get good looking results you want to put a lot of effort into preparation. What this means if you'll want to take your time getting your caliper surfaces spotless to give the paint a good surface to bond to. The kit includes a fairly large can of brake clean to help you do just that. You'll want to take a 3M Scotch Brite Heavy Duty Pad (not included) and work it until the metal is spotless. My calipers went from a graphite gray to stainless steel gray after a few brake clean / scrub cycles. If you don't do this well you risk having paint flake off in the future forcing you to redo the work. Important note: Use proper respiratory protection, brake dust is nasty and you'll be kicking it up while cleaning and you certainly don't want to breath it in. I used a 3M N95 (not included) particulate mask but recommend considering something stronger since the fumes from the solvents (brake clean + G2 paint) had me feeling pretty nauseous by the end of the experience. Once you've cleaned and optionally masked your surfaces you get to the fun part; painting. Pour the entire little jar of hardener into the G2 paint, shake vinously and wait for it to bubble and start applying. This starts a count down timer and leaving you with only 3 hours to finish. You should finish with plenty of time since you will probably spend a little over an hour coating all four corners (2 - 3 times). I *highly* recommend buying quality paint brushes because as soon as the hardener is mixed in with the paint it rapidly starts turning viscous and sticky the little paint brush that is supplied is poorly made and will not hold up as it gets thicker and stickier. I used some Behr's nylon paint brushes (not included) to give thin even coats. The first coat of G2 is one of the most important and you should definitely heed the instructions and apply a thin coat. The instructions say to leave 15 minutes between coats for drying time. This should be perfect for you to go around and paint the three other calipers and come back and do another coat. You can use a slightly heavier second coat to fill in gaps in coverage. I let the second coat sit for a little bit longer and while the paint claimed to be self-leveling there were tiny ridges / rivers. I took a 3M 150 grit sanding block (not included) and smoothed those out. I added one additional thin coat to this and according to the instructions you're done. If you have decals this would be a good time to add them in. Otherwise the wait 2 hours and put your wheels back on. If you purchased scotch brite pads like me for prep you might as well take one (not the same one soaked in solvent b/c brake clean will damage OEM clear coat) and clean the inside of the rims; clean rims help reflect light / glow that will enhance your freshly painted calipers. :) Important note: the instructions state you should give it 24 hours time to cure before driving, plan accordingly.
M**Y
Good quality and durable
I recently used this brake caliper paint, and overall, I’m quite pleased with the results. There are several pros to this product. First, there’s plenty of paint included, which is great because the yellow color requires several coats to achieve a nice, even finish. The yellow itself is bright and vibrant, making the calipers really stand out. The paint also seems to be high quality, adhering well to the calipers and providing a durable finish. However, there are a couple of things to keep in mind. The brush included with the paint isn’t the best quality, so I highly recommend purchasing your own brush to ensure a smoother application. Also, the paint is on the thinner side, so it will take several coats to cover the calipers properly, especially with the yellow color. And be aware that there is a bit of a smell, so it’s best to work in a well-ventilated area. Despite these minor issues, I’m happy with this purchase. The end result looks great, and the product performs well. Just remember to have a good brush and patience for the multiple coats, and you’ll be very satisfied with the outcome!
B**N
Great caliper paint solution
I purchased this kit months ago, and was finally able to put some time aside to paint by front dual piston aluminum calipers for a 4th gen Camaro. They are going on my 88 Eldorado as a cheap OEM upgrade, and I wanted the gold to contrast my metallic blue paint. The kit is a fantastic value, with enough paint to definitely color 4 fullsized calipers. The 2 part Epoxy paint is friendly for low temp environments, and actually stated the curing temps are ideal between 50-80F, which is great if you work outside or in a cold garage. The paint seems extremely durable, and adhered to the cold aluminum with ease. Here's why it's not a perfect review though. The brushes provided were cheap, and several bristles came off during the application process, causing them to be permanently cemented onto the caliper. Not a huge deal, but annoying if you are a perfectionist. Secondly, I think the directions to apply 2 coats is a bit poor. I applied a heavy 2nd coat, and experienced dripping with poor coverage in some areas. I would highly recommend 3 coats. I was nervous about how long the epoxy would take to set in the can once mixed, but after 12 hours, the paint in the can wasn't hardened yet. My point is take your time, and don't rush. You have hours to apply a few coats by hand. A paint gun may not be as time friendly, but I'm sure an experienced painter may already be aware of the 2 part Epoxy behavior. Lastly, I still think this kit is a fantastic value, and even when brushed on, the results looked great. I did not sand my new calipers at all. These were straight out of the box and degreased. My advice is to take your time, and make sure your brakes are prepped. As you can see by the photo, it still managed to get a well covered glossy look, despite my own mistakes. I think this will look great behind the wheel of my Eldorado.
Trustpilot
1 week ago
4 days ago