Illuminate Your Space, Elevate Your Style! ✨
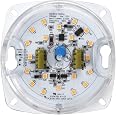
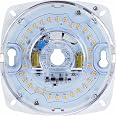
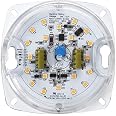
The Legental Dimmable LED Light Engine is a cutting-edge retrofit solution designed for various ceiling fixtures. With a compact 3-inch PCB size, it delivers 850 lumens of bright, 5000K light while consuming only 10 watts, making it an energy-efficient choice. Its impressive 25,000-hour lifespan and 5-year warranty ensure long-term reliability, while the flicker-free dimming feature enhances your lighting experience. UL approved and easy to install, this light engine is perfect for modern living.
| Manufacturer | Silverlite |
| Part Number | 43219-79650 |
| Item Weight | 4.6 ounces |
| Product Dimensions | 3.31 x 3.31 x 0.63 inches |
| Country of Origin | China |
| Is Discontinued By Manufacturer | No |
| Size | 3inch |
| Color | 5000K |
| Style | 3" 5000K Dim |
| Finish | Painted |
| Material | Iron |
| Shape | Round |
| Power Source | AC |
| Voltage | 120 Volts |
| Wattage | 10.00 |
| Installation Method | Surface-Mounted |
| Item Package Quantity | 1 |
| Type of Bulb | LED |
| Luminous Flux | 850.00 |
| Mounting Type | Ceiling Mount |
| Plug Format | A- US style |
| Certification | UL |
| Special Features | LED Light Engine,dimmable |
| Usage | Garden |
| Included Components | User Manual |
| Batteries Included? | No |
| Batteries Required? | No |
| Warranty Description | 5 years. |
C**O
Not always a simple plug and play, but a wonderful retrofit.
I've used these Light Engines now for 3 different projects. All were converting a more conventional bulb in a fixture to LED. One was very simple, one only required a minor modification, and one should only be attempted by someone that understands PCB electronics.Lets start with the more challenging one. The first photo is the ceiling fan in my son's bedroom. Originally, the very center had a 20 watt halogen bulb. On a desk, that's fine, but in a ceiling fixture, it was hardly more light than a nightlight. In this application, I put in one of the 4". In retrospect, I probably should have used the 3", but I really wanted a dramatic increase in light. The problem was that the 4" did not really fit. Not only did I have to remove the metal backing plate, but I also needed to cut into the PCB board and the plastic cover in several places to fit past parts of the fixture. I was able to line up the PCB and find areas that could be cut, but this is where you really do need to know and be able to test before you modify. I don't recommend this modification to most people. But, as you can see, the amount of light is now sufficient for the bedroom.The next step up was to use the 5.5 inch models to replace 100w Halogen bulbs in the master bedroom. Here, there are 2 ceiling fans. In this case, I needed to trim the metal plate so that it was the same diameter as the plastic cover. This is a much easier modification. The plastic and metal plate come off very easily. Be careful not to touch the thermal grease between the light and plate. I covered the grease with a piece of plastic wrap and then cut the metal plate to size. I did have to relocate the grounding wire. Once reassembled, the Light Engine fit the fixture. Inside the fixture I had to remove the bulb holder and the insulated structure that kept the heat from the halogen bulb from frying the fan motor. (those bulbs get crazy hot) I wired up the Light Engine to the existing wires and secured it with a screw that once held the insulation in place. The glass cover then screwed in place easily.The last one is in a coffee table. The table has a top that is inlay marble that we bought on a trip to India. Under the marble was a crude 3 socket setup for 60 watt bulbs. Although it worked, the light was not even and you could easily tell where the bulbs were. So, I gutted the entire thing, installed the 8.5" Light Engine exactly in the middle, added some reflectors to get light along the edges, and wired in a Z-wave dimming controller. Using the home automation through the Echo Show, you can now say "Alexa, set Coffee Table to 100%" or "Set Coffee Table to 40%" which is what this photo shows. 40% gives a really nice glow that allows you to look at the details in the marble inlay. 100% is just too bright. With the exception of the home automation, replacing the original sockets with the Light Engine is just a matter of connecting 3 wires.Not only do these Light Engines make replacing old bulb setups with LEDs easy, you get a lot more light and the light is much more even. The Halogen bulbs had a noticeable hot spot where the light was brightest. And the Coffee Table is much better shown with the central area being brighter.In my son's bedroom, I only saved 3 watts, but got a ton more light from the fixture, so he's not using other lights to supplement the ceiling. In the master bedroom, the two fans now have a more full light that covers the room more evenly and the total reduction in power use was 154 watts from 200 to 46. And the Coffee Table has a much better presentation using only 40 watts instead of 180. Likely we are using even less since we run the Engine most of the time at just 40%. If the translation is linear, that would be using just 16 watts, or a savings of 164 watts. But even if the dimming does not save as much, it's still a lot less.These light engines might require a little more than just basic wiring, but if you measure carefully and can fit the Light Engine without any modifications, it takes about the same skill as replacing a socket or light switch. And the results are worth it.
D**R
Well worth the cost, if you appreciate the advantages.
I paid $13.99 on 12/21/2016 for the 4” 17W 3000K (warm color temp) model. I see from the options printed on the PCB that a wide range of other temps were at least planned, if not ever manufactured in quantity. I’d love to be able to buy this in 5000K, my favorite daylight color temperature.I’m very impressed with this “light engine”. It’s an ideal upgrade for any ceiling fixture that you have that you like enough to keep, but would like to bring into the LED era.This is an instant-on design. There is virtually no delay between switching it on and full light output. I’d imagine that inrush current is substantial, but I don’t own any proper tools to measure inrush (yet!).Build quality is simply excellent. Taking a close look at the circuit board, it’s one of the best I’ve seen in an LED light. Everything is clean, the surface-mount components are all very well aligned with their PCB pads, and the large capacitors are 105C rated. There is essentially NO flicker, verified with my “patented” Sony 59.94FPS rolling-shutter method. I did not test the dimming capabilities, so can’t vouch for the amount (if any) of flicker at lower input voltage.I used a special meter to measure the electrical characteristics of the module I received. Here’s what I measured, at a line voltage of 122VAC:Power used: 18.7 WattsCurrent: 164 milliampsPower factor: greater than .9 (excellent!)This light engine is made in two parts. The PCB (Printed Circuit Board) is round, and measures 3-15/16” (100mm) in diameter, close enough to the 4” nominal size.The PCB is attached via two small machine screws to a larger metal piece behind it, which measures:4-7/16” (113mm) across the smaller dimension5-⅜” (137mm) across the larger dimensionNote to advanced “hackers”:You CAN remove the PCB from the larger piece (backing plate), but I assume that there will be thermal compound between the two, to dissipate heat from the PCB into the backing plate. I would recommend ONLY removing the backing plate if you intend to attach the PCB directly to a good heatsink. Your heatsink should be QUITE flat, and you should use thermal compound, as well.Rather than buying this “light engine”, simply screwing in an LED bulb is an option, of course, but bulbs are not ideal for ceiling fixtures, as the omni-directional light output of a bulb is not what you need for this application. You want all your light to go down. The original foil reflector in the fixture that doubled as heat insulation for the blazing hot incandescent bulb(s) doesn’t do a very good job of reflecting the light that the bulb throws upwards. I’ve tried improving the light output of a conventional ceiling fixture that has LED bulbs screwed in by removing the plastic diffuser from the LED bulb itself (I DO NOT recommend that you try this). No diffuser means that all of the LED’s light escaped the “bulb”, but it’s now much more directional, which can work for or against you, depending on how the bulb sockets sit in the fixture, and where you want the light to go. You often end up with some nasty “hot spots” showing in the fixture’s glass cover, but perhaps they’re pointing toward something in the room that you want more light on, anyway.The first photo shows the inside of the fixture as it was used just before I installed the LED light engine. There was a 10 Watt Compact Fluorescent (CFL) bulb screwed into the single E26 socket. This was about the largest CFL bulb that could fit inside the glass fixture cover/diffuser. The purchase of the light engine was spurred by an incident with this fixture a couple weeks ago- I removed the glass cover to clean out the dead bugs, and also removed the CFL to clean it. I noted that the glass spiral portion of the CFL was loose relative to the bulb’s base (ballast), but decided to re-use the bulb. During careful reassembly, I nonetheless broke the tip off the glass tube of the CFL. Fortunately, the glass fixture cover was in place when the bulb broke, so it caught the minimal amount of broken glass from the bulb. “All right, that’s IT! No more darn CFLs!”. Shortly thereafter, I found this light engine, and decided that it’s a much better (but yes, also much more expensive) alternative to an LED E26 bulb.The last two photos are two-stops negative exposure comp shots of the fixture’s glass cover with first the 10W CFL, then the 17W LED light engine installed, just to show light output pattern. These are NOT manual/fixed exposure shots, so total light output can’t be compared. To the eye, though, the LED is MUCH brighter, and the instant full brightness is much appreciated on a light that’s often used in this “I want light, and I want it NOW” application (over a dark stairwell outside my aged parents’ 2nd floor bedroom).You may note that in some of the attached photos, the clear plastic cover has been removed. I chose to do this, but I DO NOT recommend that you follow my example. This cover serves an important safety function, keeping fingers and conductive tools away from the energized components when power is switched on to the fixture. Remember, someone else may get curious and see about changing the “bulb” inside the ceiling fixture some day. If the light engine has failed, and grid power is still present, the insulating cover will prevent a potentially fatal shock to the curious and incautious.A note to the makers of this light engine, if they read this- I have a feature request for a future revision:Built-in microwave radar motion sensing!This has very recently become a “thing”, and has some advantages over PIR (Passive InfraRed), especially when mounted behind the glass cover of a ceiling fixture. Radar motion sensing is a very inexpensive feature to add, but I’d likely pay a substantial premium to get it (hint, hint).
L**I
BRIGHT light!
Easy installation with basic electrical wiring knowledge. This took approximately 20 minutes to install and involved snipping a couple wires and using wire nuts to connect the LED kit to the ceiling fan light fixture wires. The caveat is that this is a very, VERY bright white light which is probably best used for a small home office. The light focuses downward and does not emanate throughout the room like a regular bulb arrangement. We used it for our home office and it brightly illuminates the desk which is pretty much directly under the ceiling fan. It is a stark-not soft-white light which I would not use in living or bedroom area ceiling fans. (A bit harsh to look at fixture directly) That said, it provides so much more light than the inadequate candelabra LED bulbs which used to be up there. I wish they would make this in a warmer tone for the rest of our rooms. The dimmer function works like a charm. Good $ value.
G**T
Quality LED lamp upgrade for ceiling fans
Ceiling fan led lamp upgrade.After 9 years of occasional use, these kits are still bright and working perfectly !
Trustpilot
3 weeks ago
2 days ago