🎶 Soundproof Your Style!
The Sonic Acoustics 12 Pack 3D Hexagon Acoustic Panels are high-density soundproofing panels measuring 14" x 12" x 0.2". Made from 100% polyester fiber, these panels provide superior sound insulation, are flame retardant, and feature a stylish 3D design that enhances any space. They are easy to install with adhesive options and are suitable for various applications, including studios and home theaters. Plus, they come with a satisfaction guarantee for a worry-free purchase.
A**N
Great for doors (with some recommended additions)
With the switch to working from home during the pandemic, I was looking for something to help cut down the amount of sound coming through the door to my office. Along with a some additional items that I'll go into below, these tiles really did the trick.HOW MANY DO YOU NEED: With 24 tiles I was able to fully cover (i.e. no gaps) a standard interior door (32" x 80"), with a few tiles and some scraps to spare. I've included a picture so that you can get a sense of what that might look like.ACOUSTIC EFFECTIVENESS: These tiles significantly reduce sound at the locations they are placed, but whether they reduce sound enough for your needs will largely depend on whether you've left other ways for sound to enter your space. Most obviously, they will not be able to eliminate or reduce sound that's coming through gaps they aren't covering. If your sound is coming through a wall, covering the wall in these should significantly help. If your sound is coming from a door, as was my case, these tiles should be the first step you take in fixing the issue, but you may also want to seal the gaps around your door, depending on your needs.COLOR: I purchased the white tiles, which you can see in the attached picture. For reference, the light source in the picture is a "daylight" color LED bulb, which is a fairly cool white, the trim in the picture is painted with Snowbound SW 7004, which is a fairly stark white, and the walls are (I think) Light French Gray SW 0055, which is a very true gray (i.e. neither warm nor cool).QUALITY CONTROL: Out of the 24 tiles I received, one came with an obvious black smudge on its facing side that wouldn't clean up easily. I was able to use it for scrap pieces around the edge of the door.CUTTING: A standard box cutter, ideally with a fresh blade, was the right tool to use. From experience, scissors are the wrong tool. For my part, I simply used a pencil to trace the lines I wanted to cut, then made a series of successively deeper cuts with the box cutter until I was through. It was surprisingly easy. I was even able to mount it cleanly around the door handle with some careful measuring and removing the fitting so that I could use it to trace the circle.MOUNTING: Based on recommendations in various comments, I opted for Scotch-Mount Indoor Double-Sided Mounting Tape 314H-MED, 1 in x 125 in. foam mounting tape, figuring that the foam cells and the air gap it creates between the door and tile would aid in sound isolation. I cut off 5 squares from the roll for most of the tiles (four in the corners and one in the middle), each a bit under 1" in size, and I still had plenty of tape left at the end. None of the tiles have fallen off after 2 months of opening and closing the door, though I have noticed that a few of the scrap pieces along the edge where I used less tape have become a bit loose, so I may need to add some more. Link: https://amazon.com/gp/product/B0007P5G8YADDITIONAL MATERIALS: After getting the tiles up on my office door, I couldn't hear typical sounds coming through the tiles themselves, but I could hear sounds coming through the gaps between the door and the door jamb or floor. After doing some research, neoprene seemed like a good choice, so I picked up a few rolls of White Foam Weather Stripping in different sizes to fit the variously-sized gaps around my office door. Make sure to measure each of the dimensions of your gaps carefully, since neoprene doesn't compress much and that adhesive WILL take paint off your door if you try to remove it later (e.g. I had to remove the 1/8" thickness tape I put on the hinge side because it kept the door from closing). Even so, I HIGHLY recommend it if you want additional sound isolation for your door. In my case, I added it to the top, left, and bottom sides of the door as it appears in the attached picture. Link: https://amazon.com/gp/product/B08HVJ2KZGRESULTS: With both the tiles and tape in place, my office door transformed into an airlock. It feels like I'm sealing myself off from the world whenever that door closes, making a sucking sort of sound as it does so. It's EERILY quiet. My wife has literally been watching movies at theater volume in the room across the hallway from my office, and I had no clue until I opened the door. I can usually hear when she knocks at the door, but I have to practically shout "come in" for her to be able to hear my response.FINAL WORD: If you're wanting to get sound isolation for a door, start with these, cover your door while leaving no gaps, and then see how it is for you. If you need additional isolation, look into the tape I mentioned above.-------------------EDIT (2023-05-16): Following up two years later to provide notes on longer-term use. In general, everything has held up remarkably well. The solution I laid out two years ago with the tiles and neoprene weather stripping has proven every bit as effective as I had hoped.A few of the tiles near the latch-side of the door have become discolored with dirt and oils from hands touching them over the last few years. I wouldn't necessarily change anything in response to that, but it's something to be aware of if you're purchasing light-colored tiles for use on a surface that will have frequent touch.The one thing I would change is how I taped them up. The adhesive doesn't really penetrate well into the fabric-like surface of the tiles, so it's a bit easier than I'd like to knock them off by brushing up against them. They're easy enough to put back on, and they'll generally stay in place so long as they aren't disturbed again, but if I was starting from scratch today I'd either find an alternative tape that works better with fabric or I'd use 2-3x the pieces of tape in the hope that it would prove more effective.
K**A
Perfect ! Thin but effective!
Love the color, thought they were really thin but actually they are very effective - much more comfortable than the thicker black foams. I also have sliding closet doors and they are thing enough to go on closet door and still open and close - sound is definitely improved and I like the ability to easily cut to fit corners!
A**.
Not every tile is exactly the same, but still look good.
While these do work to muffle sound, not every tile is exactly the same. Since every tile is unique, it takes some time finding which tile will sit best next to the ones you’ve already glued to the wall. This is highly apparent when you are butting them up against each other like I have on my office door. So because of this, my project was time consuming and took me about 5 hours. I used gorilla glue spray adhesive to attach my tiles to the door, and they are not going anywhere, that is the right stuff to use for sure. Use a long skinny utility knife blade with multiple passes to get clean cuts. These tiles are also light and didn’t add much weight to the door.
T**A
How to get them to stick...
I had issues getting any form of tape to stick to the actual hexagons as the outside fabric is like a felt material. I tried various double sided tapes and 3M but I did not dry adhesive glue. I wanted to put lights behind the panels so this is what I did. it took about 3 hours to do the hexagons and about 2 for the lights.I bought the 1/2in foam insulation tape that's used for windows or doors. I hot glued a 1in long section on all sides of the hexagon following the flat area, not the corners, and leaving ONE FLAT SIDE BLANK. I put the foam exactly on the edges and leave the sticky part facing outwards. I measured the wall and figured out the spacing I needed between the hexagons and marked where the center of the hexaton flat side would go. Next, I put the thinnest and long enough nails I could find through the center of a 1in cut piece of the foam and nailed it to the center mark on the wall. Lastly, I put hot glue on the foam thats nailed into the wall and put the center of the hexagon with a missing piece of foam on the hot glue. Quickly measure and level then press down and hold for a few seconds while the glue cools. The other sides with the sticky only are just supports.For the LEDs, I started in the center of the wall, going both ways with a splitter. I followed the hexagon along one side and then halfway along the top line. From the center, you bend upwards and then follow the bottom of the next one back to the side and follow along until you get to the top of the next one. You kind of make a U turn when you get to the center top/bottom to make it look like you went all the way around but in fact you did the left side then started the right side and did the same thing when you got to the top of the row. If this makes zero sense, I added a drawing. The LEDs we ordered were the same width as the spacing from the wall to the panels to they worked perfectly. We left the tape on the back of the LEDs and only removed small pieces where the foam was located and stuck to those.I used 200ft of LEDs. The 100ft option actually comes in 2 50ft wheels so I connected a 50ft to each side using the connectors I found on here for like $10. It's super simple. The lights do fade out as you get further from the power source so I'm not sure if that's because I bought cheap connectors or because that's just how the power flow works.Overall, its super cool and was worth the time and effort. If I were to remove these, I would just have thin pin holes throughout the wall but nothing major.
B**K
Used For A Different Purpose
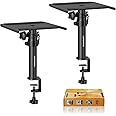
Wanted to put my Kat Percussion device on the desktop, and thought some sound absorption would also be necessary, and found this monitor pad on amazon, as shown in the picture, put the one piece on the bottom angled, and the other on top, and it works perfectly, can play all day without making a lot of racket.. the second picture is the full studio setup.. this pad is well made, and good quality foam
J**.
Great product if you received a properly QCed pack
Overall impressed by the quality, look and pricing. As some reviewers mentioned, total coverage may be less than expected so you may need to order more.Unfortunately when ordering a 2nd pack the day after, quality control was a fail. Leftover residue/discoloration on several panels, patterning and shade of color varied from original. Now I need to waste time making a trip to UPS to do a return...
A**K
Calidad y Esponjosidad
No se deforman y cumplen con la función de reducir las vibraciones, buen tamaño.
J**Y
Awesome, nice and thick
I’m not sure of how to place them to keep sound from penetrating my walls. However if anything will do it these will.
J**A
Buen tamaño
Buen tamaño y grosor, altamente densos. Para una pared rugosa tuve que verme en la necesidad de usar clavo y martillo para mantenerlos fijos
S**C
ISO pads - firm and well cut
This is a review of the speaker pads.These pads are dense and lightweight.They are cut perfectly and stack without visible seams. The size is as described.They fit my large bookshelf B&W (8 inch woofers) speakers perfectly and do not compress.Isolation pads help isolate the resonance of the low frequencies to the speaker enclosure itself as designed without transferring vibrations to the table or stand they are placed upon. This also reduces the transfer of vibrations to your components, especially turntables which are, by design, sensitive to vibrations. This should tighten up your bass response and reduce fatique on your components.
V**.
Buen material
Buen material, me han funcionado muy bien. Llegó en buenas condiciones no venian aplanados ni nada por el estilo, lo malo es de que no tome en cuenta el tamaño para mis monitores y si quedaron algo grande los pads
Trustpilot
1 month ago
2 months ago