🚽 Flush Away Your Worries with Style!
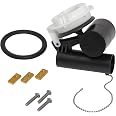
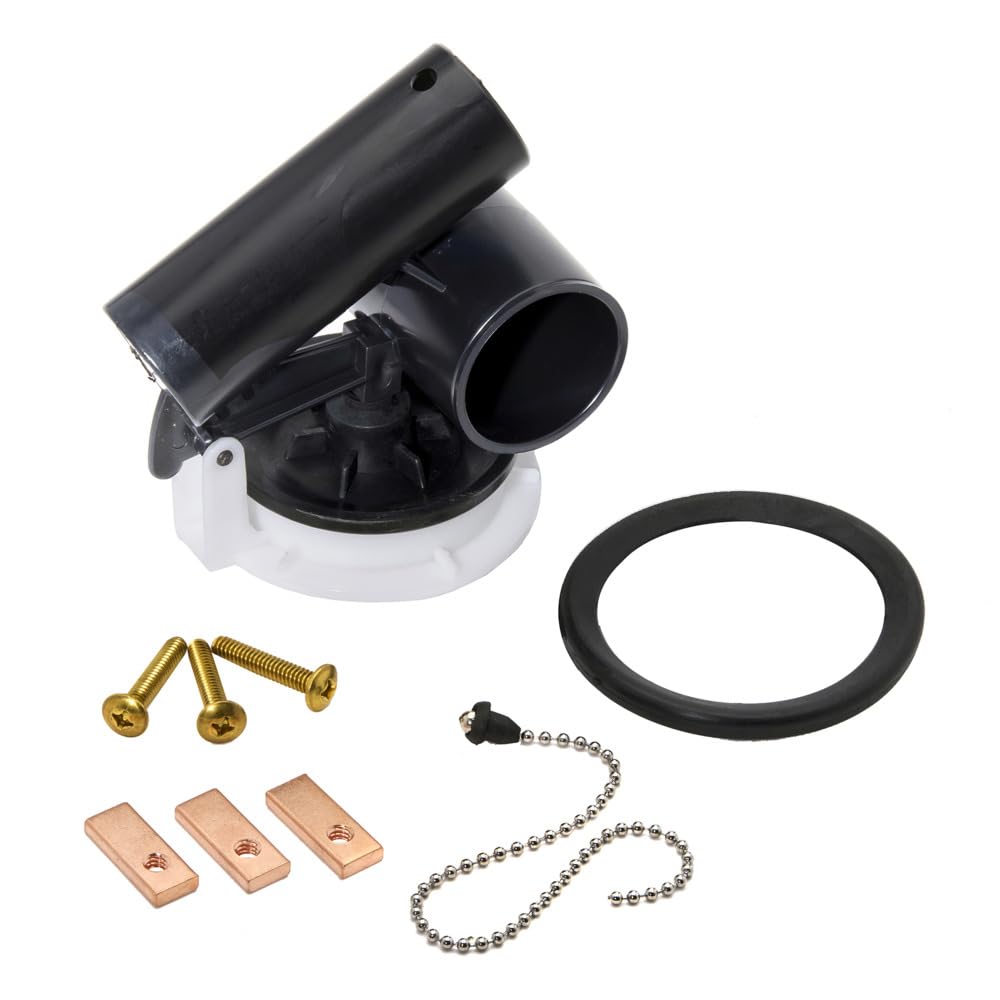
The American Standard 047107-0070A Selectronic Toilet Flush Assembly is a high-quality flush valve kit designed for one-piece toilets. It features a durable plastic construction, easy installation with included components, and compact dimensions, making it a reliable choice for any bathroom upgrade.
Manufacturer | American Standard |
Part number | 047107-0070A |
Item Weight | 204 g |
Item model number | 047107-0070A |
Size | 5.4 in wide x 0.7 in tall x 9.8 in deep |
Color | unfinished |
Style | Flapper |
Material | Plastic |
Item Package Quantity | 1 |
Included components | flush valve assembly kit with flapper, o-ring gasket, and mounting hardware |
Batteries Included? | No |
Batteries Required? | No |
A**R
Flush your troubles away!
This was purchased to replace the original equipment and it was awesome. Fit perfectly and easy to install. Every flush is now twice as satisfying as this flapper executes the operation perfectly and consistently.
R**N
- So instead I bought a replacement from Screwfix for UK Syphon system which was supplied with return spring - works beautifully!
Did not use this device as it did not come with a return spring. - So instead I bought a replacement from Screwfix for UK Syphon system which was supplied with return spring - works beautifully!
J**B
Easy Install Replacement for American Standard LowBoy Toilets
It’s amazing that the flapper valve assemblies on our two American Standard one-piece LowBoy toilets would last for almost 40 years without replacement. Even the ceramic toilets themselves still look like new… good quality! However, both toilets began to leak about the same time, apparently because the surface of the soft rubber flapper disk was disintegrating. Amazon.com to the rescue… the correct parts for these old toilets were easy to find on the web site and delivery was amazingly fast with Prime. The parts received were in American Standard Genuine Part packaging (not a knock-off) and the high quality of the molded/machined plastic parts and gaskets was obvious. Removal of the old parts and installation of the new ones were quick and easy. The replacement immediately corrected the persistent leak problem and the toilets have been operating great for almost a month, so maybe I can expect another 40 trouble-free years from these toilets.Removal and installation were easy, but here are some notes that might be of use…If you own one of these toilets, you already know that the rubber-disk gasket and seat in the separate filler tube are the most likely things to wear out and cause leaks. The rubber disk deforms and will no longer seal and/or the sealing edge of the (plastic or brass) seat can erode from water flow and grit in the water (hard to see unless you remove the seat for close visual inspection). Make sure that these items are sealing properly before blaming the flapper assembly.A good way to determine what is causing your leak is to turn off the water at the inlet pipe to the toilet, check the water height in the tank and then come back later and see if any water has drained out of the tank. If the water level goes down, you will have to replace the flapper assembly (if the assembly is still relatively new, you can purchase the rubber flapper disk separately, which might fix the problem at a lower cost).Makes sure you order the correct flapper assembly. There are two types, with the only apparent difference being where the beaded chain attaches to the large cylinder on the flapper. P/N 047107-0070A (this review) has the chain attached near the top on the side of the cylinder, but. P/N 047250-0070A is closer the center of the side. There is also another (after market) flapper shown on the site that apparently has a brass seat (not plastic) with a rubber flapper mating surface and is separate from the actual flapper assembly – they are screwed together in the final assembly. Order the type that looks like yours in the pictures.Use care when you remove/install the beaded chain from the clip on the flush handle rod. If you damage the clip, there are NO new clips included with the replacement assembly.Do not attempt to remove or install the seat portion of the assembly without first removing the flapper assembly by carefully spreading the plastic attachment (hinge) tabs on the seat, tilting the flapper assembly to disengage one of the cylindrical pegs and then tilt the assembly to disengage the other peg and lift the assembly out. You will now have free, unobstructed access to the three screws that hold the seat in place in the bottom of the toilet tank.The seat portion of the assembly is held in place with three large (stainless steel) screws that fit into threads of rectangular (brass) blocks. All new ones are included with the replacement. The old screws will probably be frozen in place. However, the seat can still be removed by using a large #2 Phillips screwdriver with firm downward pressure to turn the screws and blocks together. A 180 degree turn of the screw will rotate the block out beyond the ceramic lip holding the assembly in place in the tank. Do this on all three screws and the entire seat will lift out easily. Before installing the new seat, clean-up the surface where the old rubber seat gasket was in contact with the tank.Put all three screws into the appropriate holes in the new seat and screw on the threaded brass blocks enough to hold them in place, but not too loose so they might fall into the toilet during installation. Rotate the blocks inward so that the assembly can be inserted into the hole in the tank (remember to install the large rubber ring gasket on the seat assembly before installation). After the seat is inserted, rotate to align the two tabs that will hold the flapper assembly into the correct location (left side and parallel to the tank sides). With your fingers, carefully rotate the blocks outward under the ceramic tank edge until they are perpendicular to the edge and then carefully snug-up the three screws so the blocks will not rotate during final tightening. Now, gently tighten the screws sequentially in small increments until they are all uniformly snug. Do not over tighten them or you may crack the ceramic tank.Now all that is left to do is reattach the flapper assembly by carefully spreading the seat tabs to accept the hinge pegs of flapper assembly and connect the beaded chain to the clip on the flush handle rod. The location of the chain may need to be adjusted so that it tight enough to properly actuate a flush, but not too tight to cause the flapper to lift and leak.Open the water valve to the tank and refill. Adjust the chain as necessary and check for leaks. Put the cover back on the tank and be sure the flush lever will actuate a flush correctly and the flush duration is long enough to empty the tank. Some reviewers have stated that the flush length is too short, so they have had to add small weights inside the cylinder that is filled with water and then empties through a metering hole to increase the flush time. I did not have this problem. Happy flushing !!!!
L**R
Prefect replacement for an American Standard one-piece Lexington Toilet.
Well made and easy to install. The Lexington flushes like new.
W**R
Successfully used this to replace Curtain #50 valves, thus saving a lot of money
I was able to successfully use this American Standard flush valve to replace a 30 year old leaking Curtain #50 flush valve in a 30 year old high end Kohler toilet, thus saving me a ton of money. The Curtain #50 valve is the big heavy brass and copper canister style valve that was always expensive and has now become very expensive (if you can even find parts for one). I was looking at having to replace the whole toilet.I actually stumbled on this solution watching an online video. Amazon always deletes my external links in reviews, so if you are interested, go to a popular video site that begins with the word "You" and search for something like "American Standard - Removing Curtin 50 Canister Flush Valve".There are a few tricky things to know about.First, completely remove the flush handle and lever assembly from the tank (if you have a camera you might want to take a picture of the rigging for when it comes time to replace it). You don't want to take a chance on damaging this because the old style ones are hard to find and expensive. I had to cut the vertical copper rod connecting the lever to the canister.Second, the whole barrel of the canister unscrews from the seat (the lowest part screwed into the tank). Trying to unscrew the screws just causes them to spin and even if you are successful the big nuts underneath will fall into the innards of your toilet, which you don't want. Unscrewing the canister requires strength. If you are not strong you will need likely need some help. Once it is out you can access the nuts holding the seat to the tank.Third, this new American Standard valve will not use the old Curtain #50 holes in the tank. You will have to plug the three holes. I found stock rubber plugs from a plumbing parts house online (couldn't find on Amazon, unfortunately), but you can make your own from rubber or cork.Fourth, after you install the new American Standard valve you will need to use a little creativity to figure out how to attach the chain to the old lever. I used a brass bolt, two brass washers, two same diameter rubber washers, and a brass nut. I put the bolt through the groove of the old lever and slid it to the desired location over the new valve I then wrapped the chain around it, cushioning and gripping it on both sides with the rubber washers. I used the brass washers at the bolt's head and nut to hold it all together. With a little trial and error I got the chain at the optimal length and position along the lever. The rubber washers grip the chain well without causing any damage.It's been over a year now and everything is still functioning perfectly. In the meantime I fixed a second toilet using the exact same valve and procedure. This valve is versatile and turned out to be a lifesaver for us.Oh, one more thing. The guy in the video, when installing this new American Standard valve, used WD40 to clean the old surfaces and to prep the new rubber gaskets. I found this to be a mistake. When I did this the WD40 contaminated the whole tank and made the parts too slippery and the new American Standard valve leaked. It was very annoying to be woken up in the middle of the night with the tank dripping and the fill valve running new water in every half hour. At first I thought the new valve was defective then realized it was probably the WD40 causing the problem, which it was. After I rinsed the heck out of the tank and parts the new valve worked perfectly. I didn't make this mistake the second time.Hope this info helps somebody.
Trustpilot
2 days ago
2 months ago