❄️🌈 Cool your core, light your lore.
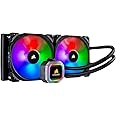
The Corsair Hydro H115i RGB Platinum is a premium 280mm liquid CPU cooler featuring dual 140mm magnetic levitation PWM fans with speeds from 400 to 2000 RPM, delivering up to 97 CFM airflow. It boasts 16 individually addressable RGB LEDs on the pump head, fully customizable via CORSAIR iCUE software, which also manages fan and pump speeds and monitors temperatures. Designed for quiet, high-performance cooling, it supports a broad range of Intel and AMD processors, making it a versatile choice for high-end gaming and professional builds.


| Brand | Corsair |
| Product Dimensions | 32 x 14 x 3 cm; 979.76 g |
| Item model number | CW-9060038-WW |
| Manufacturer | CORSAIR HOLDINGS HONG KONG LTD |
| Series | Hydro Series H115i RGB Platinum |
| Colour | RGB |
| Processor Socket | Intel 1200, 1150, 1151, 1155, 1156, 1366, 2011, 2066 AMD AM4, AM3, AM2, sTRX4, sTR4 |
| Processor Count | 32 |
| Wireless Type | 802.11a |
| Voltage | 12 Volts |
| Wattage | 12 watts |
| Are Batteries Included | No |
| Item Weight | 980 g |
| Guaranteed software updates until | unknown |
S**G
I'm very pleased with the quality and functionality.
I was recently upgrading my PC which included a new motherboard, CPU and RAM. I decided to go down the water-cooling path for the new CPU. Although more expensive than some other manufacturers, I went with Corsair as they have a good reputation.The new CPU is the OctalCore Intel Core i9-9900K, 4700 MHz (47 x 100) which should fulfil my needs for a few years. The motherboard is an Asus Prime Z390-A and the RAM is two Corsair 3600 RGB 8GB giving 16GB of RAM. Both the motherboard and RAM are RGB devices. So, the choice of this water-cooler, with its RGB fans, seemed a logical choice.When I first unpacked the cooler, the task ahead seemed a little daunting. There are lots of components to assemble and a pile of wires that have to connected to the system. This is a multiplatform cooler so it comes with parts for Intel and AMD processors. Fortunately, by default it’s setup for Intel which saved a bit of work. The instructions are okay but they can leave you wondering if you are using the right parts.I set up the fans in a pull format when I fitted them to the radiator. As I was fitting the radiator at the bottom of the case, this seemed the logical way to do it. This will then draw cool air through the radiator. There are two leads coming from each fan, one for power and the other for the LED lights. These have to be connected to the corresponding leads coming off the heatsink pump.Fitting the heatsink pump on the processor was pretty straight forward. There is thermal paste on the heatsink already but be careful not to disturb it prior to fitting. Was clamped into place you have a couple of other wires to connect. One has to be connected to a SATA power socket which will then supply the power to the pump and fans. The other single wire should be connected to the CPU fan connector on the motherboard, so that the motherboard doesn’t complain that there’s no CPU fan. There is just one more connection to be made, the supplied USB lead has to be connected to the side of the pump with the other end connecting to a spare USB2 header on your motherboard. This allows software to control the RGB lights.As you can see, the job isn’t easy but the rewards are well worth the effort. While I am typing this review, the CPU is running at around 25ᵒC. If I ramp up the processor cores to 100%, the temperature gets up to 68ᵒC for a few seconds and then drops down to around 50ᵒC. This is so much better than air cooling where I’ve had temperatures as high as 80ᵒC and static. What’s more it’s virtually silent.On the downside, I had to send the first one back as the fan lights weren’t working properly. A minor problem but frustrating. Theirs is always the possibility of failures and it’s not always a quality issue. While probably tested fine in the factory, the units have undergone the rigours of travelling to their final destination. The main thing though, is that it was replaced without question.Overall, I am very pleased with the quality and functionality of this water-cooler.
C**N
Great Corsair product
For disclosure I have been building computers for over twenty years. I have worked on them professionally and personally in that time. Although I found it an easy install I imagine a novice might struggle and would be better starting out with something a bit simpler.Firstly mounting the block and the radiator was mostly very simple. The Intel bracket is in place by default and it is quite stiff to remove. I double checked I was actually doing what they wanted as it did take a bit of force to come loose. However once that was done it was simple to remove my air cooler and mount the Corsair (thermal paste is pre-applied) in its place.The Rad gave me a little bit more of a headache. I was building in a MicroATX case and I wanted to mount it in the front. My case isn't fantastic and unfortunately the top drive bays are riveted and not easily removable. However I know from experience that most AIO cooler rads will fit in the gap no problem. The Corsair one was slightly thicker and no amount of force could make it go in. I ended up mounting it in the top and sadly lost my 140mm dust filters. However it was easy to fit in that spot and it does look nice.There is actually quite a lot to connect when putting this system together. Each fan has an RGB and power header that need to be connected to the leads coming off the block. The block itself has a USB connector that needs to be run to a USB header on your mmotherboard. It's fairly self explanatory but you do need to make sure you connect your fans to the pump cables not onto the RGB/fan headers on your board like you might with a normal case fan. I had a read of the manual and I thought it was actually pretty poor on this front. I don't know if Corsair just assume people building with this know what they're doing. Though reading it over I felt the descriptions were likely to mislead less experienced builders.Once booted I was impressed with the results. My case is inside a desk so airflow isn't always that great especially at the top and back. However the CPU was idle at around 30C (about 15C cooler than with air) and while gaming it was mainly between 50 and 60C. The noise level from the cooler and its fans were low (in fact I couldn't tell they were running over the GPU) so I am very happy with the new setup.ICue is actually a really good bit of software. I own a Corsair wireless mouse, headset and now cooler and I have never had a problem using the software. My kids love the RGB and I love the temps/acoustics so everyone has won.A great product and the only mark down I have given is for the poor manual and instructions. I actually feel like you could use it for something like a HTPC as it really is quiet enough that I reckon it could live in a living room PC. In fact I am impressed enough I have just ordered a commander and three case fans as I feel like the basic ones in the case are letting the side down.
Trustpilot
1 day ago
2 weeks ago