

Buy anything from 5,000+ international stores. One checkout price. No surprise fees. Join 2M+ shoppers on Desertcart.
Desertcart purchases this item on your behalf and handles shipping, customs, and support to Kenya.
โฐ Elevate your automation gameโbecause every second counts!
The UCTRONICS DC 12V Programmable Multifunction Time Delay Relay Module offers ultra-flexible timing control with 18 delay modes ranging from 0.1 seconds to 270 hours. Featuring reverse polarity protection, auto power-saving, and automatic memory retention, itโs engineered for reliable, long-term use in smart home and industrial automation setups. Its compatibility with PLC digital outputs and sensor signals makes it a professional-grade solution for precise, programmable control.


| ASIN | B07BT32T1M |
| Brand | UCTRONICS |
| Brand Name | UCTRONICS |
| Coil Voltage | 12 Volts |
| Connector Type | Screw |
| Contact Current Rating | 0.01 Amps |
| Contact Material | Silver |
| Contact Type | Normally Open |
| Current Rating | 5.5 Milliamps |
| Customer Reviews | 4.4 out of 5 stars 305 Reviews |
| Item Weight | 0.09 Pounds |
| Manufacturer | UCTRONICS |
| Maximum Switching Voltage | 12 Volts |
| Minimum Switching Voltage | 12 Volts (DC) |
| Model | U6030 |
| Mounting Type | DIN Rail Mount |
| Operation Mode | Automatic |
| Part Number | U6030 |
| Specification Met | Ma |
G**A
Great multi function timer after learning how to program
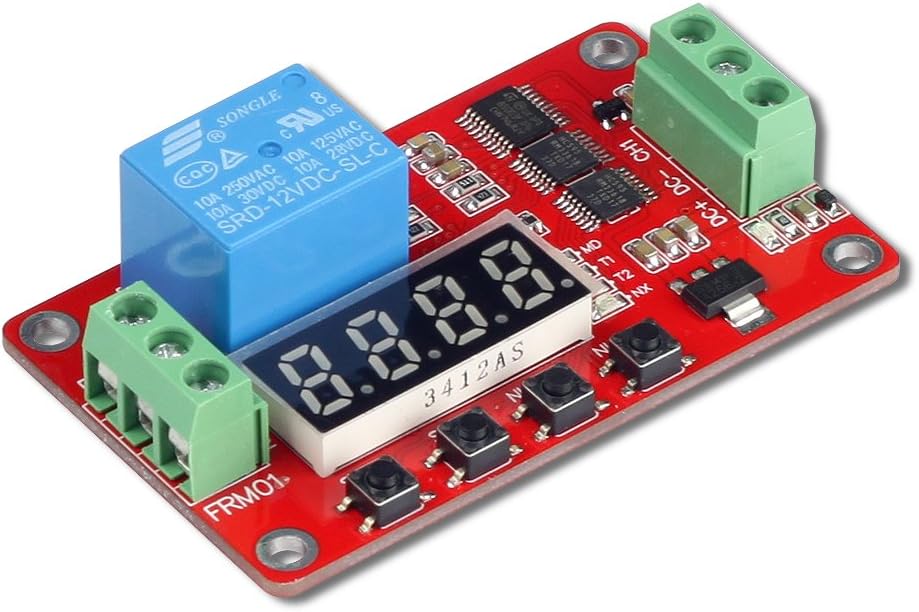
Read the setup procedure below to understand how to program this timer. However, after learning how to program it, I ran it through 111,000 cycles with 2 seconds on and 2 seconds off. It worked beautifully and never missed a beat. I had it connected to a relay control board so it would turn the relays on for 2 seconds then they'd be off for 2 seconds then back on for 2 seconds and so on. Over 100,000 cycles without a failure. Not bad, especially considering the price. The instructions that come with it are limited. Here is another explanation of how to program this timer. 1st.....To set up the timer... Press and Hold the SET button... this puts it into program mode To Select the function Quick presses of the Set button will step through the four functions. The function selected is indicated by the small blue LED just to the right of the readout. These functions are: MO... When this light is illuminated you can select the Mode. you select 1-18 (see the instruction sheet that came with the timer T1 ... When this light is illuminated you can set the time for T1 T2 ... When this light is illuminated you can set the time for T2 NX ... When this light is illuminated you can set the multiplier for the time of T1 and T2 MO - the MODE OF THE TIMER. Set to between 1 and 18 based on how you want the timer to work. See the instruction sheet that came with the timer for a limited explanation of the modes. It's best to experiment with a couple before choosing a final Mode T1 - FIRST TIME PERIOD DELAY. Based on the mode selected, this is the delay from first receiving the input trigger pulse until the second action T2, happens. Look at the graphs provided with the timer for further explanations. Make sure you understand what happens at power up compared to the what happens when the trigger pulse is applied. T2 - SECOND TIME PERIOD DELAY. Based on the mode selected, this is triggered by the completion of the T1 delay and in some modes reapplication of the trigger. T2 determines the delay until the next action happens. NX - NUMBER MULTIPLIER. Used to set the values of T1 and T2 to greater than 9999 seconds. The default value of NX is 0101. To determine the actual time delay, T1 is multiplied by the left two digits of NX. The resulting value is the delay in seconds used by timer.. Similarly, the right two digits of NX are the multiplier for T2. As an example, imagine T1 = 2000, T2 = 4000, and NX = 0105. Then the actual time delay would be 2,000 seconds (2000 x 01) for T1 and 20,000 (4000 x 05) for T2. A setting of NX to zero appears to do nothing.
D**R
It can be set to turn itself off!
Excellent timer. The instructions are a bit obtuse, but once you figure out the sequence of short and long presses, programming it is easy. One special note - my use required that the timer be shut off completely once the countdown was completed (to avoid draining a hard-to-access battery.) Put the timer in auto-start, count-down mode (mode 2 in my version) and wire it so that the timerโs 12V power source is routed from the battery to the + terminal through the NO relay contact. Start the countdown by temporarily applying 12V to the + terminal. This starts the timer, which closes the relay and temporarily supplies 12V to the + terminal. When the timer reaches zero, the power supply is interrupted, and the timer goes completely off. Perfect.
V**C
Worked
Didnt get any instructions but found them in the reviews here thank god, else you'd have no chance. Have a fan linked to a smoke sensor. Worked great apart from it flicking on and off continually. So i used this board to smooth it out, now it turns the fan on when the sensor triggers. but starts a 15min countdown before it will turn off. this counter resets everytime its triggered. End result is the fan turns on when needed and stays on 15mins past its last sense of smoke. not before. No more power up/power down cycling. Took a point off for lack of instructions and the use of those awful green connectors (not safe for 120v).
J**A
PERFECT! Exactly what I was looking for! :)
Just arrived today and this is the PERFECT device for my application. I needed a device to enforce a hard time limit on the water valve for a water fountain and this did the trick. I used function 01 with a time limit of 120 (seconds = 2 minutes) and leveraged the COM and NC terminals. The water valve is energized when power is applied to the device and then shuts off after 2 minutes. No more worrying about my flower bed and yard being flooded because the home automation glitched. (This already happened once where the water fountain "refilled" for over an hour before I realized the mistake.) At $12 it's a good value, in fact I purchased another one to keep on hand as a backup in case I need to replace the one I installed. Pros: * Good value * Works exactly as expected * Digital interface for changing settings * Compact Cons: * It's not free ;) * Doesn't do laundry ;)
P**L
Inexpensive and reliable
Oh man, this thing is the best device I bought for my subaru crosstrek, simple to set up (thanks to a YouTube video) and now my car doesn't shut off every time I come to a stop. Been using it for 5 years.
A**S
Versatile Programmable Timer
My project was to add a hot water recirculation pump and return hot water line to the water heater in our house. It took forever to get hot water to the kitchen sink and upstairs shower. Significant water was wasted while waiting for the hot water to arrive, and then quickly cooled off because the original pipes were not insulated. I did not want the pump to run all the time, but only when needed. I added a motion sensor in both parts of the house that activates the timer when someone is present. The timer is programmed to run the pump for 3 minutes and then stop for 5 minutes. If the motion sensor continues to be tripped, the timer then repeats. The timer is also known as "multifunctional relay control module (FRM01)". Use that name to search the web for the user manual, as the instructions in the box are very poor. I selected program function "16" of the timer with 18 total to choose. Functions 1-8 start when powered up. Functions 9-18 start after receiving a momentary + power input to channel 1 terminal. Power to the 115 VAC pump is controlled by the timer relay, rated for 10 amps. Timer performs excellent, and would buy again.
D**G
Time Delay On/Off Relay Module
Failed. To be fair here, I have requested a replacement so this might have been just a bad one. I was able to figure out the programming of it and it working in a bench test type setup. I thought I smelled something which turned out to be a single component overheating. I shut it off quickly but apparently the damage was done. Now it โwasโ working then it just wasnโt. I checked all of my connections, insuring no miss-wiring, no shorting anything. I ended up using mode 3 when things went downhill. Has me wondering if this can only be powered on briefly as opposed to my thinking it could be on constantly?
T**S
NO 5, 12 and 24 volt units only 12 volt units. .
No 5, 12 and 24 volt units only 12 volts even if you select the 5,12,24 option, if you use them in a 24 volt DC system, they will work for awhile, in a 5 Volt DC system they will not pull in the relay, I had to put a 12 volt regulator in from and still control my 24 volt circuits with the relay dry contacts. The Sell confirm there are no 5.12 and 24 DC units only 12 volts, still they are very nice and work well in a 12 volt environment.
N**S
Doesnt work
Bought 2 units and both are unuseable. When power up, they show ''0'' and the button doesnt work and cant set anything.
P**N
Very handy
Love these devices... so handy! Works great and remembers perfect. Using with a relay and a non-contact liquid level sensor in my RDWC.
Trustpilot
2 months ago
1 month ago