🔒 Secure Your Space with Style!
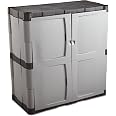
The Rubbermaid Small Storage Cabinet is a robust and versatile solution for organizing your home or garage. With a durable resin construction that resists rot, rust, and dents, this cabinet features a unique snap-together design for easy assembly without tools. It offers 13.5 cubic feet of storage space and can hold up to 336 lbs, making it perfect for safely storing valuables and hazardous materials. The lockable doors provide added security, ensuring peace of mind in any environment.


| Product Dimensions | 45.72 x 91.44 x 93.98 cm; 12.7 Kilograms |
| Item Weight | 28 Pounds |
| Fabric Type | Plastic |
| Finish types | Black |
| Care instructions | Wipe with Damp Cloth |
| Number of pieces | 2 |
| Warranty description | Yes. |
| Number of shelves | 2 |
| Batteries required | No |
| Included components | Shelves |
J**N
Liked it so much I ordered a second one
I ordered this Rubbermaid cabinet, medium size, to put outside my backdoor off my kitchen to hold cleaning supplies, laundry detergent, garden tools, and grill supplies. I liked it so much I ordered a second one to put in an area next to my house where I work on craft projects, to hold various crafting tools and supplies. I covered both cabinets with a piece of marine vinyl that covers the top and draps down both sides. I had the first through some heavy rains and it stayed dry inside. If it wasn't covered, it could get some water in it at the corners, if unsheltered during rain; I would anticipate that the water would drain down the four corners but most of the inside would stay dry, if it wasn't covered.Both of my cabinets arrived with no damaged parts, as others have reported and pictured. I did have the plastic debri from the punched out holes inside the parts and box.I found the assembly easy and fast, and the instructions more than sufficient. You don't even need to read the instructions; just look at the pics. I put the first one together in about 20 minutes, and the second one in 14 minutes. (I timed the second assembly.) I don't understand why others report trouble with assembly and instructions. The parts are also labeled with letters moulded into the plastic of each part. The parts are simple and easy to figure out. I also didn't need a rubber mallet. (For reference, I'm a 61 y/o woman with arthritis and somewhat weak hands. I was able to put the cabinet together easily.)Here is some assembly info:- You have a bottom and top piece that are identical; you can use either one for the bottom. There is no front or back of the base and top panels. Just put one down (solid side of the base panel (solid except for 4 corner holes) facing up) and push 4 of the poles (all poles are the same) into the corners firmly. The tapered part of the poles go down into the holes of the base.- You have 4 side panels that are identical. After you put the 4 poles in the corners of the base, slide one side panel over the 2 poles on each side. At this step, you are using 2 of the side panels; it doesn't matter which two. Look at the picture in the assembly instructions to see which end goes up, if it isn't intuitive for you. Gently jiggle the panels when putting them over the posts so that you aren't forcing them but fitting them over the poles, and push the panels down into place.- You have 2 back panels that are identical. Slide one of them over the tops of the already installed back poles. Again, jiggle them to put them over the poles at the holes in the panel so you are not forcing them.- You have two front doors that are different. They are clearly labeled F (left) and G (right). You slide the front doors down over the exposed tops of the previously installed front poles. Jiggle to line up the holes over the poles and push the doors down into place.- Next, place the interior center shelf on the exposed tops of the 4 posts you previously installed and press the shelf down firmly and evenly on all sides.- The next step of the instructions shows putting the last two side panels into place (with the following step of placing the remaining 4 poles you haven't used yet). I did something different here. I put two poles in the back holes of the previously installed shelf. Press the 2 back poles in firmly, and then slide the two remaining side panels over them and swing them into place in the front.- Now install the last two poles (or the last four if you have put the remaining side panels into place before installing the two poles in the back). When you feed the poles down into the holes of the front doors, you need to jiggle the poles when pushing them through at the ends so that you aren't forcing them but getting them to fit inside the holes. Use finesse, not force. I found this step to be the most tricky but it just takes a moment to two of patience in jiggling the posts as you push them through the holes. After you get the remaining poles lined up and through the holes, press each one down firmly.- Now slide the remaining back panel over the exposed tops of the back two posts.- Last step is to put the top panel (identical to the base panel) on over the tops of the exposed poles at each corner. After you get the holes lined up and over the poles, press each corner down firmly so that the top panel is fit down completely and evenly all around.- Done!!! Now you can load it up with your stuff...The height of the cabinet is perfect for using the top as a work space for things like potting or crafts. You would not want to use it for hammering things, except possibly light hammering of crafts if you have a board over it. Putting a thin layer of foam with a cutting board on top would make it better for any hammering you might do on top, but this is not a work bench that will take heavy work. It could also be used as an outdoor kitchen work station with a cutting board placed on top.I'm not positive but I suspect that people who received damaged parts might have received returned cabinets that people tried to force together without the holes being lined up properly. Mine parts were all in perfect condition. I did examine the holes as I removed the parts from the box, and would have returned for replacement if I received one that was damaged. If you receive one that isn't damaged, it should go together quickly and easily if you don't try to force the parts but gently jiggle the panels over the poles at each step, and then press firmly, so you aren't damaging the product as you put it together.The one change I would like to see in the design is a top panel that is different from the bottom panel, and solid on top so that water could not drain down through the four corners, or a top that fits over and snaps into the 4 corner holes of the top panel. This cabinet appears to be designed as a stackable unit with the possibily of a second cabinet installed on top. For those of us using it for a work station, and when placed where it will get rained on or be exposed to leaves from trees, would be great to have a solid top without the corner holes.I thought it was a little overpriced for what it is but I couldn't find anything I liked better for my needs.
T**A
Took 15 minutes to put together
I was worried due to the bad reviews of missing items and mis-matched items. The box top tape was half way in place. Received all the correct parts. Thinking it was probably checked? This is to use with unit I purchased 15 years ago that is still in great working condition for our garage. Same great quality and perfect fit for existing 15 year old shelf unit that I’m adding two shelves to the top! When adding the second shelf, put the door poles in first then the back poles. Have a sweeper and needle nose pliers to remove the cut outs handy. A bit pricey but worth the price as these units have proven to hold up. Very happy!!!
E**L
Been using these for years
Used as an equipment cabinet in a chain of grocery stores.No good for weight on top but we have not had one that broke.
S**.
Gets the job done
Ok overall, doesn't come with assembly instructions so you need to be able to assemble it from the box picture. Manufacturing quality was a little disappointing. Was a little thinner walled than I expected, but was still OK. Had lots of the plastic punched blanks leftover inside most of the pieces that had be shaken out, and had lots of sharp edges. Would still consider buying again based on price. A solid 3.5ish.
K**R
Good and sturdy, some rough finishes
We chose this over the cheaper versions because Rubbermaid has a good brand name. For the most part, it did live up to expectations and is clearly sturdy enough to hold a lot of items, even heavy things. Assembly was straight forward and the parts aligned One negative was the rough finish around all of the holes - the cut out pieces stayed inside and had to be shaken out. Be sure to wear gloves while assembling to avoid getting cut on the rough, sharp edges. It would be better if the shelves were adjustable.
Trustpilot
1 month ago
2 months ago