🌠 Elevate Your Night Sky Experience!
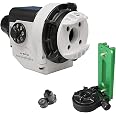
The Sky Watcher Star Adventurer 2i Astro Pack is a motorized DSLR night sky tracker designed for portable astrophotography. It features a lightweight design, rugged construction, and a built-in illuminated polar finderscope, making it ideal for capturing stunning celestial events with ease.
J**J
Great beginner Star tracker
It’s pretty good for amateur astrophotography, it’s very light weight and is a good price compared to other star trackers.
S**Y
Great Mount for Astrophotography
This mount performs exactly as advertised. I took it out for the first time a couple of weeks ago in Maupin, Oregon. I'm attaching a couple of images, so you can see what's possible with this mount. As I said, this was my first time. The first image is of Andromeda, and its two companions. The second image is of the Milky Way, with the galactic center in Sagittarius in the lower left, and Cygnus in the upper right. The North American nebula is visible as a pink patch in Cygnus. Note that there are no star trails in the images.Equipment used:SkyWatcher Star Adventurer Photo PackageEquatorial Wedge (Recommended. This makes polar alignment MUCH easier.)Counterweight Kit (Recommended, especially when using heavier cameras and lenses.)Canon 6D70-200mm IS USM L lens (for Andromeda at 200mm)24-105mm IS USM L lens (for the Milky Way at 24mm)Imaging: 10 images each @ 30sec with ISO 1600 @ 38 deg F. Periodically, and after a few minutes, I noticed I started to get some star trails, so I re-aligned to Polaris between image sets as needed.Processing: I followed the workflow with image stacking as described on the LonelySpeck web site. I'm still learning how to optimize the images.[...]I attached images to show different configurations with the SkyWatcher. The ball mount option makes it easier to compose wide-angle shots.You don't need expensive camera equipment to take great photos with the SkyWatcher. However, I do recommend using a camera with manual settings that can take raw images.To help me align the camera to the parts of the sky I wanted to shoot, I used an Xtend-a-Sight™ Plus II bracket which attaches to the flash shoe on your camera, and allows you to add a reflex site (purchased separately).[...]I used a Sight Mark Sure Shot Reflex Sight, but any sight capable of attaching to a weaver-style rail should work. This setup makes sighting in dark skies much easier than just pointing and hoping for the best. I still took a couple of test shots to fine-tune object centering.https://www.amazon.com/Sightmark-Sure-Shot-Reflex-Sight/dp/B004TDQDF0The sight is attached to my camera in one photo. I attached a close up image of the Xtend-a Sight with the reflex site.One final thing to note. There are 2 ways to align to polaris through the polar scope. Both ways work. One method is a bit complicated, and is described in the product manual. When done correctly, this should result in accurate alignment. The other method is easier. With the reticle positioned with 0 at the top, and 6 at the bottom (see image), you just simply you place polaris in the correct position on the reticle. The correct position of Polaris can be determined using an iPhone or Android app. The easy method will work, but it can be prone to misalignment. I used the easy method when I took my images, so that may be the reason why I had to re-align periodically.
T**N
A decent tool for photographing solar eclipse
The Star Watcher Star Adventurer 2i seems to be a decent tool for tracking heavenly objects. The instruction manual that came with it is not organized in a way that is easy to understand. It is published in the ENGLISH LANGUAGE but was created (or translated) by a person who lacked an understanding of how to convey the way one is to operate the device. It took a lot of trial and error to get the get the device to track the sun across the sky.
D**O
Totally worth it
This device is well worth the money. I will say it's not completely for the faint of heart. There is some configuration required. It's not just an "attach your camera and shoot" device. You first need to make sure your device is calibrated correctly from the factory. Checking the calibration requires pointing to a distant object in the daytime then rotating the axis manually 90 degrees to see if the axis stays aligned. What I found was the manual rotation is what introduced play into the system. So I had to do it 5 or 6 times before I realized it was as calibrated enough for my taste. The reality is you will not likely get to a 90 degree rotation in the field because it rotates so slowly. If you do need to calibrate it requires a .5 mm Allen wrench (not included).Regarding the tripod, you do want one that is very stable. I read that many times but until I set it up I didn't truly realize what it meant. It's not really about wind per say. It's more about how much play your tripod has. Meaning if you were to put downward pressure on the tripod, would it flex? Millimeter adjustments matter with this thing. It is extremely delicate. Even when turning the device on you can accidentally tweak your Polaris alignment. I do not think any photography tripod will truly qualify. Now I must admit, I do not have a very stable tripod, but I was extremely careful. I mounted the legs at a steep angle so downward pressure due to weight did not give vertical play. I did also purchase a leveling mount to place between tripod and sky watcher gear. You need to have the kit level to the ground. I think this is very important. Trying to level your tripod using the legs would be a nightmare.I bought the Astro package even though I use a dslr. I made the right choice because I can mount my existing tripods ball head onto the L bracket no problem. It also makes it easier to align to Polaris because there is a slot in the L bracket that allows you to place the LED device which illuminates your Polaris scope. Then you do not have to add your camera after the alignment, which would surely tweak your setup and give you bad results. So I would say, only buy the Astro package.Before you align to Polaris, you want to roughly level your gear, and roughly point towards Polaris. Then mount your camera to the L bracket using the ballhead and point it to your desired destination and tighten the clutch. You can point the camera in any direction you wish. It doesn't need to face polaris. It can point anywhere and this device will work. If this is your first run I'd highly recommend a wide angle lens. That way, even if your alignment is not perfect you will still get acceptable results. Next change your iso, aperture, focus, wb, and shutter to like 30 secs and snap a shot using a timer then check the rough results. If you are happy, attach your shutter control cable from your SA to your camera (you need to buy this), take camera off the timer, set your camera to bulb mode, proceed to leveling your tripod perfectly, then do the Polaris alignment. There are 2 ways to align Polaris. Easy way and hard way. Using the easy way I got stellar results :) it requires an app. I used the Android app Polar finder and set the recticle to the star adventurer setting to mimic the layout. It tells you where Polaris should be located in your scope. But to locate Polaris use Google sky map. When aligning it helps to have a green laser pointer and point to Polaris then look through the scope and verify. You will see the laser in your scope. Also make sure the cross hairs are pointed straight 90 degrees, not at an angle. Once aligned perfectly with a leveled rig make sure to your hemisphere N or S is set then turn the dial to the star. The tracker will then control your shutter at a default 140 seconds.The first night I forgot to focus correctly. The second night I got a milky way picture that was absolutely stunning. The attached picture was taken with a Canon t5i, with Sigma 10-20mm @ 10mm, 800iso and F3.5 @140 second exposure. 20 separate of these images were stacked to eliminate noise.
D**R
Amazing gear!
I am by no means, an expert on astrophotography, but I can asure you this item is very well made. Feels Sturdy, and after strugling trying to "piggy-back" a DSLR on top of my cheap Astromaster 130EQ with the mechanical cheap motor (Sold on Amazon BTW, $25), this SkyWatcher blew my mind.I was able to track for 3+ minutes on a 50mm canon Lens on my first attemp. My first attemp on M42 went pretty good with this star tracker. (Attached Image). Recommended 1000%.Cons: The polar scope iluminator seems bad designed.
Trustpilot
1 month ago
5 days ago