


🚀 Upgrade Your Dishwasher Game!
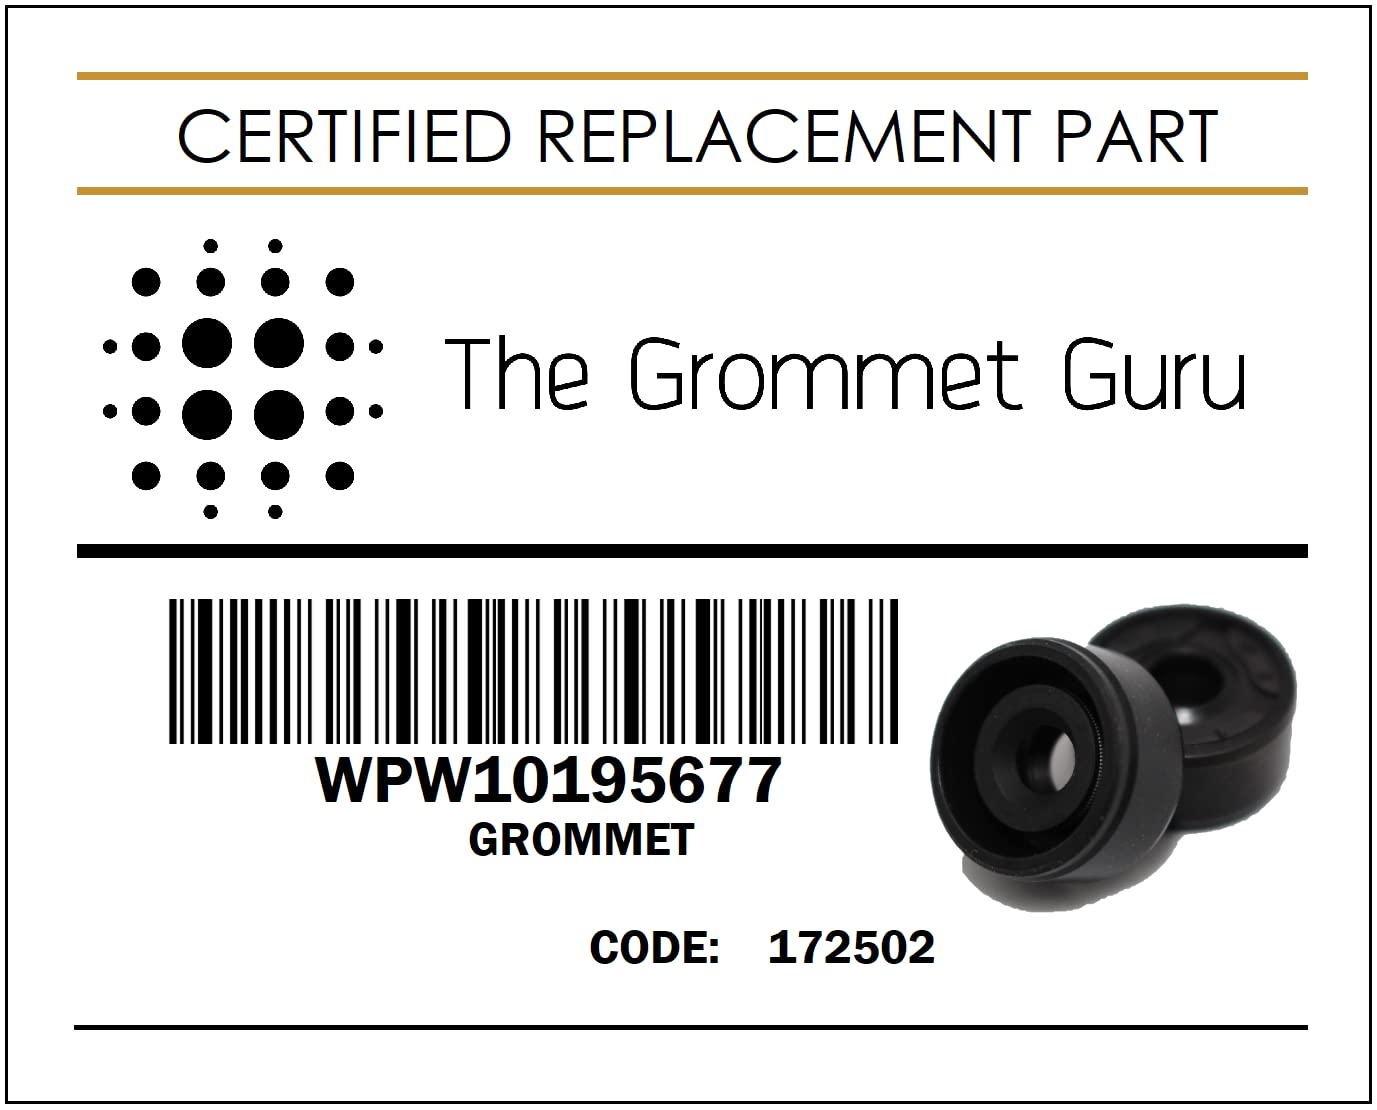
The Dishwasher Diverter Valve Diverter Motor Seal Grommet is a high-quality replacement part designed for select Kenmore and Whirlpool dishwasher models. Featuring a new industrial-grade design with a rust-free spring and superior nitrile butadiene rubber, this grommet ensures durability and resistance to chemicals and extreme temperatures. Easy to install and cost-effective, it helps you avoid expensive repairs while keeping your dishwasher running smoothly.
| Part Number | WPW10195677 W10195677 |
| Item Weight | 0.16 ounces |
| Package Dimensions | 3.62 x 2.24 x 0.28 inches |
| Country of Origin | USA |
| Item model number | WPW10195677 W10195677 |
| Is Discontinued By Manufacturer | No |
| Batteries Included? | No |
| Batteries Required? | No |
X**U
Working great, no leaking anymore
This little guy is incredible. It works great with my Kenmore Elite dishwasher, solved my wife's problem, and saved me money. I highly recommend it.
A**
Perfect replacement for my dishwasher!
The diverter valve gasket was exactly what I needed and fixed my leaking issue right away. The part was easy to install, and it’s made of durable material. I saved a ton of money compared to calling a repair service. Highly recommend this product if you need a quick and reliable fix!
J**D
Worked like a charm
This saved my dishwasher it was leaking from below.Basically a $6 fix took about 10 minutes and saved about $1000 dollars.
J**R
Worked great on my Kitchenaid model KDTE254ESS2
Stopped my leak. Slipped in very easily with a little dish soap applied to it. It sat perfectly level with the housing (not too thick as some have reported, YMMV). Hardest part was removing the old gasket, but once I had the center portion torn free from the rest it was straight forward to get the rest of it out. Remember to stuff a rag into the sump drain to keep bits of gasket from falling in there.
L**S
Perfect fit unlike others
I tried a few different grommets for my Kenmore dishwasher and they were all just a bit too loose, so it still leaked. I was about to give up and then came across the one from GrommetGuru... and it was perfect. Their customer service before the sale to make sure I was getting the right one was very useful and nice too! Definitely checkout their supply before you buy from others.
C**.
Likely saved hundreds on senseless diagnosis + 'repair' from contractor or technician
This grommet very easily and quickly solved a common issue with minor leakage under the dishwasher, likely saving us hundreds of dollars that a technician would have charged to 'diagnose' and then potentially repair...even though they would have likely done the exact same thing I was able to do with this grommet! It has been at least a year or two now and the grommet has been holding fast, no issues with the dishwasher ever since replacing with this product. Thanks for helping homeowners fix easy solutions the right way!
A**R
Detailed INSTRUCTIONS to FIX your Dishwasher LEAK
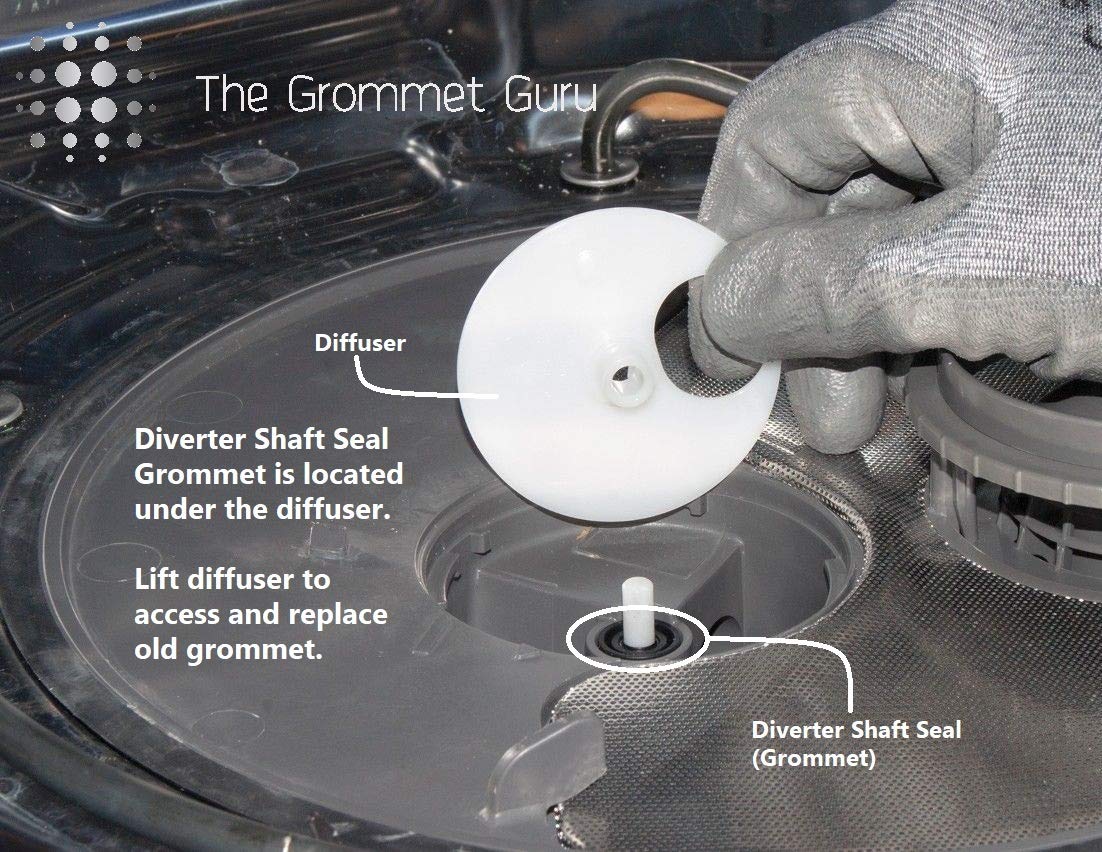
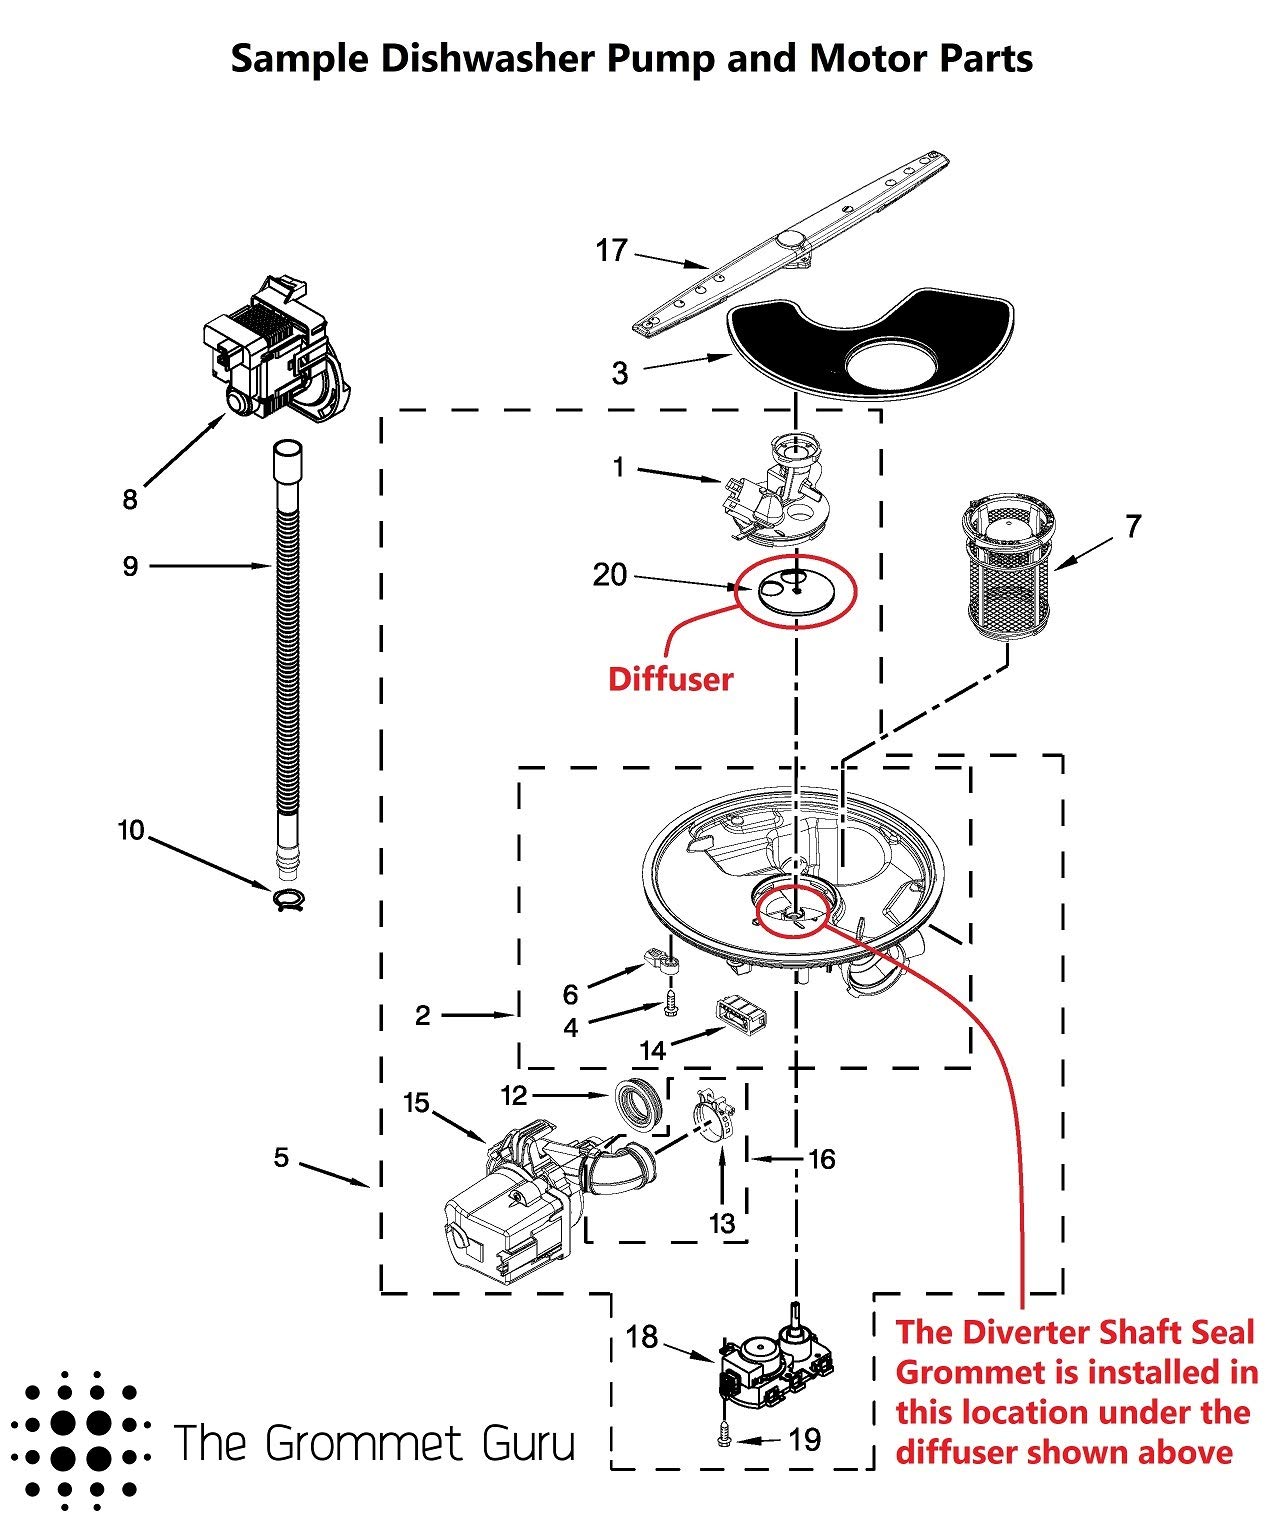
After enduring a flood from my upstairs neighbor (I woke to a downpour of rain through my kitchen ceiling), I am finally finishing my new kitchen install . . . but noticed that my dishwasher was leaking a little (dollar size puddle). Was not about to have another flood ruin my brand new hardwood floors so I decided to investigate (2014 Kenmore model # 665.13043K112 d/w from Sears but likely manufactured by Whirlpool).I removed the rubber kick plate & soundproof batting behind it and ran the rinse cycle (watching the entire 18 minutes from on the ground with a good flashlight at night). A few drops fell @ 4 minutes & a drip developed @ 13 minutes into the cycle.My leak was from the circular white part on the bottom of the diverter motor under the sump assembly. Most often the black rubber washer (aka gasket/grommet/seal) that sits atop the diverter shaft is causing the leak (due to wear from age or in my case being improperly installed). You need NOT remove the diverter motor from the bottom to replace the washer. It can be done from inside the tub without even moving your dishwasher (just unplug your d/w or flip the circuit breaker off if it's hardwired after you identify the precise leak location).From inside the tub, just remove the (1) lower rack (2) lower wash arm (3) 2 tubes connected to sump (4) sump cover and (5) diverter disk to expose the black rubber washer. Regardless of the brand/manufacturer, most dishwashers from this genre pretty much have the same parts that function and orient in the same way (Google your model # for parts diagram and watch PartsDoctor YouTube video). Turn parts "lefty loosey" to remove and gently lift the appropriate tabs to facilitate the rotations.The top of my rubber washer was installed upside down and protruding up above the sump pump edge (rather than being flush - see photo #1)! Easily removed the old washer with a narrow Allen wrench (needlenose pliers are too fat and will damage the washer; computer tools won't give you the necessary grip or leverage). Be sure to extract every little bit of your old washer (including the fine silver metal ring) because otherwise your new one will not seat properly.My black rubber washer was actually in great condition even though (and probably because) it had been installed UPSIDE DOWN and was also PROTRUDING above the sump edge. I applied SILICONE plumber's grease ($4.92 from Home Depot) to the bottom and outside edge of my old washer and dropped it over the white diverter valve motor shaft (see photo #2) ... with the DEEP GROOVES and silver ring FACING UP (toward the tub center) and the flat side of the washer facing down (toward the diverter motor). Be sure not to use non-silicone plumber's grease because it will degrade your new washer. To get my washer to seat evenly and flush with the top edge of the sump assembly, I used a 3/8-inch socket to evenly and firmly press it down. Easy peasy.To reassemble the diverter disk, sump cover, 2 tubes to sump, lower wash arm and lower rack, just do the reverse of what you did to remove them (but this time "righty tighty"). To ensure you eliminated the leak, set a paper towel under your dishwasher before you run the final test cycle. Also feel the bottom of the diverter valve motor circle to ensure it is dry to the touch.I had bought a new diverter motor, diverter disk and washer but the disk didn't fit only one way and the washer was too fat (thick) so will be returning them to the other seller.NOTE - many of the Grommet Guru reviews say that silicone plumber's grease was provided with the 2-pack of washers. I was disappointed that no grease arrived with my 2 new washers. After contacting Grommet Guru (very responsive even over the weekend), they denied every providing plumber's grease. Either Grommet Guru used to provide the grease ... or all those reviewers are posting a review for the wrong product/seller (Loureflections grommets may be the seller providing the silicone plumber's grease).Grommet Guru did provide a little card with a video link for the washer replacement (long & by a novice homeowner). PartsDoctor has a more comprehensive and professional video with many important tips to follow.My old dishwasher is a workhorse so I would not be surprised if it lasts another 10 years. Because I was able to use my old washer (that was in great condition and had just been installed upside down), I will have 2 extra new washers from Grommet Guru in case a new leak develops in the next 10 years.Do yourself a favor and spring for 2 silicone drip trays for under your dishwasher ($49 from Basin) and under your sink ($25 from Leashboss). I'm so happy that I diagnosed and repaired my 10yo dishwasher leak by myself (girl power) and have extra peace of mind with my 2 silicone drip trays.
J**H
New diverter valve leaks after six months
After less than six months since installing a new diverter valve seal, Kenmore dishwasher diverter valve is leaking again.I would expect a new diverter valve seal should last a lot longer@
Trustpilot
3 days ago
2 weeks ago